
# 1
Demco Stay-IN-Play Duo Flat Tow Brake System for RVs w/ Hydraulic Brakes - Proportional
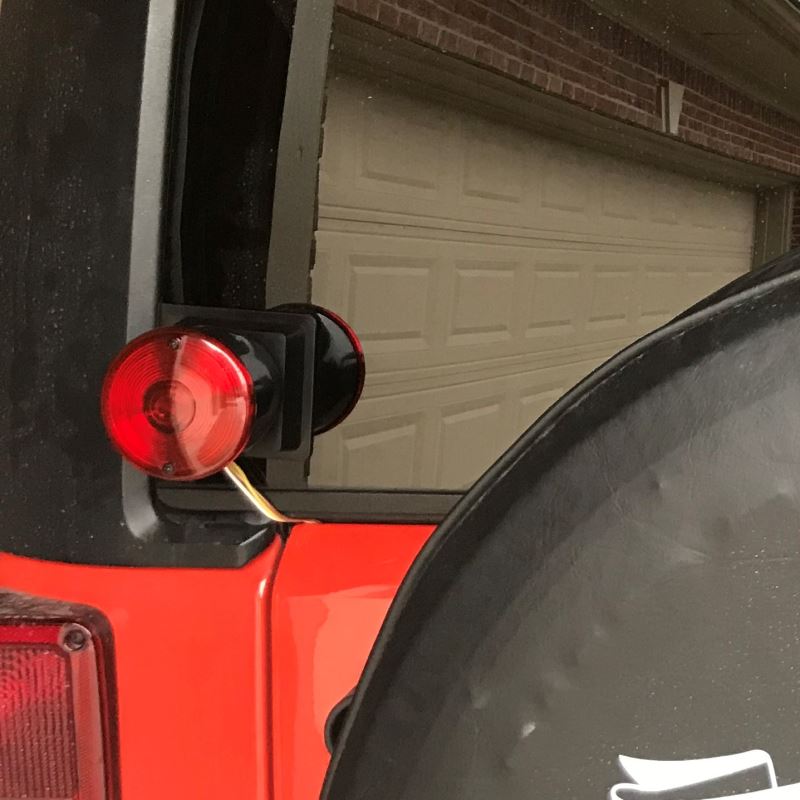
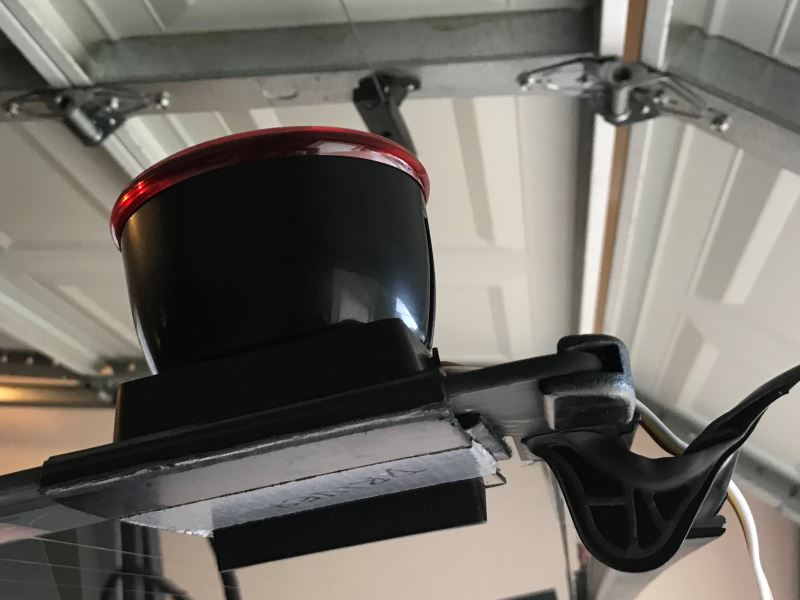
SMI Stay in Play Duo installation in 2015 Jeep Wrangler Unlimited – Packaging was great with everything needed included plus extra items for various installation methods of you’re choosing. Upon initial investigation and survey, everything except the CD Information pack was accounted for. No big deal, as I had previously watched 2 different Youtube installations found on the internet. In fact, the internet videos were what I used as my step by step installation process, and the written instructions were only used for concerns where the video may not have been as clear as I had hoped for. Understanding that everyone has their own style and methods for doing this project, I purposely was not in a hurry to rush through it. All in all, I took @ 8 hours to install the Adapter 4 to 6 pole #30637, the EZMount Tow lights Kit, and the Stay in Play Duo Braking System. I choose the EZMount because I didn’t want to mess around with the OEM taillights and wiring. Magnetic lights don’t work so well on composite tops and I didn’t want to stick them to the sides of te Jeep, so I modified the EZ mount to wrap around the thickness of the rear glass hatch on both sides. I added a 2”x 4” pc of Velcro on the inside of the glass hatch and the mating surface of the plastic light housing - to hold the lamps in place until the rear gate was closed. I ran the wire harness on the inside under the trim all the way up to the front and through the grommet in the firewall. The flat 4 wire was routed and secured up to the Adapter 4 pole to 6 pole that I had fastened to the Blue Ox base plate. The actual installation of the SMI unit and assorted parts went rather smoothly. Most difficult issue was the lack of working space in front of the driver’s seat area. Installing the screw that holds the G force controller on the front (the side towards the front of the car) was difficult as it was almost a blind installation due to lack of room. The nut and fender washer used through the fire wall for attaching the air cylinder cable bracket was a challenge to reach - tight fit with not much room for one's hand and arm. Other than that, no big surprises – just a lot of tedious steps to do when you want to be sure that it is being installed properly – take your time and don’t be in a hurry. Once everything was installed – it all worked when I checked the system out. The only thing that may seem a bit odd is that when setting the G force initially, the compressor will shut off while adjusting per instructions. To do this initial adjustment, the wife stepped on the brake in the Motorhome, with the switch “On”. The compressor starts, and the brake is pushed down by the Air Cylinder, at which time I slowly adjusted the G force until the compressor shuts off. I secured the adjusting bolt and I told the wife to take her foot off the brake and then re-apply them. The compressor did not start again and the air cylinder did not apply the brakes in the Jeep. After setting the G force per instructions, the unit didn't turn on when the brakes in the Motorhome were applied - but since we were not moving - all I can assume is that the brake system will function while slowing down once the accelerometer setting (the sensitivity setting on the G force box) has been met. I assume that the sensitivity setting method includes a way to ensure the Jeep brakes are not engaged too frequently and only until needed. This is the only step that is a tad bit confusing without an explanation as to what to expect once the G force sensitivity is set. Lastly, I checked the brake away switch and it turned the compressor on and applied the brakes as expected. Overall - the installation went rather smoothly. Can't wait to see how the product works once we hit the road. I'll check back and provide an update later.
 2015 Jeep Wrangler
This braking system is as easy to activate as flipping a switch. Now the installation, on the other hand, is a project! But, well worth the effort, since an alternative (non-installed) product would be cumbersome having to be positioned and stored in the vehicle. I have a 2015 Jeep Wrangler and the space in the engine compartment is rather tight. I had to fabricate a strap or two to secure the under hood equipment You need to be rather handy with tools and willing to dive in to get it done, but the results are great. The brakes of the towed vehicle apply proportionately without jerking. I did, however, by the radio transmitter-receiver to indicate that the brakes were indeed working because I found that the light supplied with the braking unit was not easily visible in the rear camera of the motorhome. I am happy with this product.
# 2
Demco Air Force One Flat Tow Brake System for RVs w/ Air Brakes - Proportional
Great product. It took about 7 hours to install. A complex install so I took it slow. Make sure you have some extra wire handy to make all the connections. Also locate a source for extra DOT air hose, I needed about 15 feet more than included. Not all auto parts stores carry it. The install video on the etrailer site was spot on for a jeep wrangler.
Just unpacked unit. All parts were accounted for. Looking foward to installing it on my 2015 Jeep Wrangler Sahara 2 dr. Arrived on schedule.
# 3
Demco Stay-IN-Play Duo Braking System for RVs w/ Hydraulic Brakes - Wireless Monitor - Proportional
2023 Jeep WranglerI've used this setup for a year towing a 2023 Jeep Wrangler . I 100% recommend it for anyone else. Under normal conditions it is very easy. Under stressful conditions (bad weather, uneven terrain, need to connect/disconnect quickly) it is a life saver. I am 63 and I can connect/disconnect this in 5 minutes.
I installed this system in a 2023 2 door Wrangler. I also used an etrailer base plate and etrailer tow bar. I had originally purchased a Demco Delta Force Braking System. However, with the shape of the floor in the Jeep I was unable to use this unit. There are various places to install the stay n play duo in the Wrangler and the etrailer installation videos show this. I elected to install mine under the drivers seat as I wanted to keep it out of the elements. I fabricated a sheet metal bracket to mount it on that allows the rear seat heater duct to function unimpeded. Once installed the unit is out of sight and very simple to use. Just a flip of the toggle switch and its ready. I only needed to make a few adjustments to have it brake the way jeep the way I wanted. This is also a very simple procedure. I highly recommend this unit and appreciate all of the information etrailer has on their site to aid in the procurement and installation of their products.
# 4
Demco Air Force One Flat Tow Brake System for RVs w/ Air Brakes - Wireless Monitoring - Proportional
Overall a great system, there are some intricacies to the install as it pertains to old instructions with LED light in the TOAD vs. CoachLink Wireless and also the 3 wire reed switch vs. the newer 2 wire one. But using the provided written instructions along with YouTube videos you can figure it out. My other challenge was my Jeep is a 392 model and thus the battery and fuse box are in swapped locations, as well as a different VAC line layout, but again you can figure it out…just takes some time to study and trace the routing. My only real complaint was ordering, I was quoted the wrong system for my RV (Stay and Play) vs. AF1 since I DO have air brakes. etrailer was helpful in getting the return process but wants to charge me the shipping and possibly restock fee, I am working with them on this and hope to get a good resolution.
The Air Force One Braking system just arrived. I opened the box and looked it all over. No damage to anything thanks to good packing. A friend of mine has this same braking system and he loves it. Can't give a product review because it's not installed yet but I can honestly say Dianna A in customer service helped me get my order correct.
# 5
Demco Air Force One Flat Tow Brake System for 2021 and Newer Freightliner Chassis RVs w/ BrakeSync
I this is a replacement for my new 2023 Jeep Rubicon. I am impressed with the brake notification unit for my motor coach. Nice touch!
Love the Air Force One. After professional installation, it's simple to and quick hook up the toad. The bluetooth display in the rig cockpit clearly indicates when toad's brakes are engaged. In the year since it was installed, we've used it over 10,000 miles with no problems.
# 6
Demco Air Force One Flat Tow Brake System for 2020 and Newer Tiffin Chassis RVs w/Factory Air Brakes
Towing a 2020 F250SD with powerstroke. The Blue Ox Patriot 3 just would not press the petal enough. This applies the breaks well. Had to mount the box behind grill due to no room under hood. Used some copper wire to make sure it stayed in place. Had to cut a bit of the plastic cover over radiator. One thing did that was a little off the instructions is I did not run power into cab with air hose. I took power off my charging coach-> Toad charging circuit because it was under the bumper. For the reed switch I ran a wire to passenger side fuse box and used a fuse tap. Every thing else was pretty easy. I am pretty handy and have all tools needed. I installed in about 6 hr.
I installed this system myself in an RV site. All went well and the system works as advertised. Please take special note to the inside brake peddle cylinder placement on the brake peddle arm.
# 7
Demco SBS Air Pressure Stop Light Switch Kit for Towed Vehicles - Air Force One
I bought this kit to add to the Denco automatic braking system, that I installed on my Jeep. It is used to trigger a signal on my Demco wireless break monitor so that I am positive that the braking system is functioning.
Just finished installing the SMI AF1 on a 2012 Tiffin Phaeton and 2014 Chevrolet Silverado. While it took me substantially longer than the pro's, I found it straightforward to install and well documented, between SMI's video and etrailer's video. The brake system itself seems to me to be both well designed and well made. So far, it works just as advertised.


What our customers are saying:
"very easy to shop"