
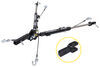
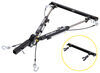
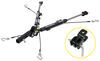
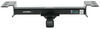
etrailer Classic Base Plate Kit - Fixed Arms


To see if this custom-fit item will work for you please tell us what vehicle you'll use it with.


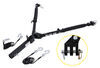
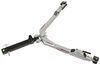
Custom-fit base plate kit lets you hook up your tow bar to flat tow your vehicle. No external crossbar means that only the base plate tabs are visible, providing a clean, low-profile look when you're not towing. Simple, bolt-on installation.
Features:
Specs:
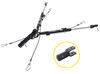
If you have a tow bar from a different manufacturer, an adapter may be available. etrailer offers adapters for use with other manufacturer's tow bars so that you don't have to go through the added hassle and expense of replacing your tow bar when outfitting your new towed car with base plates.
| Type of Tow Bar | Use Adapter |
|---|---|
| Roadmaster Eagle and Eagle 8000 | e98979 |
| Reese Tow Champ and Valley Industries | e98980 |
| Roadmaster Falcon 5250 | e98981 |
| Blue Ox, Aladdin, Aventa II, Aventa LX, and Alexus | e98982 |
| Roadmaster Tracker, Falcon 2, Falcon All Terrain, Blackhawk, Blackhawk All Terrain, and Sterling tow bars with serial numbers up to 14,500 | e98983 |
| Roadmaster Sterling All Terrain and Sterling tow bars with serial numbers above 14,501 | e98984 |
| Demco Victory Series and Kwik-Tow | No adapter needed |
At etrailer we're committed to the products we sell, and to our customers. Our experienced and knowledgeable staff are available via both phone and email to address your questions and concerns for the lifetime of your base plates. The technicians at etrailer perform flat tow installations on a daily basis, making them a valuable resource for do-it-yourselfers. The one-on-one, personal service you'll receive comes straight from an expert in the towing and automotive field. We've installed it, we've wired it and we've towed with it, so whatever your question, we can answer it.

California residents: click here
Videos are provided as a guide only. Refer to manufacturer installation instructions and specs for complete information.
All right, to start off our install, we gotta remove the air dam right here. This is our curved one, like here, there's a different type, depending on the vehicle. It gets a little different on different trim levels, but I think we got the easy one here with the curved air dam right here. Now we also have it up in the air too. You'll have to have it in the air, but just makes it easier for you guys to see what's going on, how we install it. There's two fasteners that I can see that we need to remove.
There's gonna be one here. We're gonna use a 13 millimeter socket, half inch socket will work too and we're just gonna back this off. (drill whirling) And this is the driver's side. We'll do the same thing on the passenger side. Next on the list, we need to remove a tow hook.
It's got one on each side and we need to remove them. And according to instructions, these will not be reinstalled. So we're gonna use a a 15 millimeter socket. We're gonna remove this bolt here and here. (ratchet spinning) Okay, let's move on to the other side.
(ratchet spinning) It also helps have a flex head ratchet to get up in there too. Gets a little tight, but all I have is a half inch breaker ratchet. All right, with the tow hook out of the way, there's a metal clip in here. We need to get this outta the way too. So we have complete metal to metal contact, just using screwdriver to kind of help get it started and pulled out.
There's like a little spring clip in here, so it kind of got the finesse out so it slides out backwards. (metal clanging) This block needs to sit inside the frame like this here. So we're gonna push it into this oval hole here and it use a screwdriver and kind of get it straight back down where we need it. But before we do that, it always a good idea to take one of the bolts, this is a half inch bolt, go into this half inch thread here. It's always a good idea to make sure you thread everything in there first. Otherwise you try to thread it in there and doesn't. Try to put the base plate up there and try to thread it. It's not playing nice, it's gonna make the day a lot longer. before we put this block into place. So they'll give you one piece of advice here. You wanna clean out these threads first. We're gonna use a half inch by 13 thread tap. We're gonna just clean it out using the tap. We're just gonna work it through easy, just get rid of that junk in there. One done might as well do the other one. Dropping it in slow as possible, and I'm using the long blade screwdriver to knock it around. And we'll put those threads right in the center of the square hole. The base plate reuses some of the bolts from the tow hooks and we're just gonna reinstall one in the back here. And we're not gonna throw it in all the way. We're just gonna run it in just enough to hold it. 'cause What happen is our base plate will slide over the bolt and then we'll push it back up and back. Then it'll kind of set on the bolt or rest while we can install the rest of the hardware. If you find out the threads aren't matching up with the hole anymore after you took the tow hooks out, actually you can just reach in there. And this is a bolt plate, so you can just take it, put it back into place and steer it as necessary to install the bolt. Next part we're going to do is actually trim out this section right here from the inside edge to here on up. This will give us room for the base plate. This is actually stated in the instruction, it was a little bit earlier, but it wasn't clear on exactly if you need it or not, depending on the vehicle. So we did a quick test fit and found out, yeah, we did definitely need to do on our four wheel drive pickup here. We need to cut this section out. Now you can cut this with a knife. It's pretty soft, but it's gonna take a while. So an oscillating tool will make the job a lot easier. (oscillating saw vibrating) and we will bring our knife out again, just to clean up the rough edges and kind of even it out. Unless you're crawling underneath the truck, you're not gonna see this anyway. Okay, to make things a little easier to install the base plate because it has to go through the slot. And three of this is kind of tight still. So I'm gonna go around and loosen these little screws here, here and just find 'em all the way around and see if that gets more flexibility out of it. We're using a eight millimeter socket to remove these guys. Looks like there's two here, here and one, two here, here. (drill grinding) Now in this bolt here, I'm using the extra long socket to reach down and get to it. (drill spinning) We got a little bit more flexibility out of it. It's because gonna have to pull this down to shove the base plate from inside out, So every little bit helps. At this point, you definitely wanna get extra set of hands here. I got my buddy Kevin here to help me out. Now let's gonna install from behind the plastic and come out this way. We're gonna push the bolt up as we do it, and it should fall into this keyhole right here. When you install it, don't be like us. Make sure that this keyhole, this is going towards the top. (metal bar clanging) Okay, once you get the fold through here on both sides. (Kevin speaking quietly) And then just push the whole assembly forward. Okay and you can let it rest on net for now. We'll grab the last, the two remaining tow hook bolts. We're gonna apply some blue Loctite on these guys just enough to get on there. We're gonna do both of these and then we'll get the rest of our hardware installed. Now those original first two factory bolts, we'll take those out and then put our blue Loctite on. I just like to have it more in a straight line, less messy while I'm filling in the bolts and then we'll come back and take those bolts out and put the blue Loctite on. Next up, we'll put the bolt in right here and it's gonna use that block that I told you earlier, uses the wrong hole. We can use that to our advantage and just use it to shove it over and move it into place. (screwdriver clacking) We use the screwdriver to help align it. then we'll have to add our hardware. Okay, now our hardware is 2" long bolt here. It's going to use a lock washer and they call it a heavy washer. This is an extra thick one. There's some thinner ones in there. We won't need those. So we'll just put those on here and then we'll put our blue Loctite on. (crew members murmuring) And with a lot of patients and be careful and slow, we'll thread that up in there. Now let's push the base plate up and try to get as much threads up in there as possible to help hold it up for us, that way we'll come back to this middle bolt. Now everything's being held in line for us. We can easily remove this bolt now, put a Loctite on and put it back in place. Passenger side's done. Let's do that one more time over on our driver's side. Let's go ahead and tighten these down as best we can with a ratchet still. (ratchet whirling) We'll use a 3/4" socket on this guy here. (ratchet whirling) With all the hardware loosely installed, we can go back down and tighten all the bolts down as described by a torque setting in your instructions. Now remember, at the beginning of our install, we had to take off this curved air dam here, and we also had to figure out if we had a straight one or a curve one. Obviously, this is our curved one here, but if we had our straight air dam, it'd be we just leave this off completely and actually we'd be done with it and ready to put everything else back together. But ours has a curved air dam here and it requires a little bit of different hardware that we just previously installed. This is the bolt we need to replace. It has a stud built into the top of the head of the bolt. So our, where our air dam, our curved air dam will bolt onto that. So for our purposes, we're just gonna simply reinstall or remove this and reinstall the hardware and put this back into place. Okay, once again, blue Loctite, lock washer, heavy washer, and maybe a little bit Loctite on these threads too and we'll put this back into place. (metal bolt spinning) We'll need a deep well socket to tighten this up. Before this goes on, there's still gonna be a little bit of trimming involved, so I'm gonna line this up with those bolts, with the studs on 'em, and see where I need to cut out. We will do this on both sides too. (oscillating saw vibrating) We will score this part here, make it easy. We'll just snap it off. All right, we're getting towards the end here. Let's go ahead and reinstall our air dam. This plastic spacer comes with the kit. We'll go right here and then our air dam will go right over that bolt and then this will get a flat washer, lock washer and a nut, this is all 3/8 size. All right, we use a 9/16 socket to tighten it up. (drill spinning) Okay, with that, the base plate itself is fully installed. The only thing extra we gotta do now is that, remember how we loosened this up a little bit to get some flexibility and put this in place, we'll put those screws back in.
Customer Satisfaction Score:
83% were satisfied with this product
17% of customers were not satisfied
Ratings & Reviews

Order was easy and fast delivery on time

Thank you
The product is fine, but the box was flimsy and damaged.
I’m happy with them can’t wait to get back on the road
I just received, maybe next week I will working on that.
Info for this part was:
At etrailer we provide the best information available about the products we sell. We take the quality of our information seriously so that you can get the right part the first time.


Thank you! Your comment has been submitted successfully. You should be able to view your question/comment here within a few days.
Error submitting comment. Please try again momentarily.