
etrailer Invisible Base Plate Kit - Removable Arms


To see if this custom-fit item will work for you please tell us what vehicle you'll use it with.


Stay sleek when not towing! These hidden base plates offer a clean, factory look and quick twist-on arm connection. Easy, bolt-on install with all hardware included.
Imagine enjoying a clean, unobtrusive look on your vehicle's front end when it's not being towed. The etrailer Invisible Base Plate Kit features a design that keeps bulky crossbars and brackets out of sight. This means you maintain your vehicle's sleek appearance while ensuring it's always ready for the road.
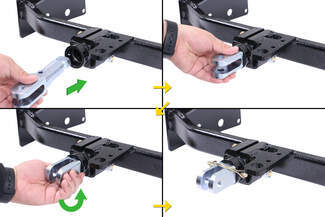
Let's talk about convenience when hooking up and disconnecting your tow bar. With this base plate kit, you simply twist the insertion tabs to lock them in place securely. Thanks to this feature, attaching and removing your tow bar becomes an effortless process, even if you're handling it solo.
Whether you're using an etrailer, Demco, or Blue Ox tow bar, this base plate kit has you covered without needing additional adapters. It integrates seamlessly with these brands, offering versatile compatibility that saves you from purchasing extra components. Part numbers like e98983 for Roadmaster tow bars (if needed) keep your options open without added expense.
There's nothing worse than fighting corrosion when it's time to tow. This kit includes high-density polyethylene covers to protect the receivers from dirt and debris. These receiver covers snap easily into place, preventing seizing and ensuring your setup remains operational over the long haul.
If you have a tow bar from a different make, etrailer ensures that you have options with adaptable solutions. While most setups don't require an adapter, specific Roadmaster models might, and etrailer provides part numbers like e98987 so you can easily get what you need.
This feature may include visual guides or step-by-step illustrations that show how to install your base plate kit using directional arrows, ensuring a smooth and intuitive install experience.
| Type of Tow Bar | Adapter |
|---|---|
| Roadmaster Tracker, Falcon 2, Falcon All Terrain, Blackhawk, Blackhawk All Terrain, Sterling tow bars with serial numbers up to 14,500 | e98983 |
| Roadmaster Nighthawk, Sterling All Terrain, Sterling tow bars with serial numbers 14,501 | e98984 |
| Roadmaster Eagle, Eagle 8000 | e98979 |
| Roadmaster Falcon 5250 | e98981 |
| Blue Ox | No adapter needed |
| Demco Kwik-Tow | No adapter needed |
| Curt Rambler | No adapter needed |

California residents: click here
Videos are provided as a guide only. Refer to manufacturer installation instructions and specs for complete information.
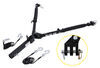
Hi, I'm Daniel with etrailer, and today we're gonna take a look at, I'm gonna show how to install the etrailer base plate kit on our 2025 Jeep Grand Cherokee. There's gonna be five main components with your flat tow setup here. Now I'm just gonna briefly cover all of them, but if you wanna go into more depth, then check out our videos on each one of these individually. But starting here at the vehicle side, we've got our base plate and this is just gonna be the device that attaches directly to the vehicle's frame that allows you to have an anchor point for your tow bar. And this is your tow bar here. It just is the in between between your motorhome and your vehicle.
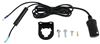
And then you're gonna need some safety cables down here, just an extra set of precaution. And you're also gonna need a braking system just so everything stops when you're stopping in your motorhome. And then lastly, you'll need some wiring. So you're gonna have to get some diode wiring in the back of this, so your turn signals and brake lights will function on the rear lights of your vehicle. Now, those we inchesre the components you're definitely gonna need.
Now, some vehicles will require other components that you will need, like the Grand Cherokee here. This will require a charge line kit. That's just gonna provide a trickle charge from your motorhome, because this braking system we have is going to drain the battery. So that's definitely something you need. Now, let's focus on the base plate.
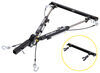
So this is what it's going to look like, and of course you can attach it via these arms here. Now, I'll go ahead and take these components off so you can see what this looks like without it hooked up. Now, these arms are compatible with the Blue Ox tow bar like we have today. They're also compatible with the Curt Rambler and the Demco Kwik-Tow. So they're compatible with quite a few different tow bars.
Now, if you have a Roadmaster already, you will have to buy a separate adapter, but it will still work with that. And take this out, you just turn it, and it'll pull straight out. When you don't have this hooked up, it looks pretty good actually. The base plate doesn't stick out too far. Now, you will have to do a lot of trimming around this front fascia piece, so that can be kind of daunting. One thing I do really like about this base plate is they have, on the safety cable tab, two holes, and they give you this bracket so you can mount all of your components right here. And that's a big deal, especially on the Jeep Cherokee, because there's really nothing back there to mount this two securely. So you can just put it all in a line, and it's pretty neat that way. Something to keep in mind when doing your flat tow setup is the height your base plate sits on your vehicle. So we measure it from the ground to the center of the base plate. We got about 21 inches. That measurement's important to know because you want everything to be as level as possible to your hitch on your motorhome. So you might need a high-low adapter. You just wanna come over here and measure from the ground to the center of your hitch. We got about 19 and a half, so we're all good because you want about three inches plus or minus. So definitely keep that in mind and purchase a high-low adapter if needed. Now, if you have any other questions about any of the other components you've seen here today, maybe your braking system, maybe your tow bar and what's gonna be best for your setup, feel free to reach out to us here at etrailer. We do this all the time so we'd love to help you out. As far as the install goes, this is pretty in-depth. You will have to remove your entire fascia, and there's a ton of steps doing that. Now, it's not too daunting if you watch the video. I'll take you through all the steps on how to do it. And you're also gonna have to trim that fascia, like I was talking about. So if that's not something you're wanting to do yourself, you can check out our dealer locator. We can find a professional in your area to get this installed for you. But if you wanna do it yourself, follow along, and I'll walk you through how we did it. Starting off, I got the hood open, and we're gonna take this middle trim piece out. And there's just gonna be a ton of push pin fasteners. So I'm gonna get a flathead. And with that core popped up, I can get a trim panel tool and get this under here and get these out. There's gonna be one side that has a little divot in it, and that'll allow you to put your flathead in. Once we removed all 10 of those, we can lift this away and set this aside for now. We are removing the fascia, so I'm gonna take all these fasteners that are holding the front fascia in. I'm gonna use a T40, (tool whirring) and get all these removed. (tool whirring) On both sides there's gonna be another fastener, and we're gonna use a 10 millimeter to get these out as well. (tool clicking) I'm over here on the driver's side wheel well and whatever I'm gonna be doing over here is gonna be the same process for the passenger side. Now, I have an eight millimeter socket, and there's gonna be a couple of fasteners we'll have to remove. I'm gonna start here way at the back, (tool whirring) get these taken out. (tool whirring) And to get at these, it's really helpful to have an angle drill like this. I did move the tire just a little bit, but that doesn't give you a whole lot of room still. But there's five fasteners where I started right there, and there's gonna be one more eight millimeter right behind the wheel towards the front a little bit. So I'll get this one taken out as well. (tool whirring) I switched out to a 10-millimeter socket, and there's gonna be three plastic nuts we'll have to remove. One's pretty close to that one we just removed. (tool whirring) And the next one's a little bit higher up. (tool whirring) And the last one is gonna be up top. (tool whirring) With all those taken out, we can pull back on our fender and get our carpet pulled back. Just wanna get this enough and to get it kind of tucked behind the tire so we can have some room to work. All right, like that. Right on this seam, there's going to be a bolt, so traveling all the way inside. It's gonna be a bolt going through. So I got a swivel adapter, and this one is a bit hard to get to, so just take your time to make sure it's all the way on there. We can now pull this trim piece all the way back, and you can just pull it back a little bit. Just get your hand in there. I have a 10 millimeter socket that I'm gonna put on the fastener that's back here. There's two types of fasteners. There's a white fastener. It's kinda like a bullet fastener where you can put this on there and it should unclip it. And then we'll pull that other fastener out. So I'm gonna travel up here doing that same thing, putting this on the white fastener. You can see that white fastener in there. We're just trying to get those clips to release. And then those other fasteners have that green clip on there. So I'm just gonna go all the way up to our seam, just a little past it. And so now I'll just put some paper towels in here and get this to hold out for us. We got the vehicle up in the air. I'm gonna use an eight millimeter socket and remove more fasteners. (tool whirring) There's gonna be five. (tool whirring) And I'm gonna switch out to a 10 millimeter, and there's gonna be two more. (tool whirring) Behind this plastic piece in front of the wheel, there's gonna be another eight-millimeter fastener that's gonna be on both sides. (tool whirring) With all those removed, we can pull this underbody panel down, and then we can get to two push pin fasteners on either side, so we'll take those out. I'll use a trim panel tool to get both of these popped out. There's gonna be two plugs we'll have to remove. And the first one is this larger plug. There's gonna be a white pin which is going to get this pulled out. That'll just pop out just a little bit, and then you can push down on this and disconnect this. And then the other plug is right next to it. And there's gonna be a red tab on this one, and I'll just pull back on that. Might need a tool, it's a little difficult. And then I'll push in on this, get this disconnected. On the passenger side you'll have to remove two plugs, but you're also gonna have a line, and this is gonna have your windshield wiper fluid in it. And this is just traveling to your front camera to wash that. So I'm gonna get this removed, but it is gonna start leaking. So I'm gonna upstream, I'm gonna clamp on some Vise-Grips so this won't leak everywhere. I don't wanna go too tight, I don't wanna hurt the tube, but I just want it to be enough to stop leaking. Then I'll take some pliers and get this disconnected. Now we can get this fascia removed. There's gonna be a small tab right at the seam that you wanna pull down, and then you can pull out on this side piece. And once you've done that, I got Scott over there helping me on the other side. And we'll just work our way, unclipping everything. And we wanna get this off the peg in the center. Once we've done that, we can lift this away and set it to the side. With the fascia removed, we can remove this bumper. So I got a 16-millimeter socket. (tool whirring) Remove these larger bolts on both sides. Now I got a 10-millimeter socket. I'm gonna remove this smaller bolt. And once you removed all that hardware, we can take our bumper beam off. And we won't be reusing this so we can just set this to the side. That alignment pin that was holding on our bumper, we'll have to remove. I did stick a magnet through this hole in the frame just so I can pull this out so it's not in that frame rolling around. Now we need to install these side brackets. There's a couple of different orientations these can go depending on your model. And we're gonna install it on a model that has a lower shutter, and they don't have factory tow hooks. So definitely check your instructions and make sure which model you have, because there are a couple different ways. So how we're gonna do it is we're gonna have this square notch that's gonna be facing outside, and then the two holes that our base plate middle section's gonna go into, these are gonna be facing up. So I'll get these lined up with these two holes that this is going to be screwed into. So I'll line up the best I can, and I'll just take a marker, draw a line on this plastic piece. We will have to trim this out. As you can see there was some metal that was protruding out, and I just got that all trimmed. And now I'm gonna paint it with some spray paint here so this doesn't rust. I held this back up and we are gonna have to do some trimming on this bottom piece. I just mark where I'm gonna cut this out and get this trimmed up. We'll get our side bracket put on with our hardware. We're just gonna use these 10-millimeter bolts. It's gonna have a smooth shank to it. And then we're gonna get a lock washer and a flat washer on there. Now, all of our hardware going forward is gonna take this blue Loctite, and this does come in your kit. Gonna get this on both. Now, I'll hold this up in place and get these loosely threaded in. Now we can install our cross member. And again, the model you have is going to determine the orientation if this is gonna be flipped upside down or not. So ours is gonna be with the holes and the brackets facing up. Now, I'll get this in between our side plates, and we may have to do some trimming. So let me just get this roughly in place and then we'll see. Now, I did end up having to cut a little bit of this air dam here. I'll probably cut about two-inch piece off, and that way I was able to get this to fit properly. So now with that in place we can put our hardware in, got our half-inch bolt, and then we'll put that through our middle section into our side plate. And then I'll take a nyloc nut and get that attached. And I'll do this on all four holes. So I'll get this on the upper. Since our model does not have tow hooks, your kit actually comes with this rod that's threaded on the end, and this will get attached to our side plates. Now, you have two washers that are connected together, and that'll go basically right like that. Then I'll put this through that hole in our frame. Get this lined up. You wanna make sure that tab is sitting in your section there. And I'll take our bolts, I'll put these through. And on the other side I'll just put a flange nut. On the threaded part of this long rod, we're gonna get our inch washer, our 3/4 washer, and then a locking washer, and we'll put that on. Then I'll get our larger nut, get that tightened on. (nut rattling) We can now tighten and torque everything down. So I'll start here with our side plate and get that tightened to our frame. We're using a 17-millimeter socket. (tool whirring) I'll tighten this intersection next with a 19-millimeter socket and wrench. (tool whirring) Using a 14 millimeter socket and wrench, I'll tighten up the bolt into our support rod. Now, I'll torque everything down in that same order. If you don't have a torque wrench, you can usually rent one from your local auto parts store. And do check your instructions, 'cause all these hardwares are gonna have different torque values. Just make sure you're torquing them to the proper value. Once you torque everything down up front, you can go in the back and torque down this larger nut on the support rod. Just use a inch-and-an-eighth socket. I already installed the safety cables. They just need to be wrapped around some part of the base plate, and then wrapped around the frame. So I went low here. There's a lot of different ways to do this, and of course, depending on the model, there's different ways to do this as well. You just need it to be secured just in case something happens. This will catch it because it's wrapped around the frame. Now, at this point I'm going to put some of the other components up here like our diode wiring and our breakaway switch. Then we can put our fascia back on the same way we took it off. We will have to do some trimming, but I'm gonna run some of the other components, and then we'll come back to this. Before I trimmed out where I needed to so our base plate could fit properly, I took the foam out of the back of our fascia. And there's just gonna be four rings, and they're gonna be on there. And you can just break these off because you're not gonna be reusing 'em. So I just got some needlenose and twist 'em off. And then took this whole thing off. Then after that I grabbed an extra set of hands and we threw it onto the vehicle. And I kind of marked where I was going to cut. I just used an oscillating tool and just cut some of this mesh out of here so everything could fit. Now we brought our Jeep outside, we hooked all of our other components up to our motorhome, and once you've done that, you can hit the road onto your next adventure. And that just about does it for the look at the etrailer base plate kit on our 2025 Jeep Grand Cherokee.

Info for this part was:
At etrailer we provide the best information available about the products we sell. We take the quality of our information seriously so that you can get the right part the first time. Let us know if anything is missing or if you have any questions.


Thank you! Your comment has been submitted successfully. You should be able to view your question/comment here within a few days.
Error submitting comment. Please try again momentarily.