
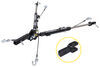
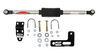
etrailer Invisible Base Plate Kit - Removable Arms


To see if this custom-fit item will work for you please tell us what vehicle you'll use it with.
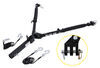
Stay sleek when not towing! These hidden base plates offer a clean, factory look and quick twist-on arm connection. Easy, bolt-on install with all hardware included.
Imagine enjoying a clean, unobtrusive look on your vehicle's front end when it's not being towed. The etrailer Invisible Base Plate Kit features a design that keeps bulky crossbars and brackets out of sight. This means you maintain your vehicle's sleek appearance while ensuring it's always ready for the road.
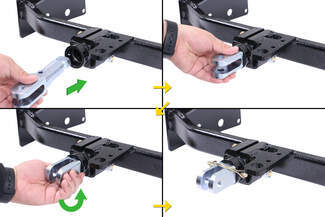
Let's talk about convenience when hooking up and disconnecting your tow bar. With this base plate kit, you simply twist the insertion tabs to lock them in place securely. Thanks to this feature, attaching and removing your tow bar becomes an effortless process, even if you're handling it solo.
Whether you're using an etrailer, Demco, or Blue Ox tow bar, this base plate kit has you covered without needing additional adapters. It integrates seamlessly with these brands, offering versatile compatibility that saves you from purchasing extra components. Part numbers like e98983 for Roadmaster tow bars (if needed) keep your options open without added expense.
There's nothing worse than fighting corrosion when it's time to tow. This kit includes high-density polyethylene covers to protect the receivers from dirt and debris. These receiver covers snap easily into place, preventing seizing and ensuring your setup remains operational over the long haul.
If you have a tow bar from a different make, etrailer ensures that you have options with adaptable solutions. While most setups don't require an adapter, specific Roadmaster models might, and etrailer provides part numbers like e98987 so you can easily get what you need.
This feature may include visual guides or step-by-step illustrations that show how to install your base plate kit using directional arrows, ensuring a smooth and intuitive install experience.
| Type of Tow Bar | Adapter |
|---|---|
| Roadmaster Tracker, Falcon 2, Falcon All Terrain, Blackhawk, Blackhawk All Terrain, Sterling tow bars with serial numbers up to 14,500 | e98983 |
| Roadmaster Nighthawk, Sterling All Terrain, Sterling tow bars with serial numbers 14,501 | e98984 |
| Roadmaster Eagle, Eagle 8000 | e98979 |
| Roadmaster Falcon 5250 | e98981 |
| Blue Ox | No adapter needed |
| Demco Kwik-Tow | No adapter needed |
| Curt Rambler | No adapter needed |

California residents: click here
Videos are provided as a guide only. Refer to manufacturer installation instructions and specs for complete information.
Hi, this is Scott with the etrailer. Today we're taking a look at and installing our etrailer invisible base plate on our 2024 Ford Bronco. Your base plate is gonna be one of your five main components you're gonna need to get set up to flat tow. You're gonna need your base plate, you're gonna need a tow bar, you'll need safety cables, some form of tow bar wiring, and you're also gonna need a braking system. One thing that's nice about this base plate is how easy it is to get unhooked. All you have to do is unpin it and then pull your pin through.
Then you can pull your arm out. (metal clacking) Then when you want to get this end of it out, you'll have to remove your pin, give this a quarter turn, and that pulls out. Then you can undo your safety cable. Now, a lot of Bronco owners are concerned about the way things are gonna look after you get this all installed. The nice thing about these is we're not gonna have any kind of crossbar that comes across.
All it's gonna have is a separate module that goes in each side, and it basically replaces your toe loops that are on here. So this just mounts in place of those. And really, I think the finish on it looks really good. It kind of blends in really well with our flat-colored bumper. Another thing that's nice about these, if you do much off-roading or anything like that, this is gonna come with these little caps and you're gonna be able to pop those in place, and that's gonna help keep dirt and debris out of these.
So you gonna have those to go down there. And I think it actually makes it look pretty good as well and it kind of helps it hide 'em even a little bit more. Your base plate kit is also gonna come with this bracket. And what's nice about this is it's really heavy-duty bracket and has different options that you can have. So, say, you have an Air Force One set up and you have air nozzle, you can actually have air coming outta one of these and then have your plug installed.
It's also gonna give you a place where you can hook up your breakaway switch. So it is gonna have a tab back there where you can get that put in place. Now on our case, on this one, we did have to modify this one a little bit by cutting off one of the arms that come back 'cause we have a plastic panel back here, but it was pretty easy to do to get that cleaned up and to shoot a little paint on that. Other than that, it's really heavy-duty design and mounted straight to our seal bumper. So it's gonna hold up for a long time. So what are the things you want to keep an eye on if you're looking to get your Bronco set up to flat tow is you want to take a look at our fit guide and make sure that you're getting the right setup for your Bronco. A lot of the Broncos now have a lot of different trim packages and bumpers that are available for 'em, so make sure you're getting the right setup for you. Other than that, if you have any questions or comments about this setup for your Bronco, you can always leave a question or comment down below in the comment section, or you can get ahold of one of our experts here at etrailer, somebody would love to help you out. As far as installation goes, you will have to take off the bumper and do a little bit of drilling. But it really isn't too bad. It's something you can definitely get done yourself. If it's something you don't have time to do or the space or the tools, you can always take a look at our dealer locator and get something done for you locally. If it's something you want to tackle yourself, stick around, watch our video, and we'll help you get it installed. To start our installation, we're gonna need to remove our plastic cover that's around our toe loops here. So what I'm gonna do is use my little plastic clip tool and just get behind that and just kind of start getting that to pop out. And there's gonna be little clips back there that's gonna hold it in place, and we'll just start working our way around that. Once you get it pop loose, all we're gonna do is just pull back on it and pop it off of our little clips and pull that straight back. And you can see here the little clips that hold it in place. For our next step, we want to get our loops out of the way. So we're gonna take a 15 millimeter socket and remove these three in the front on each side. (drill whirring) (drill whirring) (drill whirring) (drill whirring) With an extra set of hands, I'm gonna have somebody hold the bumper for me while I get these removed. (drill whirring) (drill whirring) (drill whirring) Now we can pull our bumper back. And keep in mind, we're probably gonna have some wiring here. It looks like I'm gonna have one connection here. All I'm gonna do, I have somebody hold the bumper, push on this tab, remove that. Now we can set our bumper off to the side. On the back of our bumper, we're gonna have this little eight millimeter, and that's holding our hook in place. So we're just gonna get that removed on both sides. (metal clacking) (drill whirring) And now both of these, these will not be reinstalled nor our hardware. So we're just gonna get that put off to the side. We will be reusing our factory hardware that goes into the front of these. On the inside of our bumper, we have it marked out, we're gonna need to get this cut out. This is pretty thick metal, so I'm gonna use a cutoff wheel and just take my time and get this cut out. We're gonna do this on both sides. You can use whatever you want. You can use, if you have like a reciprocating saw or whatever you have that you can get this cut out with. (angle grinder whirring) (angle grinder whirring) After we get that all cut, let's get that moved outta the way. Now I came back through and just cleaned up our edges a little bit, and took a paint pen and just went around and got this all sealed up, and that's gonna help prevent any rust in the future. On each side of our frame, we're gonna have this hole that we're gonna need to enlarge. We're gonna run it through and then through the other side and just make sure that both of them are at 1/2 inch. So I'm gonna take my 1/2 inch drill bit and get these enlarged on both sides of our vehicle. (drill whirring) (drill whirring) (drill whirring) (drill whirring) After we have the hole all drilled out and come back through with a little bit of black spray paint and just spray those, and that's gonna keep us from having rust and corrosion in the future. To give us a little more room to get it our bolt that's gonna go for through our frame on both sides, we're gonna take this skid plate off, and these are gonna be 15 millimeter bolts and we're gonna have four of 'em. These two in the front, we're gonna completely remove. These two in the rear, they're gonna be slotted, so we're just gonna back those off a little bit. (drill whirring) (drill whirring) (drill whirring) (drill whirring) (drill whirring) Now we can just slide our skid plate out and set it aside. So we got to test fitting our base plate and realized we needed to open up this slot that we made in the back part of our bumper. So we came back through and cut that out a little bit bigger to make our base plate fit right down in there nicely. And we did that on both sides. What we're gonna do now is we're gonna get our base plate pushed into our frame, and then we're gonna have our hole back here. We're gonna have blue Loctite on all of our hardware from this point on, so we wanna make sure we get that on everything. Now we'll just get our bolt in through our frame and our base plate. (metal clacking) Now we'll take our nyloc nut and get that installed on the backside of our bolt. Just want to go down finger tight with that. Now we'll just take our bumper and get it lined up over our base plate, and we've gotta get above our plastic strip here. And don't forget to plug in any of your electrical connections you may have behind your bumper. (metal clacking) We just wanna get one of our bolts started. (metal clacking) And we are using our factory hardware, and what we're doing is we have Loctite on all of our bolts, and you will have Loctite supplied in your kit. So just get those in finger tight to hold our bumper in place. After we have our bumper all centered up, what we wanna do is come back through and snug down our bolts here in the front. (drill whirring) (drill whirring) (drill whirring) (drill whirring) (drill whirring) (drill whirring) Now we'll come back through with our torque wrench and torque down our hardware in the front to the specified torque listed our instruction manual. (torque wrench beeping) Now we wanna snug down our bolts that go through our frame. (metal clacking) (metal clacking) It can be a tight fit to get up in there. (ratchet cranking) Just use your 19 millimeter or 3/4 socket and get those snug down on both sides. After our front bolts are torqued down, we want to come back through and torque down our bolts that go through our frame to the specified torque listed in our instruction manual. Now, if you don't have a torque wrench, you could pick one up here at etrailer, or you could always take a look at your local auto parts store. You should be able to rent one there. (torque wrench beeping) With everything torqued down, now we can just pop on our covers, just line up our tabs, put that pop back in place. (panel popping) Now, normally at this point, we would put our skid plate back on. But at this point, we're gonna have a few more accessories we're gonna need to get installed for our flat tow setup. So we're gonna do that later on. For our cables on our base plate, I went ahead and installed these 'cause they're really hard to see them getting installed. So what we ended up doing is we ran our cable up one side of our frame, and we went up and around our frame, and then ended up coming back down. Now our goal was to make sure we have our cable set up where it's at least behind one of our body mount bolts, and that's really heavy duty right there. So we did end up getting our cable to go around behind that. Then we brought 'em down and we have these tabs that come off the bottom of our base plate. We went ahead and went through those and then ran our cables up above that. Now, normally, you would have your cables in your rings hanging down. So what we have on this one is we're gonna have a metal skid plate that comes down, and I didn't want these rings coming down and rattling on our skid plate or giving us issues when we go putting that back in place. So what I ended up doing is getting these set up where I could push these up. And I ran a wire tie, two of them actually. If you have a really long one, that one will work as well. But I ran through both of our loops and then ran a loop over the top of our frame to where that will hold up both of these loops where they won't come down and rattle and make contact with our skid plate and it won't give us any issues when we reinstall that, so that way we won't have any issues in the future. With all of our other components installed, I think it turned out really well the way it looks, appearance-wise, we went ahead and got our skid plate back in place. And with that, that'll do it for our look at and our installation of our etrailer base plate kit for our 2024 Ford Bronco. I'm Scott with etrailer, and thanks for watching.

Do you have a question about this Tow Bar Base Plate?
Condition: Surface Scratches
Notes: Item has minor cosmetic scratches.
Info for this part was:
At etrailer we provide the best information available about the products we sell. We take the quality of our information seriously so that you can get the right part the first time. Let us know if anything is missing or if you have any questions.


Thank you! Your comment has been submitted successfully. You should be able to view your question/comment here within a few days.
Error submitting comment. Please try again momentarily.