
Roadmaster Direct-Connect Base Plate Kit - Removable Arms


To see if this custom-fit item will work for you please tell us what vehicle you'll use it with.


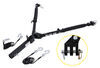
Designed for use with motor-home-mounted tow bars, the direct-connect brackets are virtually invisible, easy to mount and remove, and they eliminate the need for a quick-disconnect crossbar on your tow bar. Installs on your vehicle's frame.
Features:
Note: Roadmaster direct-connect base plates will only work with Roadmaster tow bars that slide into a trailer hitch, such as the Nighthawk, Sterling, Blackhawk, Blackhawk 2, Falcon, or Falcon 2. These base plates will not work with tow bars that require a hitch ball.
The drawbars, or front arms, on this base plate kit are supremely easy to mount and remove. Just insert them into the brackets and twist to lock them in place. To remove each arm, simply tug the built-in pull pin to disengage the lock, twist the arm back and pull it out of the bracket. Once the drawbars have been removed, the remaining brackets are virtually invisible. On most automobiles, the brackets are mounted within the grille, where they remain not only unseen, but protected from scrapes and scuffs as well.

California residents: click here
Videos are provided as a guide only. Refer to manufacturer installation instructions and specs for complete information.
Hello, neighbors, it's Brad here at etrailer. And today we're taking a look and installing the Roadmaster base plate on our 2025 Buick Encore GX. Now this is what your base plate is gonna look like when it's installed, and you're just normally driving it down the road. And Roadmasters done a really, really good job of keeping everything in this lower grill nice and in line so you have all the hookups for your flat tow components, nice and low. And I was able to salvage quite a bit of this honeycomb grill while putting them all in place. So it really does a good job of maintaining the aesthetics as much as possible by having everything pretty well recessed, yet still having all the usability of being able to open up your six pull latch.
And your safety chain loops are just slightly out enough to where you can hook those in. But everything else is pretty well hidden. So a really clean look overall. And then when you're ready to flat tow, it's super easy, you'll just grab your arms, and you'll see this spring loaded clip here. It's just a simple quarter turn, twist, and it locks in place.
Whenever you're ready to remove it, same thing, you just pull this quarter turn and it pops out. Now there's gonna be five main components that are gonna be required at minimum to flat tow any vehicle. And the Buick's not gonna be any different except you are gonna need a battery disconnect, or you're gonna have to manually pull the battery cable off each time you flat tow. And we installed a Roadmaster battery disconnect on ours today and it's a great way to do it. But as far as the five main minimum components, the first thing we'll have is the base plate.
And that's gonna attach to the frame in the vehicle and become the structural mounting point for all of our connections. But also allow us to be able to tow it down the road by attaching to our tow bar. And the tow bar is gonna be the connection point between the base plate and the hitch on the RV. And just like towing a trailer, you have your safety cables that'll go onto the loops on the base plate. And that way in case of a any disconnect, you're gonna have those cables still holding onto the vehicle.
We also have diode wiring, which is gonna be cables that run to the taillight on the Encore. And that way when you're running your running lights, your turn signals and brake lights, they're gonna illuminate on the taillights of your towed vehicle keeping you safe in legal. Many braking systems will also require tapping into diode wiring, so it's definitely worth picking up. Speaking of braking systems, we have a Blue Ox Patriot today, but all braking systems are gonna have a breakaway cable. And this is in case of a catastrophic disconnect. This cable's gonna pull and apply the brakes on the vehicle, bringing it to a stop, so it's not rolling down the highway. Now something that we want to take a measurement of is going to be the height of the arm. So from the ground to the center, we're looking right at about 14 inches. And that's gonna be really important, because you may or may not need a high low adapter. This is a fairly low arm placement on the base plate. And what we found today is our RV's hitch height was quite a bit higher. And when setting this all up, you want it within a three inch range of the height of the center of the pinhole on the hitch on the RV, and our arms to be within three inches. So everything's nice and level or close to it. So today we had to get a high low adapter to adapt to that. So hopefully that's something that your RV can account for. If not, we have plenty of high low adapters available here at etrailer to get everything in place. So while we have our arms set up, we'll get our tow bar all hooked up, and I'll show you how the components attach into our base plate. To attach all our components, we have quite a few things, but if you go across your base plate, that should be all the mounting points or connections that you'll have to make. And you'll find pretty quickly that this is a Roadmaster Nighthawk tow bar, a fantastic tow bar. And so being that it's a Roadmaster, it's gonna work directly with our base plate. But if you have a Blue Ox or a Demco or really any other brand, you can pick up adapters to be able to adapt to your base plate by getting the Roadmaster ends. Just make sure if you're buying a brand new tow bar that you get those ends. If you have a used one, you can pick those up separately to adapt it. So we'll get our pins in place here. We'll get this side in place as well. (metal clanging) And then we will just have our safety cables, which you can see work really well to be able to hook up. It sticks out far enough, it's not gonna make contact with our fascia. We also have our diode wiring. And then finally our breakaway switch cable. Now with all of those in place, all that's left to do is get our vehicle set up in flat tow mode, and then we're ready to tow our Buick Encore down the road. Now that we have it hooked up, you're probably wondering what's it like to install. And this isn't exactly the easiest base plate I've done. It's not the hardest, but there's multiple pieces to get this to work. And there's trimming and drilling required, which is pretty standard for a lot of vehicles. And the facia is gonna be coming off, and I highly recommend why you have that off and doing your base plate to get the rest of your components set up, that we can cleanly run all the wires and get all of your components set up. Now if this is something that you're gonna be doing on your own, the video's gonna help you step by step to make sure you get it installed. But if you watch it and decide that maybe it's beyond what you're gonna wanna do, maybe you don't have the place to do it, the tools to do it, or even the want to do it, you can use our dealer locator to find someone close to you to get it installed for you. But watching the video will definitely help you decide whether or not this is for you. And for you DIYers that are gonna be powering through to get this done, let's get this knocked out. Follow along on our install video, and it shouldn't be too many problems. We'll have this knocked out in no time. To begin our installation, we're gonna get our hood open and we're gonna start removing a lot of hardware to get our fascia taken off to get the base plate put in place. So that brings me to a point of any hardware that you take off, highly recommend having a nice organized spot because when you put everything back together, it'll be a lot easier. So the first thing we're gonna need is a T15 torque screwdriver or bit, because we're gonna be removing some hardware right above the radiator support. We'll find the first screw on this plastic tab. The remaining ones are right along where the fascia kind of meets the hood. So it says in the instruction that there's three on each side. I actually have four, so just go along here, we'll get all four of these taken off. And then we're just gonna repeat that same step on the other side. Next thing we need to remove is gonna be the plastic push pin that's attaching our washer fluid bottleneck. Now once we get this off, we should be able to get this pulled out. So with any plastic push pin you'll find that there's gonna be a slot, and a trim panel tool works really well to be able to get that center portion raised up. And then as long as you get both of them together, that's really what you're looking for. If you do pull out the center and the bottom part's still there, just make sure that you get those attached. That way you're keeping everything together. And you don't have to use a trim panel tool. These are really, really nice for plastic push pins, but a flathead screwdriver will accomplish the same thing. So with that out, we should be able to just pull this out pretty easily. This just has some O-rings that pops in. So we'll set this aside for now. We'll now head underneath the front fascia, and we're gonna need a seven millimeter socket to remove some screws. And on each side it should be the same. We have this underbody panel and we'll have a seven millimeter screw here. And then as you go forward, you'll have ones here. Now sometimes manufacturing there'll be some variances. So you may have something in this spot, we do not. So we're gonna continue on. So we'll get this taken down. And then we're also just gonna go across the front 'cause we're eventually gonna need to separate that as well. (tool buzzing) We're gonna continue on with our seven millimeter socket, and we're just gonna get this whole underbody skid plate taken down. So you'll find that there's gonna be more of those, just go back. And then there's also a plastic push pin. So we'll get that separated, and then just go along the outside until we get all of that hardware taken back. (tool buzzing) Once you have all the hardware out, it may start to drop down on you. If you just pull this towards the rear of the vehicle, we can take this down and set it aside. Headed to the front corners of the fascia, you're gonna find that there's gonna be two T15 torque screws that we're gonna take out. It looks like this back one is completely separate, so I don't think we'll need to take that out, but if we need to later I'll let you know. But this is gonna give us access to a frame stiffener that's gonna be up here that has some hardware attached. (tool squeaking) Now I did determine that we only need to remove those front two T15s. The other one's not really holding anything that we'll need to remove. But once you peel back the liner with those T15s that we had in the front, that's gonna give us access to the two 13 millimeters on this frame stiffener. So just with a ratchet and 13 millimeter socket, we'll go ahead and get those bolts taken out. And once you get those bolts out, we'll just repeat that same step on the other side. So we'll go ahead and get our T15 screws that are located on the wheel well liner removed. There should be a total of five on each side of the vehicle. Now if it's difficult to gain access to them, you can hop in the vehicle, put it in accessory mode and turn it to one way or the other to really open that up for you. And that's gonna make it a lot easier. So just work your way up. And then once you get those taken down, there is going to be a plastic push pin that's gonna be located up towards the top. So get all of that removed, and then we can start getting our wheel wall trim taken down. And the main reason we're getting our wheel wall trim taken out is gonna be, there's attachment screw that's gonna have the fascia attached to the quarter panel. So we do need to get this taken out. So if you peel back the wheel well liner, there's gonna be a series of clips that pop these in. And they mentioned in the instructions that you can use a pair of needle nose to clip those. That is a good way to do it. Another way that I've found is an eight millimeter shocket or something along those lines. If you slide this over those push pins, it'll pinch those tabs together, making it a lot easier to pop this out. So main goal is to kind of start at the bottom. I can actually do this by hand and just slowly work your way up. So just peel back a little bit. And once you get those clips to pop out, you'll see we have one, two. They're gonna continue up and that's where it becomes a little bit helpful with that socket or needle nose to just slide that over it and then you'll be able to pull this back. And we're just gonna wanna work our way to about this portion. So again, with those series of clips, just keep a little bit of pressure on it and just pry back, just be careful you're not scratching or damaging. And this is where it's really important. Don't peel this back anymore, because that's where that crease can occur. The main thing is is we're gaining access to the small seven millimeter that's located right here. Pretty tight here. I have a very small quarter inch ratchet that I'm able to gain access to this to get it out. You can also use a seven millimeter wrench, whatever works best for you to get this removed. There's also gonna be this electrical connector on a reflector that we wanna remove as well. And that's really easy to do. You just peel back that red locking tab, just slide it, and then there's a push pin that you just push on that tab, and we should be able to get this to separate. Just be gentle with these. They're pretty small here. There we go. And with that popped out, we'll get that remaining of the screw taken down, and you're gonna want to grab some painter's tape. We're gonna put that along the seams just to make sure that we don't have any scratches on our fascia, while we take it off or when we put it back on. So that painter's table along the edge is really gonna help when we get the fascia off. But also putting it back, we wanna make sure we don't scratch that clear coat. I also just kind of folded up some paper towels to keep this wheel well trimmed, kind of peeled off to the side. That way when we get our fascia pulled off, it's not gonna be a scratching it. Now to get your fascia taken off, have a safe place set aside to keep it rested while we get the base plate put on. You probably want an extra set of hands for this, because there's gonna be electrical connections and it's not necessarily a heavy fascia, it's just kind of bulky. And having that extra set of hands to hold that while getting the electrical connection separated makes it a lot easier. So the best way to get this separated is there's just gonna be a series of clips along this edge. We wanna make sure though up top where we remove one of the T15s, there's this alignment tab, just kind of pop that up over it so it's not hung up on that. And then just reach behind the fascia, and you'll see pretty quickly those snap off and work on both outsides, and then make your way towards the middle. It might get a little bit tight here. So what I'd like to do is just kind of grab on the bottom and just kind of wiggle a little bit until those clips separate. And then we should be able to get the whole thing to kind of pop off. Now I did mention those electrical connections. It looks like we have one here for sure on the passenger side. And that's gonna be again, just one of those locking red clips. So pull that back and then we'll get this plug separated. And if you're struggling with this, sometimes these are not easy to get able to separate. You can put a small flathead screwdriver and wedge it under there, and that's gonna make it a lot easier for you. And also there is a plastic clip here on the reservoir bottle for our washer fluid. So if you need a little bit more leverage to be able to get this separate, you can slide that off. It looks like we just had that one electrical connector. If yours has more, obviously get those separated, and then we'll set this aside. I've marked this out with a little bit of a paint marker. It might be hard to see here, but this is rubber. So you can really use, I'm just using a utility knife here to just cut down, and then just kinda run along this edge from this flap. So I'm gonna go from this backside here and cut through that. Now this portion starts to get a little bit more plastic, so if you need to, you can use a dremel, you can use really any cutting method that you may have. Just be careful because you do have obviously some cooling here and compressed lines. So we wanna make sure we don't damage that. But I'll just trim this back. Now as I cut back, I noticed that we do have this plastic portion, and we wanna separate this completely. So I just have a pair of tin snips that I'm gonna cut through here. And this is to separate that lower air dam, because we are gonna be removing that and this is a great way to be able to separate it. So I'll just cut through here. Again, just making sure you have those AC lines, condenser lines that you wanna make sure you're not making contact with or damaging. So once we have this cut, we'll just go ahead and repeat on the other side. Now right where we cut, if you go straight down, you'll see where the air dam attaches to this plastic bracket, and there's just a small tab that's keeping that in place. So if you need to, you can use a flathead screwdriver and just pull that out. It'll be the same on the other side. Now we're not gonna be replacing this air dam. So you can do whatever you want with it, but it's not gonna allow our base plate to fit. So we're gonna throw ours away. We are gonna be trimming a little bit of our inner cooler at least the plastic flashing part. And this is obviously where our base plate's gonna fit. So we wanna make sure we have the clearance for it. And I'm gonna be using a multi-tool. I'm a big fan of these, because you can get really clean cuts in small spots. And being that this is where we obviously have, you know, air flowing through for our turbo, we wanna make sure that we're not causing any damage. So pretty safe cut here, we're just gonna go, you'll see the two holes, the kind of mounting part there, we're just gonna trim straight down and notch that out. And we'll be doing the same thing on the other side. On the driver's side there is this little plastic snap place. I'm gonna basically use that as my reference to be able to get a nice clean straight line. So I'll go ahead and get this cut out. (tool buzzing) On our driver's side we're gonna find some large electrical harnesses as well as part of the computer. And we're gonna be getting this removed, it's just attached with two 10 millimeter nuts. But we wanna unplug these first. So first one we have our red locking tab like we had before. And then this should raise up and it kind of latches it in. So these can be a little bit tricky. So push down on this part up top here, and that's gonna unlock it. And once you draw this up, a lot of times it'll kind of push the plug out for you, and we can let that hang. This one is going to be also probably pretty similar here. Let's see what we can do. On that, slid off its own little holder there, which is fine, it gives a little bit more room to work with. And it does look like there's a locking tab on the back. So I'll just kind of pry that back a little bit. This main large harness, I really struggled to get this to unclip, so I think looking ahead we can really omit having to do that. There is this panel that it snaps into the frame here, so if you just kind of, you know, work that out, it's pretty soft plastic, and pop that off, it's gonna get this out of the way. And then once we remove the 10 millimeter nut here as well as the one up top here, we should be able to take this whole thing and set it aside. And that's gonna open up area for us to get our base plate in. Now with both of those 10 millimeter nuts removed, this plate still has a plastic snap that's keeping it attached. So I'm just gonna go on the backside and kind of pry that, and then I can show you what it looks like. I got this popped out, and this is the portion that slides into this hole. So if you can reach up through the frame, there's an opening and the tabs gonna be on the top and bottom. So just trying to press those in while pulling back is gonna help that kind of snap out. It was a little bit tight there, so just take your time, really try to get those to separate and then pull back. And you should be able to get this to be loose. On our passenger side, we're gonna continue by making clearance for our eventual base plate. So on our inner cooler you'll have this plug. So just slide that back and then push on the tab, you'll be able to get that to pop off. We're also gonna be removing our washer fluid fluid bottle. So there is gonna be quite a few connections here that we need to separate. First one, this main one up front, just pull that tab back, and we should be able to push this down on this section here. And we're gonna wanna pop these out of the holders that they have because we will be removing this whole bottle. We also have one down here. Same thing. With the electrical connection separated, we are eventually gonna need to pull off the hoses that have the fluid running through it. But hopefully my, goal is to get our reservoir loosened up with the 10 millimeters. So up top we're gonna probably want to use a ratcheting 10 millimeter wrench. And then we have one that you're probably gonna want an extension with the 10 millimeter socket, and then one more that's on the inside here. And I think if we get that all loose we'll be able to kind of tilt this, and then pull off our hoses to where we don't lose all of our washer fluid. If you have a cap or something that you can plug over that, that's a great way to do it. But I don't have anything right away that I can think of to use. So we're gonna try this method and see how it works. (tool clicking) Now we do wanna separate where the harness is attached. There's a plastic Christmas tree, so just pry that out with the trim panel tool. And then if you haven't already popped your hoses out of the holders, go ahead and do that. And all of this is held up. The two studs here are gonna be supporting our washer fluid. So what I'm gonna do is I'm gonna pull off this one, and we don't have any fluid going through there. This is gonna start leaking out of this valve. So my goal is once I separate this, lift this up and out and kind of get it tilted, and hopefully that should keep it from flowing. And as you see, if you do that quickly, I no longer have anything coming out the bottom. It can come out the top where we remove that neck. So just kind of find a nice proper spot to where it's not gonna leak out of either one. The plug that we had on our intercooler also has some plastic attachment points. This one just goes on the stud and if you want to, you can also get this plastic Christmas tree popped off, and that's because we're gonna have our braces. They're gonna go on the side here, so we wanna make sure that we have this nice and open. Now grab the brace that looks like this. There's gonna be two of 'em and these are designed to fit right into this pinch weld area on the outside of the bumper beam. And have a paint marker ready, because this is gonna be our template for drilling out holes to get everything mounted up. So you'll see this notch here, that's gonna go in line with the welds that we have here, and you'll start to see this groove will fit in there pretty well. So get that in place, and then get that notch to where it's right at the edge of that pinch weld, and that should be the spot that we're looking to mount it. So I'm gonna get this kinda leveled up. Again, that notch fits really well there. So I'll mark this one out as well as the back, and then we can repeat that same step on the other side. So now that I have those marked out on both sides, I'm gonna take a punch and just create a nice dimple for us to begin drilling. And we're gonna be using 13/32 drill bit. If you want to, you can start with a smaller one and get that through the pinch welds and then enlarge it. That might be a little bit easier for you. But either way we're gonna just drill these out. (tool buzzing) We need to go do our bumper beam, and there's gonna be four bolts on each side that are attaching the bumper beam to the frame rail, and it is gonna be supported along the center portion. And what's gonna happen is our base plate is gonna go back over this, and we're gonna need to put some pipe spacers in place and then put new hardware in. So the first thing we'll do is get all four of these taken out on each side. (tool buzzing) 15 millimeter socket will accomplish that. (tool buzzing) This will get a little bit loose, it's still gonna hold itself up, but once we put all the hardware back it's not gonna be a problem, 'cause that's gonna tighten it back in. But we're gonna be putting pipe spacers into these knockouts that we have on the bumper beam. And you'll find in the kit that there's gonna be two different sizes. So one is a 1 5/8, one is 1 1/2. The 1 5/8 is gonna be slightly longer, and that's the one that we're gonna put on this inside here. So it's just gonna slide into place here. And then our bolts eventually are gonna go through the base plate and into these pipe spacers. So get two of those in place on each side of the bumper beam. At this point you're gonna want an extra set of hands. The base plate is rather cumbersome, and we're gonna be threading our hardware in place through those pipe spacers and through the base plate to get it all lined up. So you may have to move that bumper beam to get this bolt to pass in. We're just gonna get a few threads started on each of them, And the combination of hardware that we have, you can see we have a shoulder bolt, and we have a flat washer and a split lock washer. So make sure you have those in place. And I have Dan here helping me get our base plate up. So as we raise this up, just go line those inside holes with the pipe spacers. And as I mentioned, you may have to lift that bumper beam up a little bit just to get those threads started. And we're gonna do this for all four of those spots. Now I will say these are a little bit tricky to get started, and I think part of that is the threads are pretty well straight, and this is a curved piece, so keep that in mind when trying to get that all bolted up. We have 'em all started. And now we're gonna grab that same hardware combination and the smaller pipe spacers, and those are gonna go on the outside portion. So just like we did before, you're gonna wanna get this in place, and that's why you don't snug this down all the way. You can still get your pipe spacer in place. And then we'll get our hardware started on the remaining four holes. We're gonna grab our plate that we used as our template to drill out and that's gonna wedge between the base plate, and it's going to be on the outside portion of where we drilled. So it's gonna sit at a very odd angle for a little bit. I think our best bet is to get some of our hardware started at that top. Rearward hole is not really gonna want to button up without really squeezing it. So I think if we get our top bolt that's forward started off, that's gonna have just a flat washer, a split washer. And you probably won't be able to get a flat washer on the backside, because of the bend from the welds. But from there we'll get our large bolts passed through our base plate and onto the plate with the large diameter bolts, a flat washer. And then on the backside we'll have a split washer and a nut that goes with that. We'll get the one below that attached. And then also our bracket on the bottom. We have our large shoulder bolt that we're gonna pass through with a flat washer, and then finish that up with a flat washer, split washer and nut. Now this is side specific. There's this bump up where we remove those 13 millimeter bolts. You're gonna wanna make sure that that notch is right there, and that the two holes on the top of the bracket are behind the bracket that we put in place. But also somewhat aligned. Once you have all the hardware in place or at least snug down on that side, you can repeat the same steps on the other side. And from there we're gonna just snug everything down before coming back with a torque wrench. So you don't need to get crazy when snugging it down, but you do wanna make sure that you're saving yourself some time with wrenching with the torque wrench. And all of those torque wrench values are found in the instruction manual. So make sure that you're changing your torque values according to the hardware that you're tightening down. And that way long term this'll be tight enough to stay in place for towing it down the road, but also not too tight putting stress on any of the hardware. (tool clicking) If you need a torque wrench to accomplish this, we do have 'em available here at the etrailer. You can generally go to an auto parts store and rent one for free. This is just gonna make sure that you have everything tightened down properly. So we officially have the base plate installed, and chances are you're gonna be doing the rest of your flat tow components at the same time. Highly recommend doing that, because with the face off it's gonna allow you to get everything hooked up nice and clean up front and route those wires safely. So we will be coming back a little bit later once we get all of our components mounted up, and I'll show you how to trim the fascia to get it put back in place. But we can get our computer all mounted back up with that hardware and plugged back in. And the same thing's gonna go for our washer fluid bottle. That's one less step that we have to do later on. Instructor So all the stuff I like, although I like lot less. So I've gone ahead, I got my components mounted up. So our breakaway switch, they do put this in an orientation to where this top metal piece, no matter the brand of your braking system, all the breakaway switches are very similar. You're gonna want it in this orientation, 'cause that's gonna put it low enough to where when we slide this in, all the cuts that we are gonna make, it's gonna be in one plane, makes it a lot easier and cleaner. So make sure you get that mounted up in this orientation. And also with diode wiring, you can see I just have my raw wire here, I'm gonna wait to put my plug on until we have the fascia on. That way we're not having to trim out around that plug. So it definitely makes it a little bit easier and generally a lot cleaner with the finished product. So this is what we have set up. And at this point we do need to modify the fascia just a little bit for it to fit. And I'll show you how to do that. First thing we'll modify is gonna be the foam insert that rests against the bumper beam. And it's just a small amount of trimming to account for the base plate. So if you look for these little U-shaped designs, if you cut on the outside, I'm just gonna be using my pocket knife and just run through here, you should be able to get that to separate. (knife squeaking) And then once that's cut, we can actually remove that portion from the fascia. So it just has a tab here, slide that out, and I'll just finish my cutting. And then we're just gonna repeat the same step on the other side. So just following that U shape, just cut on the outside of that, and then remove this portion. (knife squeaking) Now with that trimmed out, grab an extra set of hands, and we're gonna mock up our fascia to determine exactly where we need to trim out on the lower grill. So we'll see that our safety chain loops are wanting to kind of poke through this section, and it's right in the middle. That's what we're looking for, because our diodes are also gonna go through here. So we may need to cut out this section. I don't think it's gonna be able to fit over that safety chain loop that well. And then of course, where the receiver openings are gonna be, this will need to be cut out, as well as our breakaway switch. So what I like to do is you can grab a paint marker and just kinda mark out where you need to trim, or you can just use a pair of snips and start cutting these. And as you start to cut and find the tight spots, it should draw that fascia back in. And once you get it to draw in, then you can begin the reinstallation process of the fascia. So just make sure that you're, you know, if you already attach your computer, make sure that's done, your washer fluid bottle, the neck for it, and all of the electrical components. So just take your instruction manual, work your way backwards, and then you'll have everything reinstalled. So I'll get this cut out, I'll get this reinstalled and then I'll show you exactly how it looks. So I got my fascia all drawn in, I got it all put back together. So at this point we have our base plate all installed. I'm gonna go ahead and get my diode wiring in place, and now you can kind of see why I left that. You would be able to cut out this whole section and have it already mounted up if you really wanted to. But this is a lot easier I've found. So you got a nice clean fit. So as far as looking at the cutting, you can kind of get an idea of where it all comes out, and you can kind of mimic that with your base plate and it should be relatively close. So at this point I'll get the diode wiring finished up. And then once you have that you can take your arms and these will just slide in quarter turn, and then they're gonna pop in place, so you just rotate around until you hear that snap. It's good to go. And then we'll have all the mounting points for the rest of the components. We'll get our vehicle in flat tow mode and then we're ready to hit the road. That was a look and installation of the Roadmaster base plate on our 2025 Buick Encore GX.

Have not installed it yet
Info for this part was:
At etrailer we provide the best information available about the products we sell. We take the quality of our information seriously so that you can get the right part the first time. Let us know if anything is missing or if you have any questions.


Thank you! Your comment has been submitted successfully. You should be able to view your question/comment here within a few days.
Error submitting comment. Please try again momentarily.