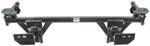
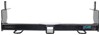
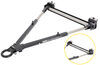
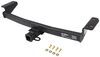
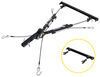
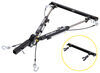
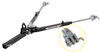
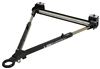
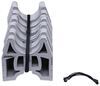
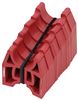
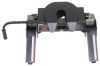
Roadmaster Crossbar-Style Base Plate Kit - Removable Arms


To see if this custom-fit item will work for you please tell us what vehicle you'll use it with.


The crossbar-style hidden brackets attach to your vehicle's frame to provide attachment points for your tow bar. The visible portions of the brackets can be removed when you are not towing.
Features:
The square drawbars, or front arms, on the crossbar-style base plate kit are simple to mount and remove, easily securing with hitch pins. Once the drawbars have been removed, the remaining brackets are virtually invisible. On most automobiles, the brackets are mounted within the grille, where they remain not only unseen, but protected from scrapes and scuffs as well.

California residents: click here
Videos are provided as a guide only. Refer to manufacturer installation instructions and specs for complete information.
Today in our 2010 Honda Odyssey, we're going to be installing the Roadmaster XL Base Plate kit, part number 1556-1. First, we've gone ahead and jacked up and removed the front wheels. Although this isn't necessary, it makes it easier to remove several of the fasteners for the lower splash guard. Next, we've gone ahead and raised the front hood. We're ready to go ahead and start removing some of the fasteners that will be necessary to remove the upper and lower fascia. Starting under the hood, we'll have 8 fasteners to remove the upper fascia.With the upper fascia loose, we can go ahead and remove it and set it aside for reinstallation later.
We can go ahead and get underneath. To remove the lower fascia and wheel well guards, approximately 20 fasteners will have to be removed. These are all pushpin fasteners of various shapes and sizes. You need to be mindful of which ones needed to go back where. With all our fasteners removed, we'll go ahead and remove the center guard and then pull back on wheel well guards to expose the screws up behind the front bumper fascia.
We can go ahead and repeat the same process on the other side.Next, we'll be ready to go ahead and remove the front fascia. To do this we'll simply pull out near the wheel well popping the fascia free on both sides. With the lower splash guard out of the way and the wheel well pulled back, we'll go ahead and lower the vehicle. We've got two more extended pushpin tabs to remove. Next, we need to go ahead and remove the air box in the driver's side.
To do this there are two fasteners that will need to be removed first. We'll go ahead and remove the fasteners and then pull down and out on the air box. We'll go ahead and set that aside for reinstallation later also.Next, we need to move them over to the passenger side and remove the windshield washer bottle. Before I do that however, I want to mark one set of lines so that I know which side it goes back into the windshield washer pump. Using a paint marker, I can go ahead and mark one side of the lines and the pump.
We can go ahead and remove the lines. At this time, it will cause any fluid in the washer bottle to leak out. With both lines removed and our tank drained, we can go ahead and remove the connector from the pump and into the 3 fasteners that are secured to the windshield bottle to the vehicle.We'll set the washer tank aside for reinstallation later. Next, we're going to go ahead and remove the bumper core. To do this, there are 3 fasteners on each side that need to be removed. We've got 2 underneath and one on top. This hardware and bumper core will not be reinstalled as it will be replaced by the new drawbar. We're ready to go ahead and take the long side brackets and install them inside the frame. With our 1/2 inch carriage bolt already in place for the bracket, we'll slide it back inside the frame until the carriage bolt drops through the frame and out the bottom.Then we'll get underneath the vehicle, we'll install a 1/2 inch block, 1/2 inch lock washer and a 1/2 inch nut to secure the bracket in place. We can go ahead and repeat the same process on the other side. Next, we'll use a 5/8 bolt, lock washer and fender washer that'll go through the side of the frame into our long side bracket. We can go ahead and repeat the same process on the other side. Next, we'll go ahead and bring our drawbar and put it into position up on top of the frame. We'll use new hardware to replace the manufacturer's hardware and secure the drawbar to the top for attachment points where we will remove the bumper cord earlier.Next, we'll take the 3/8 hardware provided which will be a bolt lock washer and nut and secure the drawbar to the side bracket we previously installed. There are a total of 8 attachment points to secure these two together for both sides. With all 8 of our fasteners securing the drawbar to the side braces, keep in mind that all of our hardware will be finger tight at this time. We need to install the lower brackets. To do this, remove the 4, 17-millimeter bolts securing the manufacturer's frame bracket to the cross member. We'll also loosen up where the brackets bolts to the frame through the body mount.This will allow us to install the new bracket. Our hardware will be the 5 spaces that goes between the bracket and the radiator support with a new bolt, lock washer and lock nut. Keep in mind everything we do here on the passenger side will get identically on the driver's side. Next, we'll go ahead and take the 1/2 inch, 7-inch bolts, run them up through the lower bracket into the drawbar. We'll secure the top of these bolts with a 1/2 inch lock washer and nut. Keep in mind, everything we do here on the passenger side will get repeated identically on the driver's side.With all our fasteners installed we can go ahead and tighten and torque the specifications as indicated in the instructions. We're ready to start reinstalling the washer bottle, the air box and all of our underbody trim panels. First, we'll start with reinstalling the air box. We'll just use the same mounting fasteners that we removed earlier to secure it. Next, we'll move over to installing the washer bottle. On the inner fender well attachment point, we're going to install a pipe spacer, a new bolt, flat washer and a lock washer. Next, we'll repeat the same process of using the pipe spacer for the lower attachment point near the wheel well.However it will need to be slightly relocated further out away from the engine compartment so we'll use the 2-inch self-tapping screw to secure it. The third attachment point up in the engine compartment will not be reused. With our washer bottle installed we can now go ahead and reinstall our washer lines. Keep in mind we color coded them so that they get reinstalled correctly. With that done, we can go ahead and reinstall the connector for the washer pump. Next, we're ready to go ahead and install the front fascia. However in order to completely install the front fascia, we'll need to cut out around the drawbar.To do this, we'll go ahead and set the front fascia in place, holding it with the two extended pushpin tabs that we removed earlier. We can go ahead and take our paint marker and mark out the area that will need to be cut. With the area marked out, we can now go ahead and take our rotary zip tool and cut out the lower part of our bumper fascia to allow for the drawbar to stick through. With that done, we can go ahead and start reinstalling the front bumper fascia. With the front bumper fascia reinstalled we can go ahead and start reinstalling the lower fascia on both the driver and the passenger side.Keep in mind, well be using the pushpins that we removed earlier. Next, we'll go ahead and reinstall the lower center fascia. However before we can do that, we'll go ahead and test fit it to see what needed to be cut out around the lower brackets for the drawbar. Once again, we'll use the rotary zip tool to make these cut outs. With that done, we can go ahead and install it using our pushpin fasteners. With that done, we've got one more piece of trim that need to be installed, the front fascia guard that goes in the engine compartment. Once again, we'll use the pushpin fasteners that we originally removed to secure it.Let's go ahead and insert our front arms and secure them with the hitch pin and clip. Lastly we'll show you how to attach the safety cable with the quick connect rings. We put the ring through the predrilled hole in our base plate and slide the cable into the ring and secure it. With that done that will complete the installation of our Roadmaster XL Base Plate kit, part number 1556-1 on our 2010 Honda Odyssey. .

deffinetly will use again!
Do you have a question about this Tow Bar Base Plate?
Info for this part was:
At etrailer we provide the best information available about the products we sell. We take the quality of our information seriously so that you can get the right part the first time. Let us know if anything is missing or if you have any questions.


Thank you! Your comment has been submitted successfully. You should be able to view your question/comment here within a few days.
Error submitting comment. Please try again momentarily.