
To see if this custom-fit item will work for you please tell us what vehicle you'll use it with.


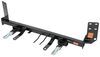
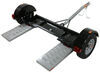
Custom designed to fit your vehicle so it can be safely towed behind your RV, this base plate has easily removable arms that offer a seamless look when you're not flat towing. Base plate bolts directly to your chassis, so no welding is required.
Features:
Specs:
This base plate's hidden design creates a clean and seamless look. The bracket arms are easily removable, creating a slick appearance when you're not flat towing. Because the arms can be removed, you also won't have to worry about banging your leg into any protruding arms when you walk by.
Attaching and removing the bracket arms is a breeze. To attach the arms to the base plate, simply insert them into the receivers and rotate them until they lock into place. Once you're finished towing and want to remove the arms, pull the pin to disengage the lock, rotate the arms, and remove them from the receivers. Finally, plug up the now empty receivers with the included receiver covers to help keep dirt and debris out of the base plate and provide a finished look.
Flat towing your vehicle is much more convenient than using a trailer or a tow dolly. These other options take up much more storage space, leaving you less room both at home and at the campsite. In addition, securing your vehicle to a trailer or tow dolly can be a hassle and more time consuming than hooking up with a tow bar.
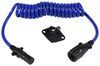
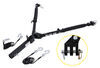
There are 5 basic components needed when flat towing a vehicle: a tow bar, a base plate kit, a safety cable set, tow bar wiring, and a supplemental braking system.
The tow bar links your towed car to your motorhome. It attaches to the custom-fit base plates that install on the frame of your towed car. Safety cables ensure that your towed car does not separate from your motorhome in the event that your tow bar becomes detached. Tow bar wiring allows your towed vehicle's signal lights to sync up with your motorhome's tail lights, which is required by law in most states. Finally, the supplemental braking system - also required in most states - brakes your towed car when the brakes in your motorhome are activated, preventing wear on the motorhome and decreasing braking distance for your entire setup.

California residents: click here
Videos are provided as a guide only. Refer to manufacturer installation instructions and specs for complete information.
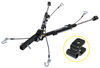
Hello neighbors, it's Brad here at etrailer and today we're taking a look and installing the Blue Ox Base Plate on a 2024 Chevy Trailblazer RS. This is what your base plate is gonna look like when it's installed and it is gonna require some modification in order for your attachment points, as well as your components, to mount up. But overall, when it's installed, it looks pretty clean. You do have your safety chain loop sticking out a little bit here, but that makes it easy to hook up your safety cables. And when not in use, your arms can be removed. You can actually put caps in here to protect them from getting any buildup and it comes with a bracket to mount up your 6-pole and your breakaway switch.
Now we put an air fitting on ours. I was able to modify the bracket a little bit for that to work, but overall, you'll have all your components up front and it looks clean in the process. There's gonna be five main components when flat towing any vehicle, and there may be some supplemental stuff as well, depending on braking system. But to cover the five main ones, first you're gonna start on the vehicle side with the base plate. That's gonna become the structural mounting point for all of the rest of your components, including your tow bar.
That's gonna be the connection point between your base plate and the hitch on your RV, and that's what's gonna be towing you down the road. And just like towing a trailer, you have safety cables that are attached to your base plate, as well as the safety chain loops on the back of your RV. You'll have diode wiring, which is gonna transmit the light signals from the taillights on the RV to the taillights on your towed vehicle. A braking system's also gonna be required, so we have our breakaway switch here. So in the case of a catastrophic disconnect, this cable would pull and it would apply the brakes on the towed vehicle, bringing it to a stop so it's not rolling down the highway.
And in our case, we have our air line. This is for our air brake system. We use the Demco Air Force One to get this to work. So using the air from our RV, this transmits to our main unit and applies the pressure to the brakes. Now once you have all your components hooked up, this is roughly what it's gonna look like.
And it's important to make sure that you have a nice level tow bar. It should be within three inches of the height of the hitch. So in certain cases, if the hitch is higher than the base plate, you will need a high low adapter to get it nice and level. Or a tow bar like this has a built-in rise or drop, which can help account for that three inches. So once installed, our base plate is coming in right at 15 inches. So if you measure from the ground to the center of the hitch pin hole on the RV hitch, you should be able to figure out the riser drop necessary in order for everything to be level. When it comes to installation, most flat tow vehicles, in general you're gonna be pulling off the entire front fascia and that's a great time to get the rest of your components all set up. And as I mentioned before, you are gonna be doing some trimming, you're gonna be removing a lower air dam, there's gonna be some drilling. So, if you're a DIYer, it's not terribly hard to do, but even as someone that's done quite a few flat tow installs, when it comes to getting everything else set up, this is not the easiest vehicle to do. And that's okay because at the end of the day, if this is what you're wanting to flat tow, I still want you to be able to flat tow it. So, if you're not doing it yourself, you can reach out to our dealer locator to find someone close to you to get this all installed for you. That way you can still flat tow down the road. Now once you get it installed, take some pictures of it and share it with us. We like to see our neighbors using our products out in the wild. Helps give other neighbors ideas what they can do with their Trailblazer. Throughout the entire process of our installation, we're gonna have a lot of hardware that's gonna be coming off. So I recommend having an organized spot to keep all of it. It'll make reinstallation a lot easier. And with that being said, it's also a good time to knock out your diode wiring, as well as your braking system while you have the fascia off. It'll really make it a lot easier to mount everything up and get those wires ran clean. So the first thing we're gonna do to get our fascia taken off to get our base plate on, open up the hood, and we're gonna find that we have some T15 screws along the top edge of the fascia. (tool buzzes) Now we'll head to each of the wheel well liners and towards the front of the fascia there's gonna be four T15 screws that we're gonna be removing. Now it can get a little bit tight. I have a right angle attachment that makes it easy for me. But if you're struggling getting to these, what you can do is hop in the vehicle, turn the tire one way or the other, that should open it up, making it easy to get these removed. (tool buzzes) (tool buzzes) Now we're gonna go to each of our wheel well trims and we're gonna be popping this off to gain access to the bolt that holds our fascia to the quarter panel. And this is plastic, so you need to be careful when you pop this off, not to crease it by pulling back too much. That can leave a permanent mark. So we're just gonna start slow here. And what I'd recommend doing is pulling this out. There's a tab that kind of interlocks into the bottom plastic of the fascia. (tab pops) So, once you get that out, you're gonna have these clips. Just work your way up and just put constant pressure on the back side. If the clips pop out, we can put those back on. It's not a big deal, but we need to go back. The seven millimeter that we're gonna be attacking is up here. So I'm gonna go back just a little bit further. There's a yellow clip and that's about as far as we need to go. And if you're struggling with these, what you can do is you can actually either pull back the plastic under here or you can kind of reach in there to pinch that clip to get it to separate. I also have a trim panel tool, which makes a pretty easy way to get this separated. (clip pops) And then once popped out, if you take a paper towel or a rag and just kinda stuff it in the edge here, that's gonna give us a little bit of room to work and keep this pried out. But we'll get our seven millimeter removed right here. Now we'll need to head under our front fascia and at the corners we're gonna find a few T15 screws. But the ones we're gonna be looking for are gonna be on this tab here. And then on the other side of the circle, the other two are gonna stay in place, but we'll get those taken out. And then on the other side we'll be doing the same thing. (tool buzzes) With the Torx bits removed, we're gonna attack the seven millimeter screws that go along the bottom side. There should be a total of six, so we'll get those taken out. (tool buzzes) (tool buzzes) (tool buzzes) And we'll be getting ready to take the fascia off here shortly. So I do recommend, if you have an extra set of hands, this can be rather cumbersome. So having that extra person to kind of support the fascia as we take it off is gonna be super helpful because there's gonna be electrical connections that we'll need to separate while holding the fascia. And something that we're gonna wanna do, just for a little added protection, is run a piece of painter's tape along the edge of the fascia, as well as the quarter panel, and we can tape up where these plastic clips are. It's just gonna help prevent any scratching on our clear coat as we take our fascia off. And also when we go to reinstall it. So your best way to get this taken off is start on each of the corners. So if you peel back the wheel well liner, that's gonna give you access to where we removed that seven millimeter and then it's just a series of clips along the body line. So just work your way towards the middle. And up top there's these tabs. So if you just lift this portion up, that'll help kind of take some of that tension off. And then our fascia should just kinda work its way out. Now remember we do have that electrical connection. Looks like we're gonna have one on our driver's, or on our passenger side. To get this separated, there's a red tab. You just pull that back and that's the locking mechanism. And this one's a little bit tight, so if you need to, you can take a small flat head and just pry that back. Push on here, you should be able to get that to separate. Now we can set our fascia aside. Now grab your seven millimeter socket and we're gonna find that we have a screw here, as well as two tabs in the front and then one on the other side that's similar to this. (tool buzzes) You get these taken out. (tool buzzes) Now we're gonna be removing three 10 millimeter screws that are attaching the bumper support to the radiator support. So we'll get these taken out. (tool buzzes) (tool buzzes) There's also gonna be two 10 millimeter screws on this bumper beam impact bar. We're gonna take that off on both sides and then we'll set our bar aside. This'll be later reinstalled. (tool buzzes) (tool buzzes) (tool buzzes) Now this is, it looks like it's clipped in a little bit to this plastic tap, so just raise it up a little bit and that'll clear that out. And now we can set this aside. We're gonna be removing our impact beam and this is just gonna be four 15 millimeter bolts. So, 15 millimeter socket to remove these. So you'll have the two in the inside, two on the outside and then we'll have four on the other side. So we'll just repeat. (tool buzzes) (tool buzzes) (tool buzzes) Now with that removed, we're gonna take our bumper beam and we'll set this aside for now. We are gonna be reinstalling it later, so keep it handy. As we progress in the installation of our base plate, eventually we're gonna need to gain access to this portion of the frame to drill in. So unfortunately, our reservoir for our washer fluid needs to be temporarily removed. And the first thing we're gonna do is go up top to the filler neck and there's a plastic push pin that we're gonna just pry up. There's a little slot. You just pull up the center and then you should be able to get the entire thing to pop out. (pin pops) If you've got a reservoir tank, there's gonna be three 10 millimeter nuts and a bolt that we'll need to take off. So one of them's attached up top here, we have one that's further back and then there's also the bolt that's right here. So let's get those taken off first. Now we'll raise this up over the studs and just kinda wiggle it back and forth and that neck should start to drop out. But we do have some electrical connections, so I'm gonna only unplug the ones that I need to. And I'm gonna try to keep this to where it's as attached as possible. We may need to zip tie this up because what we're gonna be gaining access to is in this portion here. So I do think that if we can kinda just set this aside to where we can move it and be able to gain access, we'll be good. But I am gonna run a zip tie through here and just kinda support it so it's not just free hanging. We're gonna be removing our lower air dam and it's just a series of clips. A flathead screwdriver's gonna be probably the best way. You just push up in that section. And then on this one, push down and just kind of pull pressure back. But it should unclip these fairly easily. If you just pry down on the top clip and pull back should be able to get this to pop out. We'll get the other side taken out as well. And we'll set this aside. On the passenger side, you're gonna notice a clip that we have here. I'm gonna pry that off and that way we can get this air dam removed. Our bumper beam is gonna go back up and that's going to sandwich the base plate between that and the frame rail. But something that they mentioned in the instruction manual that might be worth doing is gonna be reaming out the holes towards the inside, about an eighth of an inch to a quarter of an inch. And that's gonna account for that base plate being behind there. That way the bolts can still shoot straight through. So in order to do this, I have a burr bit. You may or may not have to do this, but it's better to just have it done and you know, that way we don't have to worry about it while it's all mounted up. So I'm just gonna run through, grind these out and then afterwards I'm gonna come back with a little spray paint on those raw edges. That way it doesn't turn to rust and corrosion long term. At this point, we're gonna put our bumper beam back up temporarily and we're just gonna be mounting it up to the three tabs up front with those 10 millimeter bolts. So just loosely put these in because our base plate will slide behind it. We just wanna make sure that it's gonna be supported. (hardware rattles) Now grab your base plate and the bolts that we took off from the bumper beam. Those are those 15 millimeters and we're gonna slide our base plate up into the slot right by where our bumper beam bolted up. And then we're gonna do the top outer hole on here. So, I might want an extra set of hands here. It can get a little bit cumbersome. But once we get a few threads started on this one, we're gonna do the same thing on the outside upper hole on the driver's side. And then we can get the rest of our hardware in. This is gonna make sure that we have everything lined up properly. Now we're gonna start threading in the other ones. We need to make sure that our base plate's gonna be level and as we tighten it up it should get everything in place. So I did not put Loctite on these outer ones, but the remaining ones, I am going to do that and later on I'll take this out once everything else is buttoned up. But this is gonna make sure that long term, you know the threads are gonna be stuck in place and they're not going to become loose long term while pulling our vehicle down the road. So we'll thread these in, no need to get tight here, we'll just get a few threads started. And then we'll continue on for the rest of our hardware. So making sure that this is level as possible, I mean this does slide side to side a little bit. So center it up as much as you possibly can, find a good reference point and these should be about, you know, even distance on the front of the vehicle. So with that, as we start to tighten it down, I recommend doing the top ones. It'll kind of cinch this up, making this level. And then we can continue tightening down the bottom ones. Now we'll grab our front bar and we're gonna slide this in place and we'll get our 10 millimeters hand threaded in here. (hardware clinks) And once these are started, on both sides, we can go through, tighten these down, as well as the ones that go into the bumper impact beam. We can also get our seven millimeter screws put back into where the shutter bolts up to the impact bar. (tool buzzes) Now we're gonna head to the driver's side and there's gonna be an electrical connection. Ours was already popped off but it really just snaps into the opening on the frame and that's where we're gonna be putting our side plates that bolts up here. So just make sure that you have enough space because we're gonna be working in here. But I think with these moved out, if you need to, you can pop off a few more of the plastic Christmas trees, as we call 'em, and really just kind of get this out of the way. Now we're gonna start on our driver's side, putting our side plates in place and we're gonna align these two holes with the holes that are on the base plate. So this is gonna slide in and go on the backside of this frame. Now on the driver's side, the holes are there for us to pass our hardware through. And this is where it was kind of confusing where on the instructions they have the bolts going in this way and then you put the nut plates. I think it's gonna be a lot easier to run 'em in this way. The holes do align with these. On the other side we're gonna have to drill out. But first things first, let's get this kind of mounted up. So I'll just slide this in place and then I'm gonna grab our smaller bolts that we have and a nylon lock nut. And I'm just gonna slide this up to kinda start getting that alignment process there. (hardware clinks) (hardware clinks) And I'm just gonna hand tighten one up here and then get my other one in place as well. Now the larger bolts we have set up with a split washer and a flat washer and I'm gonna put a little bit of red Loctite on these. And as we pass these in, they should feed through the holes on the frame as well as the new side plate that we put in. So, this is why we had to remove our wiring here as well as that reservoir on the other side, just to get this to align up. And with those threaded through, we're gonna put our nut plate, so it's just a serrated flange nut that's welded onto the tab, but this will help feed that in. And we're just gonna get a few threads started on both of them. On our passenger side it's gonna be fairly similar, but we are gonna be drilling out for one of the holes. So what we're gonna do is unplug our electrical connection that goes into the inner cooler. It's just gonna be this plug and that's gonna slide through the slotted portion on our new side plate. So as we raise this up, that should go in place. Let's get this slid in first. (plug rattles) And with this in place I'm gonna put our front hardware in and it looks as if our bottom bolt's gonna line up with no problem, but that top one's gonna run a little bit of issues. So we are gonna need to drill out a spot and that's why we have our reservoir out of the way. So I'll show you exactly where you need to mark. Looking at that top hole, you'll see that it is small, but we're not gonna be enlarging that. We're gonna go down and towards the front of the vehicle, just ever so slightly. And we're gonna start with a pilot hole and enlarge from there to make sure everything lines up. You could do this with the plate in place and that's gonna kind of help template it. You could get your other hardware, but I'm gonna drill this out. It can be, you know, a little bit movable, but I am gonna mark this with a paint marker. And when we drill this out, we're gonna start with a quarter inch as a pilot hole and then eventually we need to step it up to a half inch. That way we can get our bolt passed through. And you can see why the reservoir could be in the way. I have a right angle drill to make this easy. You can kind of hold it up out of the way, but if it's completely in the way, you can remove the reservoir. But again, that's one more step that hopefully we can avoid. I'll just get this drilled out. (tool buzzes) With all of our hardware in place, now we can snug everything down. And I'm gonna start with the bolts that we put through the side and it's gonna be a three quarter inch socket to get these snugged down. We are gonna be coming back with a torque wrench, so you don't need to get crazy here. It's just gonna save us a little bit of time of wrenching away. So I'll snug these down. And once you get those snugged down, we're gonna go to the front bolts and it's gonna be a nine 16th socket and ratchet combo. So I'll just go on the backside here and get these snugged down. (tool buzzes) (tool buzzes) And then we'll come back with our three quarter inch torque wrench. And the settings are gonna be found in the instruction manual. You're just gonna follow the chart that they have for the hardware and reference the hardware that you're gonna be torquing down. So the torque settings are gonna change between these bolts and these ones. So as we tighten these down, those weld nut plates that we have, the handle should stay pretty well in place. If it's starting to rotate around, put a hand on it just so it doesn't spin until you get your torque. (torque wrench beeps) And then we'll come up to these bolts, adjust our torque setting and torque these down properly. (torque wrench taps) (torque wrench beeps) Now you may be asking about the bolts in the factory bumper beam. These factory bolts, we don't have the torque setting, but I would suggest making sure that they're gonna be tight. I mean you can do it with the ratchet and just get 'em really snug and I don't think you're gonna overdo it by hand. So just get those tightened up. And then, before we get our reservoir back and our electrical connector on the driver's side, we're gonna be putting in these cables and these are gonna wrap around the frame of the vehicle and become just a secondary, if this was to fail. And before we do that, I do notice that I have my metal tabs here from our weld nuts and what you can do is just kind of wiggle these back and forth and it should pop off the small weld, getting the handle outta the way. (tab pops) And to get these in place, pretty easy. We're just gonna wrap around the bottom portion where we did put our hardware and I'm gonna make one big circle around it. And then as we make our way, this is gonna be the attachment point, we'll take our quick link and get both of these threaded in. And just tighten this down and then you can go ahead and do that on the other side. Now there is gonna be some moving parts of the vehicle. We wanna make sure that we don't have any issues, so if you need to, you can zip tie this up out of the way. And the same goes for the bolt. As I looked, it's pretty close to the hose for the inner cooler and coolant. Just make sure that that's not gonna be chafing long term. We just wanna make sure that long term we don't have any issues with the vehicle because of our base plate. At this point we can get our reservoir all put back with the hardware and we're gonna wait to put our fascia on. As I mentioned, it's a lot easier to get all of our components mounted up, run those wires, and then we're gonna need to do a little bit of trimming of the fascia to get everything to work. So I'm gonna get the rest of my components in place and then we'll come back and I'll show you how to trim it out and get the fascia put back in the reverse order. At this point we're gonna start trimming up our fascia to be able to get this to slide over our base plate. Now when it comes to the diode wiring and we have an air fitting for our braking system, and our breakaway switch, it's gonna get a little bit interesting here. I haven't actually permanently mounted because it looks like the prongs where it mounts up to that 6-pole is gonna go through here. So we're gonna need to figure that out after the fascia's put back on. But we need to start cutting to make sure that we have clearances for the base plate to go through. So just mocking up our a fascia here. It's obviously not set all the way back. But we can tell pretty quickly, we're gonna have to trim where we have our safety chain hookups as well as our openings for our arms. So, to do this, I use a multi-tool. This makes it a lot easier and a lot of times what I'll do, I have those tabs up top, kinda holding the fascia on, and as we cut, it should draw it back to where we can get everything snapped in. We can always cut off more if we need to. So we're gonna start small here. The first thing that we're running into clearance issues is going to be our safety chain hookup. So just kind of cutting these tabs to help kind of glide this in, is going to make it a little bit easier, so. You don't have to use a multi-tool. You can use a pair of snips and just kind of cut and that'll work just fine. But as we go through and start cutting for our openings, it is nice to have something that's powered to cut through. In order to really get everything mounted up up front, I'm gonna just trim these center bars. We have an ambient air temperature sensor here, so we wanna make sure that stays in place. But cutting this is gonna open it up and all of our hookups will be located right here. So now as I kind of start to slide the fascia back, you'll see obviously our openings for the arms are gonna be in the way. So I'm gonna cut out this section and continue to make sure that everything's fitting properly. So with that trimmed out, you can see it's gonna start to draw the fascia back to the point where we can really start attaching everything. Now remember, we unplugged that connector on the passenger side, so make sure you get that snapped back into place. And then really it's just gonna be in the reverse order that we took everything off. So you can refer to your instruction manual, get everything put back in place. And then again, you can always trim off a little bit more if you start to realize that there's clearance issues. You can also go through with a file to get some of these burrs cleared off, just to kinda clean it up a little bit. Now I found that we had tension exactly where our safety chain loops were, so I did have to cut it. It puts it almost in line with that vent. So just makes some cuts along that, keep it nice and clean. We're also gonna be cutting back here because the base plate rubs against this, causing it to not draw back all the way to get our hardware in place. (tool buzzes) That was a look and installation of the Blue Ox Base Plate on a 2024 Chevy Trailblazer RS.
Customer Satisfaction Score:
92% were satisfied with this product
8% of customers were not satisfied
Ratings & Reviews

Prompt service!
Great service

Fast shipping, good price, good product, easy install.
Delivered promptly!
Got package as told
Info for this part was:
At etrailer we provide the best information available about the products we sell. We take the quality of our information seriously so that you can get the right part the first time.


Thank you! Your comment has been submitted successfully. You should be able to view your question/comment here within a few days.
Error submitting comment. Please try again momentarily.