


To see if this custom-fit item will work for you please tell us what vehicle you'll use it with.



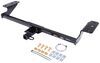
If you like your setup to look clean when you’re not towing, this base plate keeps things tidy. The hidden design leaves no bulky parts sticking out past the front end, and the removable arms twist out quickly for a seamless look. Plug in the included receiver covers to keep dirt and debris out while giving the front end a finished appearance.
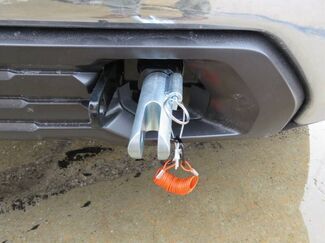

Connecting your tow bar is quick and simple. Each arm slides into the receiver, twists until it locks in place, and secures with a pull pin. When you’re done towing, just pull the pin, twist, and remove the arms. It’s a solid, repeatable connection that makes getting ready to tow or disconnect straightforward every time.

The base plate’s durable steel build bolts directly to the chassis—no welding required. Its sturdy design spreads towing forces evenly to help prevent stress on your suspension while maintaining a solid link between your tow bar and vehicle frame. The powder-coated finish resists rust and corrosion for long-term confidence over miles of use.
You can run this base plate with Blue Ox tow bars right out of the box. If you’re using Roadmaster or Demco tow bars, it adapts easily with the correct adapter (RM-031, RM-031-5, or DM9523041, sold separately). Integrated mounting points make it simple to attach an electrical connector plug bracket so your wiring stays organized and ready to connect.
With a distance between brackets of 23" and bracket height of 15-1/2", you can plan your tow bar alignment precisely. The kit includes all mounting hardware for a straightforward bolt-on install and comes backed by a 3-year warranty for extra peace of mind.


Videos are provided as a guide only. Refer to manufacturer installation instructions and specs for complete information.
Hello, neighbors. It's Brad here at etrailer and today we are taking a look at installing the Blue Ox baseplate on a 2022 Kia Forte. When it comes to getting any vehicle set up for a flat tow setup, there's gonna be five main components that are always gonna be required, and the first one is gonna be on the vehicle side, and that's gonna be your baseplate. That's gonna mount to the frame of the vehicle and give you the structural support for the rest of the components, but also be the attachment point for your tow bar, which is gonna be the connection between the baseplate and the hitch on the RV. Now, just like towing a trailer, you're also gonna have safety cables. Those will attach to the safety chain loops that are on the baseplate, and then attach to the ones that are on the hitch on the RV.
You're also gonna have diode wiring, which will transmit light signals from the RV via the umbilical. So it'll send running lights, turn signals, and brake lights through the seven-way to the six-way, and eventually to the taillights on the vehicle keeping you safe and legal. You're also gonna have a braking system, and that's what our cable right here is, is a breakaway cable. So in case of a catastrophic disconnect, it would pull this cable, applying the brakes on the towed vehicle. The braking system is going to slow and stop the vehicle as you apply the brakes on the RV.
Again, keeping you safe and legal in the process. When installing a baseplate on any flat tow vehicle, a lot of people are very worried about how it's going to look, and some brands do a better job of allowing you to mount everything up nice and clean. And some of 'em, it looks pretty busy up front and sometimes you just can't get away from that. This one overall does a pretty good job of making it look decent. You do have to cut out a decent amount of the grill in order for everything to protrude out, but overall it's really nice that they give you a mounting point for diode wiring so you don't have to fabricate that.
Now they do have a mounting bracket also for the breakaway switch, but unfortunately ours was pretty high up here, so I ended up using a bracket here that's for your adaptive cruise control, which is something that's really nice too. They've included a bracket for that. That way you're not gonna be losing any of your functions. Now, right now I have my removable arms in place, but this will be ready to hook up our tow bar. But if you're normally driving, you can get these pulled up by pulling the pin back, quarter turn, and that'll push it out, giving you an almost flush appearance.
They also give you caps that you can put in place, so as you're going down the road, any of that road grime will stay out of the receptacle, keeping it nice and clean and not corroded for the next time you load up your arms. So when you are ready to flat tow, you'll simply put your arms in, give it a quarter turn, and that'll lock it in place. Right next to our arms, we do have our safety chain loops. They stick out just enough. I really like that they're not protruding out too far, yet they're super easy to hook up, and the diode wiring puts it about flush with the grill. So, overall, I think the look is pretty decent. Now, something that's gonna be important too is gonna be the height of your arms. So from the ground to the center of our pin is gonna be 15 inches, and that's gonna be important for denoting if you need a high-low adapter or not on your RV. And the best way to figure that out is measure from the ground to the center of your hitch pin hole on your RV, and it should be within three inches. So ours is coming in at 17 inches, which is underneath that three-inch window. So you always want it within three inches of each other. And if you do need to adapt, you can always get a high-low adapter to get it as level as possible. That way you're towing safely down the road. Now the whole reason you're getting a baseplate on your Kia is so you can flat tow it down the road. So let's show you how to hook it up. Now, today we're gonna be using the Blue Ox Avail Tow Bar. So that makes it super easy. Being that it's a Blue Ox Tow Bar and a Blue Ox Baseplate, everything is gonna work out just fine with attaching. But if you had a different brand tow bar, maybe a RoadMaster, a Demco, or a etrailer, not to worry, you can always get adapters for your tow bar here at etrailer, and that way you can adapt it to the baseplate arms. So the first thing we'll do is get our first one attached, run our linchpin here, and we'll also grab our safety cables from our RV, and we'll attach that to our safety chain loop, which works out well with even a larger clevis. That does go in there just fine. We'll get our other side also set up, and then we're also gonna get our diode wiring hooked up, and then also our breakaway switch for our braking system. Once everything's hooked up properly, you can get your vehicle in flat tow mode and you're ready to go down the road. Now, when it comes to the installation of this baseplate, overall, none of it's particularly tough to do. It's actually a pretty straightforward one. You're gonna be taking off the fascia, and that's pretty normal for just about every baseplate. And I'll say if you're doing your baseplate, you should do the rest of your components at the same time because with that fascia off, it'll make it a lot easier to get all of your wires ran and everything mounted properly. I'll be walking you through step by step on how to get the baseplate installed. And again, if you're fairly mechanically inclined, this shouldn't be that difficult to do. Some of the trimming up front, just take your time and make it as clean as you can. But if you watch the video and decide, "You know what, I'm not gonna do this myself or any of the other flat tow components," I completely understand. This is kind of a unique thing. If you've never set a vehicle up for a flat tow setup, it's all kind of unique. So if that's the case and it's scaring you off, you can find someone to get this all installed for you by using our dealer locator. You'll put in your information and you'll find a list of shops near you that can get this all installed. So you can be on the road, enjoying your flat tow setup without having to worry about the install. And if you have any questions about your setup, these can be confusing with all the different parts kind of playing ball. So if that's the case, we're here to help you. Feel free to reach out to us here at etrailer. We'd be happy to guide you through your whole flat tow setup, as well as any other questions you may have. So with that being said, let's pull this in the shop, and I'm gonna show you how to get that baseplate installed. So the first thing we'll need to do to start getting our fascia taken off is open up our hood. We'll have four 10 millimeter screws that go onto kind of this radiator support threshold. So we'll get these removed. (tool whirring) Next thing we need to do is go to our wheel well liners right at the front of the fascia, and you're gonna want either a trim panel tool, which is really nice for these plastic push pins. A flathead screwdriver will also work. There's three of them that we're gonna pop off. So there's one, two, and then the third one's right here. So let's get those removed. And generally there's a slotted section. And if you get that centered to pop off, you can get the whole thing. I already did the other side, and I will say these were pretty easy to chip and crack, so take your time here if you can. If you do break 'em, you can easily get new ones of these at an auto parts store. We actually have these available here at etrailer. So don't be surprised if they do crack. I was taking my time on the other ones. And as you can see, it's not wanting to come out, but we will need to get this removed in order to get that liner loose and eventually that fascia off. So this one I'm struggling with, but a traditional plastic push pin, again, you should be able to get that center section to pop out, and the whole thing will remove just like this one. Now you're also gonna want a deep-well eight-millimeter socket because there's a screw that attaches the fascia to the front fender, and it faces vertical. So the deep-well allow you to get this onto to the head of the bolt, and then we can get this removed. And with that removed, we'll just go to the other side and repeat the same steps. Now you're gonna head underneath your fascia, and you're gonna want a trim panel tool and a 10-millimeter socket. And we're gonna take this underbody panel off. Not only does it attach to the fascia, but, also, I'm gonna lead this off. That way, when we're routing diode wiring and any of the other components, it should be nice and wide open. Makes it a lot easier. As far as plastic push pins, we're just gonna work on the outside edge. So there's one, two, three, four, five it looks like here. And then it just kinda continues along the edge, but there's also some 10-millimeters in these insets here. So you're gonna want a deep-well socket to gain access to those. And then there's gonna be more that are back here. So our end goal is remove all the plastic push pins and 10-millimeters until we get this underbody panel off. (tool whirring) Now with this panel removed, we'll just set this aside for now. Now while we're under here, we're going to unplug our fog lamps. You can do this also later when we pull the fascia off, which will be our next step. But this will make it just a little bit easier. So if you can access it while you're under here, there's gonna be a locking push tab up top. Just push that. That should slide out. Looks like that. So with that unplugged, we'll do the same thing on the other side. So now it is time to pull the fascia off, and what I've done is just run some painter's tape along the edge of the fascia as well as the front fender. It just kinda helps, when we pop this off and when we put it back on, to prevent any scratches on the clear coat. And to get this popped off, I got Scott to help me here. It's pretty simple, but it can be cumbersome with just one person, and we may still have one more electrical connection. I'll let you know here shortly. To get this popped off, you're gonna just reach back where we remove that eight millimeter and just slowly pop these clips off and just work your fingers along here. And up top, where we remove the 10 millimeters, there's these little nubs that kind of just lock that in place. So just lift this up and then we can see that drops out, and it looks like just those fog lamps for the electrical connection. So we can grab our fascia and set it aside. Now, depending on the trim of your Forte, you may or may not have adaptive cruise control. And if you do, you're gonna have a sensor that's gonna be somewhere in this location. You can remove that. It's just gonna have some 10-millimeter screws. Do not unplug the ACC, otherwise you're gonna have to go to the dealer where they're going to have to adjust all that. So just undo it from the bracket and you'll be good. The next thing that we need to undo is, on the backside of our bumper beam, we have a wire loom that goes along here and also a temperature sensor. So we'll grab our trim panel tool and work that loose. And for that ambient air temperature sensor, we'll just pop this off of this metal bracket. It's just got a little tab on the back here. I think if I push in, we should be able to get this to pop out. Looks like that this clip may slide off, but I was able to just kind of pinch that out. We'll just let this hang down for now. With that wire loom removed, now we can take the bumper beam off, and this is not gonna get reinstalled. Our baseplate's going to, well, kind of take over the spot of where our bumper beam was. And to get this off, it's actually pretty easy. You're gonna grab a 12-millimeter socket as well as a 10-mil. And as you go to each of the attachment points on the frame, you'll find that there's four 12-millimeter bolts and then a small 10 millimeter nut. So we'll get all of these removed on both sides, and then we can get this bumper beam taken off. (tool whirring) And what I'd recommend is get the 12-millimeters out, and you can loosen up this 10, but maybe leave the one side on a few threads here to where it's hand tight. That way this isn't gonna fall off as you're working on the other side. Now we're gonna grab these brackets, and these have a welded-on nut, and that's gonna allow us to bolt this up and become a mounting point in the frame of the vehicle. So inside of the frame rail, you're gonna find that there is a plastic cap. We're gonna pop that out. You can actually push it from the inside or just, with your fingernails, pop that out. And then from here, we're gonna feed this in and we're gonna bolt up some hardware through that hole that we just popped out to get it started. And we're gonna be using this bolt, a split washer, and the large flat washer. And from here on out, any of the hardware that we put in place, we are gonna put some red Loctite on there. Just gonna make sure long term as we hit bumps going down the road that nothing's gonna loosen up. This should keep it all in place. So we're not gonna tighten this down for now. We're just gonna get this started, get some threads started here to hold that in place. With both of those brackets loosely in place, we're gonna grab our baseplate, and you'll see that there's a slot right here at each end. That's gonna be on the bottom side. That's where we're gonna run that through, and then we're gonna have bolts that pass through the holes. So I have my shoulder bolts ready. You may wanna have those ready on each side. 'Cause as we raise this up, we'll guide it through, and it's kind of tight here. I think just buildup of powder coat. So you may have to kind of give it a little tap there to slide in, and we'll get both sides slid in so it sits flush. There we go. And then we'll grab our shoulder bolts. These are gonna pass through, and then we can align that bracket. So you may have to shift it around a little bit, but we'll be able to get these passed through. And then on the bottom side, I'll put my Loctite, and then we'll put nylon lock nuts. We're still gonna keep this loose, we're just gonna get these in place. With that loosely in place, we're gonna grab those factory bumper beam bolts that we removed previous, and we're gonna put these back in place. And you might have noticed that the kind of core support drops a little bit. So you can see kind of where that metal is. So what I'll do is I'm gonna raise this up slightly to get this centered back up. And then I'm gonna grab. I put the thread lock on our hardware. I'm gonna get all of these in place, and you may have to thread these in first and then come back and raise this up before snugging down, but we do want this to all align. So I'm gonna get all of that hardware fed in there on both sides. So with all of my hardware in place, I am gonna start snugging these now with my 12 millimeter socket. But I am gonna raise up as I do that. And once we're done, I'm gonna make sure that everything's looking nice and even (tool whirring) Now when it comes to tightening down this hardware, it's factory hardware. I don't have a torque setting associated with it. What I like to do on these is I remember roughly about how tight it was to get these popped off, and I'm using a torque wrench to snug these down and get kind of close to that same tension, and then just going through with that torque setting I found. that way it's even across the board. The next thing that we need to do is we're gonna tighten and torque down the bolts that we pass through here, and that should get everything nice and straight. But again, this is a good chance to make sure that everything's level. Make sure that we tighten it up properly. Now to tighten and torque these bolts down, we'll be using a 3/4-inch socket and a 3/4-inch wrench. I'm gonna go. I have a half-inch impact. I'm not gonna get too crazy here because that torque wrench will take care of the final tightening, but this will zip that all up. (tool whirring) And the torque setting on these bolts, you're gonna find in a chart based off of the hardware in your instruction manual, so get your torque wrench dialed in accordingly. We'll go through and get these torque down. Now don't forget to also do the larger bolt on that bracket that we had below. That'll be a 15/16 socket to get that snug. Once we snug that down, we'll come back with a torque wrench, again, checking that chart to make sure we have the proper torque setting. (tool whirring) (torque wrench beeps) Next thing that we need to do is utilize this hole here as another mounting point for hardware that they supply us. So we need to drill that out with a 3/8 drill bit. It's roughly the exact same size as this, we're gonna just go straight through. (tool whirring) Once that's drilled out, put the Loctite on your bolt. We'll pass this through, and then finish it up with an nylon lock nut on the backside. And just as before, we're just gonna tighten and torque this all down. Now, something that you'll need to be careful on the passenger side that you'll probably see pretty quickly is gonna be your washer reservoirs right there. Now there's a good maybe inch and a half, two-inch gap that you shouldn't have any issues, but there is this electrical connector. So just check the backside before you drill this out, make sure we're not making contact with anything and damaging in the process. And something else that I noticed on the other side, it's pretty tight against the frame rail, so I would recommend maybe drilling at a slightly outward angle. That way we can get that hardware on there a little bit easier. And once you have those bolts tightened and torqued down, the next thing we need to do is grab our safety cables and our quick link. And this is gonna be in case of any or all of this hardware failing and that baseplate was to rip forward, this is gonna keep it all attached because we're gonna wrap this and attach it to the baseplate. But wrap it around the frame so that way if this was to pull forward, everything's still gonna stay somewhat attached. So on this side, it's fairly tight here, but I'll get this looped around, and then I'll show you exactly how I routed it. As far as routing the safety cables, I realized that there's two spots, technically, that you could mount these quick links. There's one that's up here and then one that's on this corner. I ended up using this corner one, latching this together. If we follow the cables, this will wrap up, go around the frame, and then come back. So that should keep everything attached. And then I just kind of repeat it on the other side. At this point, with your adaptive cruise control, if you have that, they do give you new hardware to mount that up. So you can absolutely go ahead and do that. As far as our wire loom goes, this has holes in the back of the baseplate to get this snapped in. It's a little off here. I could probably move this clip to get it attached, but I can get the other ones. So I'll pop these in. And we're also left with our ambient air temperature sensor. And this, what we'll do is we're gonna just kinda zip tie this up to where it's gonna be in this spot. Now, you wanna make sure it's not gonna block the ACC. I really don't see that happening just as it's not long enough, but zip tying this up to where it's gonna be kind of in this area should be just fine. So I'll get this zip tied up. So at this point, the baseplate is officially installed. So all that's left to do is trim our fascia to account for all the new openings that we're gonna have. But as I mentioned previous, it's so much easier to get everything mounted up as far as our other components. So just a little breakdown of where you're gonna mount this up, we do have a tab up here for our breakaway switch, which is really nice. Having a baseplate that has mounting spots really makes it to where you don't really have to fabricate nearly as much. So our breakaway switch will go here. Our diode wiring is going to go into these spots here. So I'll start getting everything mounted up. So when we come back, I'll have all of my components on, and then I'll show you how to trim out the fascia so we can get it put back on. So I got all of my components mounted up. Now as far as my diode wiring, I am gonna wait for our fascia to go back on. Sometimes that allows us to get the plug in place without having to cut out a whole section for it. That'll keep it nice and clean. So I do have my wires ready to go as well as my charge line's tucked in here, but that way we can still get our plug attached after the fascia is on. Now, something I'll point out, and I looked at the instruction manual and the finished product on theirs has the breakaway switch down here. I think this bracket was probably flipped down. Now, why ours is this way, I'm not sure. Yours may be different. Yours may be like the one in the instruction manual. So if that's the case, your breakaway switch can go under here, and that's gonna put it in the same plane as the top kind of opening of the grill. So it'll work really well. But ours was up here and it's just gonna be too high without cutting out a huge section of the front fascia, which wasn't gonna be a look that I wanted. So it actually worked out well because we have our ACC bracket. I just bent the tab on our breakaway switch and bolted it up to here. Now, if you have an ACC, you may not be able to pull that off, but you could probably run a self-tapper into the baseplate for your breakaway switch. It's not exactly the best recommendation. But as far as getting it mounted, it would definitely work. Now there's gonna be some trimming required, and that's gonna account for the openings and our safety chain loops, and that's gonna be the minimum that we're gonna be trimming. It's very possible we're gonna have to trim more, but let's first get those sections cut out, see how it fits. So this will kind of require mocking it up and trimming as necessary until we get a nice, clean fit on here, but you can always cut more. So our goal is to make it as clean as possible. So let's go cut out those sections first. So I've marked it out with a paint marker, so I'll notch out this section and this section. So it's gonna leave this whole spot open. So just be careful while cutting. And I'm using an oscillating tool. It really makes for nice clean cuts along edges like this, and we'll be doing that on both sides. So I'll start getting this chopped off. (tool whirring) So as you mock it up, obviously, that's gonna determine where those high spots are that you're gonna have to trim. And I did have to do a decent amount of extra trimming here. So first off, our breakaway switch is just tall enough to where I did have to cut this section. If we did have that mount here, we probably wouldn't have had any issues. But this did go a little bit wide on both sides. So I did end up trimming that. And the same goes for kind of this bracket here. I was having trouble getting this to slide in. So I did cut that. And then when our diode wiring goes in here, again, I had to trim all of this out as well and modify. So, really, just go through those sections and clean 'em up. I don't think there's a perfect way to cut it before putting it on until you actually physically start to put that in place. So with all this trimmed out, we know that it fits. I kinda have it lightly latched on and kind of snapped in. We're ready to put this back on the reverse order that we took it off. Keep in mind though, you do have your electrical connections that we unplug, so make sure you put those in place. But beyond that, once you get everything put back, that's gonna do it for the installation of your Blue Ox baseplate on a 2022 Kia Forte.
Ratings & Reviews

Fit perfectly. Did not have to cut or alter a single bumper panel. Very little modification to hide the brake light and break away connectors.
Fit had to be adjusted drilling out a couple holes. No directions or details on the place for the light plug support or the break away switch.
It was a straight forward installation for me. I am a 75yr old mechanic so I have a lot of experience with this sort of thing. There were no videos but the instructions were good. what I did find very helpful was a video of different brand base plate installed on a 2024 year model that told me where all the fasteners were for the front clip. My truck is a 2025 XL which is slightly easier than XLT or Lariat because it doesn't have adaptive cruise control.
2025 Jeep Grand Cherokee Overland. Good fit. Requires some cutting. Baseplate is heavy, so I paid an installer to do the job.
solid and simple kit for the 2021 GMC Sierra 1500. It really appears that the only reason the entire front trim has to come off is to drill two additional 1/2" holes in the truck frame to allow solid attachment of the base plate. If GM provided these, this kit would be sooo fast to install. :)
I had to slightly modify mounting holes as they did not line up with the vehicle. This is the 7th base plate I have installed on various cars and trucks and by far the most challenging.
Great products from etrailer. The videos were very helpful as I was determined to do the install myself. I’m 72 years old and thought I could do it and I did with the help of my lovely assistant, my wife. The tip on running the taillight wiring through the frame rail was great. The one problem I had was that I was never able to unplug the taillights no matter how hard I tugged on them so I had my wife hold each light while I spliced in the diodes. Very happy with the Blue Ox products and the finished look on my Jeep. Thanks again etrailer.
This Blue Ox Baseplate was easy to install and fit great. etralier sent me a video of my same make and year car showing the baseplate installation. Armed with the knowledge the video provided really made my installation job easy. Quality parts and quality service by etrailer.
An added bonus was that the baseplate and tow bar I ordered arrived in 2 days.
Instructions could have been better but was straight forward and easy to figure out. Had to widen two holes on vehicle a tiny bit to align up with plate. Was shorted two connectors to attach the safety cables to the vehicle and base plate. None mentioned on inventory but two were included. Picture showed using four.
Installation was fairly straightforward. Only thing I would add the video doesn’t mention. The hole that needs to be drilled on passenger side. I put a piece of 1x4 wood between the radiator hose and the frame when I was drilling as the hose is pretty close to the frame and could be damaged if you drill too deep. I also put the bolt heads inside engine bay with the threads sticking to roadside as I felt again to close to radiator hose. I removed washer bottle completely to give easier access.
I wasn’t real happy about how much bumper I had to trim . The activ model has a different bumper c er than the RS. The studs for mounting wiring connector wound up really gut under the tag bracket so that was a win.
The bracket seems heavy duty and well made . Follow directions in the etrailer video. Very simple install. Drilling the hole was the hardest part.
Well designed and solidly built base plate. Very good product support from Etrailer and Blue Ox.
The four 1/2 inch by 1 3/4 inch bolts are category 5 bolts. I had a bag full of identically sized bolts which were category 8. But I did not have any whizz nuts that were category 8 nuts so I stayed with the standard Blue Ox Hardware. We used POR 15 rust preventing paint at every location where we cut the steel or drilled holes. The distance from the center of the attachment tab assembly holes to the ground is 20 inches on our 2025 Wrangler Rubicon JLU with "Xtreme" 35 inch tire package. Easy five stars for Blue Ox and etrailer.
The 2025 Trax license plate frame sits lower than shown in the instructions provided with this kit, to the point where it obstructs access to the 7-way electrical connector. An alternate scheme for mounting the plate will be required if your state requires the front plate to be displayed.
The Blue Ox base plate kit was installed without a hitch on our 2024 Maverick Hybrid. It was a perfect fit! It was installed by Fantasy Truck, a referred installer of etrailer, in Odessa, MO. Brett was very easy to work with and did an excellent job! I highly recommend the Blue Ox baseplate and Brett @ Fantasy Truck!
Fits my 2013 mini cooper non turbo. Does take a few hours to install this Fit was good. The hardest part is removing the front bumper and reinstalling it. You do have to cut the lower bumper grill in three places take your time locating the exact spots for cuts. I have pulled Mini Cooper about seven thousand miles now with this Blue Ox and has worked great
The safety Cable installation left a little to be desired. I'm not sure if I installed it as designed. The cables we're really long enough to go aroiund the frame rails on our Jeep, under the Radiator mount, Aluminum Frame, I was only able to go around the Raditor mount on both sides. Didn't really seam like it was the right way, but I suspect it's only for if something comes loose that there isn't a catastrophic breakaway.
I was given a Blue Ox Tow Bar and needed Base Plates for my Ford F150. In my online search, E-Trailer had the best price, so I ordered them. Delivery was a few days earlier than expected. I read the installation instructions and it sounded fairly simple to install, so I decided to tackle it myself. I began it about six pm and had the job completed and cleaned up in just over two hours. The job required removal of the bumper and tow hooks and drilling of two holes. Also William at E-trailer was of great help in the correct parts and keeping me informed of the delivery.
After installing over 500 baseplates on various vehicles, this one was probably the toughest one . It had the off road package on it . But it fit great after I had to remove a lot that had been bolted up for 27yrs.
Tried to install this baseplate. It was a challenge to say the least. It did not fit the frame of my Jeep YJ without making modifications to the mounting plates on the driver side. I had to use a cut off wheel and remove 3/16 of an inch from the driver side spacer (which is too long. See pictures) in order to get it to clear the frame. Also, instructions say to drill an additional 1/2 inch hole in the frame for a third mounting bolt. BUT....the internal frame construction doesn't allow the nut on a stick to pass under the existing reinforcements for the bolts that mount the steering gear to the frame. Nut is way too thick to pass under the internal tubing in the frame from manufacturer (AMC).
This was instilled on a 2024 Chevrolet Colorado Z71 truck. I watched your video online with this exact model truck and the words I remember most was “and we did not have to do any trimming”. Well my truck was certainly different than what was on video. Guess it’s because it’s a late build 2024 (end of September 2024) and the grill system was maybe what would appear on the 2025 models? There was lots of trimming involved. I also will tell you the mounting holes both for the frame and the bumper back plate did not line up and required some modifications to fit. I would like to say this job is not for the faint of heart. I luckily have a mechanical/machinist background so was able to get the job done. Have not tested it yet but will be soon. Good luck to those of you who are planning on installing it yourself. Just remember it can be done. Just take your time.
Items arrived in 2 days, free shipping. All appeared in new undamaged condition.
The Blue Ox base plate for my 2015 Kia Soul is well manufactured and, with a little bit of mechanical skill, easy to install. It fit perfectly without issues. Brad from etrailer provides a step-by-step installation video that is outstanding and nicely guides through the process from beginning to end. I highly recommend this Blue Ox base plate from etrailer.
Well the blue ox base plate actually fits my turbo engine. The Curt didn't fit as advertised.
Super high quality baseplate for towing by Blue Ox. Instructions, videos, shipping (one day!) and overall experience was awesome. A bit pricey but their quality and the additional support by E Trailer cannot be beat! BTW (E Trailer) the baseplate fits three different Jeep configurations but did not call out the Recon package. After looking at other brands which showed there's to fit the 3 variations AND the Recon, I figured it would fit and it DID. You should definitely upgrade to include the Recon Edition.
lways great to shop at etrailer, especially the tech experts. Royce did an awesome job with our order. Everything fit perfectly and the help video provided the guidance I needed.
We installed the baseplate on our 2023 Encore GX AWD as well as the light harness and breakaway switch. A couple of items were incorrect but Royce corrected the issues with no problems.
Thanks again etrailer!
2019 Ford Ranger baseplate worked and fitted fine for me. 73 yrs old took me a couple hours but took many breaks. Younger could do it less than hour I'm sure.
Also works fine with my Blue Ox tow bar.
Info for this part was:
At etrailer we provide the best information available about the products we sell. We take the quality of our information seriously so that you can get the right part the first time. Let us know if anything is missing or if you have any questions.














Thank you! Your comment has been submitted successfully. You should be able to view your question/comment here within a few days.
Error submitting comment. Please try again momentarily.