
To see if this custom-fit item will work for you please tell us what vehicle you'll use it with.
Thank you! Your comment has been submitted successfully. You should be able to view your question/comment here within a few days.
Error submitting comment. Please try again momentarily.


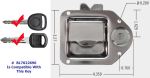
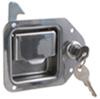
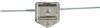
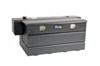
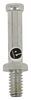
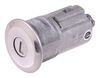
This retrofit latch kit for your toolbox has a lock that codes to your ignition key. Corrosion-resistant lock is made of automotive-grade materials and is nearly impossible to pick or bump.
Features:
Note: BOLT locks permanently code to only 1 vehicle. They cannot be re-coded or re-keyed.
Are you tired of carrying a bulky ring of keys - for your hitch lock and coupler lock, your pickup cover or trailer door, and all the various padlocks securing your equipment? Tired of fumbling for the right key or having to replace a lost key?
BOLT (Breakthrough One-key Lock Technology) has solved that problem by designing a line of locks that can operate with a key you already have handy - your vehicle ignition key.
When you insert your own key into the cylinder, spring-loaded plate tumblers move up and down until they are matched exactly to that key. The first time the key is rotated, the cylinder is uniquely coded to that key. When the key is removed, the cylinder moves into the locked position. When the key is turned again, it will rotate to the unlocked position.
BOLT is particularly useful in commercial applications. Imagine being able to send a crew without having to sign out multiple keys for a work truck, trailer, hitch pins, and equipment locks. With BOLT, the vehicle key becomes a master key. It opens all those locks and you no longer have the hassle of getting to a work site only to find that you've brought the wrong keys.

Videos are provided as a guide only. Refer to manufacturer installation instructions and specs for complete information.
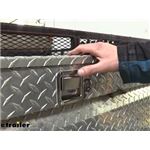
Hi there truck and trailer owners, today we're going to be taking a look at Bolt's Replacement Toolbox Latch Assembly. This is going to be a replacement latch and Lock Retrofit Kit for your truck or trailer toolbox. And what's cool about these is that the bolt, which is breakthrough one key lock technology will allow you to use your existing vehicles key and code it to match the lock mechanism here on the latch. And you do want to make sure you purchase the appropriate latch for your particular vehicle, as the assemblies here for the lock mechanism is specific to certain types of keys depending on the manufacturer. We have these available for your domestic manufacturers as well as Nissan and Toyota.So we just replaced this one and our customer's got a GM key and we coded it and we can see here it's in the lock position. I can't pull off on the mechanism.
We took our customer's key for his vehicle and we're able to unlock it and open it back up. So, we can easily lock this up, head over to our car, lock up the doors, get in, and drive away, whatever we need to do all with one key. This replacement latch assembly is great for a damaged latch on your toolbox, or maybe you just purchased this truck and the toolbox that they had in there has a different key. Maybe you didn't get those keys and you want everything to match your truck. You could easily put the retrofit kit in, and then you can now use your single key for your vehicle to operate your toolbox.
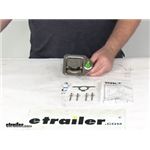
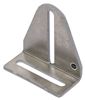
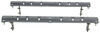
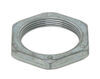
Or again, you can get an old broken one back up and running again.And then we can take a look at the latch mechanism here. This one is designed for a dual latch setup, as well as a single. If you're just putting it in for a single, you've got your latch mechanism here, but you can see it's got the accommodations here at the bottom for a rod mechanism, which would run over to a dual latch setup. The assembly is going to be weatherproofed. So you don't have to worry about moisture getting in and damaging any of our components.
And it has a stainless steel finish on it. So it'll have a nice look for many years to come. You can see here, the lock mechanism, how it operates, that's unlocked, and this is locked. You can see how it goes down and it prevents you from lifting up the lever when you unlock it. There's nothing to interrupt the operation of the latch mechanism.Now, when you're choosing a latch mechanism, you do need to keep in mind that even though you've got the appropriate make for your key, that depending on the year of your vehicle and stuff, the keys may or may not be compatible with the latch.
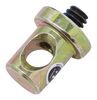
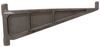
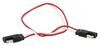
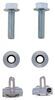
So I highly recommend on the product page for the latch you're about to purchase, to just scroll down below the description. And you'll find a compatibility chart there that has the proper models and years that are compatible with this latch.You can see our old latch here, the locking mechanism has been damaged. It looks what likely had happened is that he had locked it and then corrosion and everything else set in. And he probably had to bust into it to get into his toolbox. So, we're going to be replacing the whole mechanism here to fix it. There are rivets that hold it in, and there's also a rod on the backside that connects to the back of the latch. It'll be easier to disconnect the rod first from the backside where the latch is still solid. There's a cover here that runs along the back, we're going to remove all the screws. I think there's about five on this particular one.There are self-tappers. And sometimes when you're unscrewing the last little bit, you got to just kind of pull out with it. Now, with all the screws removed, we're just going to take the cover off and set it aside. And you can see the rod mechanism here on the back. This here is just going to push off of there. It's a little tight just because it's been rusted on there for a while. So you may need to use a screwdriver because it is kind of a metal tab and it's going to push down and rotate all the way. And once you get it push down, then the rod will actually just pull out of there. You got to get it down just enough to where your rod is going to clear the little tangs there. And then it'll just pop out.So if the rod's loose, we can get the whole assembly out of there. We're going to drill out the four rivets using a three-sixteenths drill bit. So That's how we got them all drilled out. We'll just pull our assembly out. And then if there's any rivet material left, we'll want to get that out of there. You can either continue drilling it, or in a lot of cases, you can grow a pair of pliers and just pull them out of there. Sometimes you can do it by hand. We can have to go ahead and take our latch mechanism and we're going to go ahead and code the key. To do that we're going to remove the lock from the mechanism. So just undo the nut on the backside there. And then we can slide the whole unit out once you've got it unthreaded.And now we're going to grab the key that we're going to be coding it to. This is a spare key for the customer's truck. So it matches the exact key for his ignition cylinder. This is the one that you want to insert in here. This is going to code automatically. So you see to the sticker on there it tells you not to put anything in it until you've got the key that you want it to be coded to. So we're going to code it to this one. This way, it'll match all of his ignition keys. Just going to peel that cover off of there. And we want to have the drain hole at the bottom, and that's right there. We're going to insert the key into the lock mechanism. We're going to turn it and we're going to turn it back, turn it again, turn it back, turn it again, then we're going to leave it in the locked position. And it's now ready to reinserted back into our latch.Now we can go ahead and start inserting our latch. Now, when you took your old latch off, if you can get the gasket off it, you just want to move your gasket over to your new latch. Our gasket was destroyed and it had been deteriorated. Most of it here was stuck on and we cleaned that off. So we're going to be using butyl tape to seal it up. And I find it easier on this particular one to do it on the trailer side. So we're just going to peel off the backing hip 00:06:25 already ripped off some strips around the size that I want. And we can use part of the dirt pattern from the old one to help us determine where to place the butyl tape. And then we can wrap this around the backside. You can get butyl tape here at Etrailer. And when we're putting this on, we want to make sure we're covering up the screw holes or the rivet holes there. So that way it seals up all the way around those as well.So we got our butyl tape on. We're going to take the lock mechanism. We're just going to slide it up into position. We can then take our rivet gun, use the included rivets to put our latch into place. If you need a gun, you can pick one up here at Etrailer. Sometimes you have to pull the lever a couple of times to get the rivet to snap into place. We'll then just repeat this for the three remaining holes. We'll now take our lock mechanism. We're going to slide it in with that drain facing the bottom. Then we're going to slide our spacer on, and follow that up with the nut. Then we can just snug it up with our pliers to ensure that it's all the way tightened.We can then slide on our lock arm and secure it with the included clip. You can push it on there, but in most cases to get it all the way on, you're likely going to need a screwdriver to finish pushing it in the last little bit. And there we go. If you use butyl tape, you may have some excess squished here on the sides, you can just take your razor knife to trim that off. We can now slide our small clip back into place for our rod. We're going to line it up with that hole, take the rod, slide it through the clip and your latch. Depending on how corroded your old rod is, it may be tight fit, so you might have to tap it in there. And now we've got that in our latch replacement is complete. If your original latch didn't have a rod connected to it to begin with, then you won't need to connect one, when going back together.Now at this point, the replacement of our latch is complete. One of the things you want to check though is your striker, because this one while it is a direct replacement for our existing latch, the mechanism here is not compatible with the striker that is on the lid. We're going to be replacing the striker as well, so that way it's going to be compatible with our new latch. If you have the same issue, you can get the striker here at Etrailer, and we're going to show you how to install that. Now, figure out how far your latch goes in and then transfer that measurement here up on the top. Just so we know how far and we can just set the striker. So we're going to go ahead and make our marks where we're going to be putting it. Probably go ahead and remove the old striker, it's held on with self-tappers on this one. So we're going to be reusing this hardware since our new one doesn't come with any. So if you can, I recommend reusing your old hardware.So I've gone ahead and marked it. We're going to be putting it there, but you also want to take your striker pin and just make sure too that when this is inserted, it's not going to interfere with anything, it's going to hit. It looks like we're going to be fine here, it's going to sit inside the lid. We're not going to hit on the lip or anything like that. So we're good to go there. So now we're going to run the striker bracket in with the recent, that old hardware. And then since this is slotted, I'm going to make it so we can slide it a little bit back and forth. I'm going to give myself a gap on the other side, so you can adjust with our new striker.Now you can pull it down and see, and then you can adjust it as necessary and retighten back down. And here we can see it's going to line up with our striker and everything should work out the way we need it to. So we can go ahead and insert the striker pin now, and then install that. Now your striker pin does not come with the nut, you are going to have to provide that. You can get that at your local hardware store. This is a quarter inch 20 thread. So we're just going to put that on there and then we'll tighten it down. When you use a 10 millimeter for the pin and 11 for the nut. So now we've got our pin in there. We're going to go ahead and snug it up just a little bit to where we can still move it around. So it's a little bit too snug, so I'm going to loosen it just a tiny bit. And then with a little bit loose, we can adjust the distance that we need it to be.So we're going to go ahead and just bring it down to get an idea, we push it up and it sits pretty close to about the point we want to be. If we look at the gap that we have left versus the distance, the pin needs to go until it goes underneath the latch. I'm just going to hold it right there in this position, so we know where it goes. It's not a bad idea to just make a mark here, because you may need to make some subtle adjustments to this later. So we're just going to put a little mark on the side of our pin and then a mark there, so we know where they lined up. And then we'll tighten it down. We'll test the fit. And if we need to make some subtle adjustments, we can move it up or down as necessary.We'll just check our fit and it looks like we are latched into place. So now I just want to make any subtle adjustments as necessary. We went ahead and made it just a little bit tighter to eliminate any gap, to make it nice. And we can see that it stands up nice and smooth, it closes nice and smooth. And if we lock it, we can't open it with either handle. Now, if you had any covers or panels you had to remove to access components for releasing your latch, go ahead and reinstall those now. And that completes our look at Bolt Replacement Toolbox Latch Assembly.
Average Customer Rating: 3.5 out of 5 stars (2 Customer Reviews)
This retrofit latch kit for your toolbox has a lock that codes to your ignition key. Corrosion-resistant lock is made of automotive-grade materials and is nearly impossible to pick or bump.
The lock portion works great! However the actual latch and handle mechanism gave out after about six months of owning. It was a great product as far as accepting my key, it unlocked every time. The handle mechanism just isn’t that strong though.
this handle was very easy to replace. Works well.
Info for this part was:
At etrailer.com we provide the best information available about the products we sell. We take the quality of our information seriously so that you can get the right part the first time. Let us know if anything is missing or if you have any questions.


Sierra K.
11/29/2021
This product has a limited lifetime warranty. Customer Service will reach out to you.