
 Product Experts Available Now!
Call 1-800-940-8924


To see if this custom-fit item will work for you please tell us what vehicle you'll use it with.


Thank you! Your comment has been submitted successfully. You should be able to view your question/comment here within a few days.
Error submitting comment. Please try again momentarily.
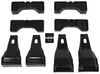
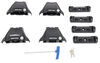
This custom fit kit lets you mount 4 Rhino-Rack 2500 legs to your vehicle with a naked roof. Clamps mount to legs with bolts. Includes 4 clamps and 4 pads.
Features:
Specs:

Videos are provided as a guide only. Refer to manufacturer installation instructions and specs for complete information.
Today on our 2013 Volkswagen Jetta, we're doing a test fit of the Rhino-Rack Vortex Aero Crossbars. The part number for our crossbars today is RRVA118B-2. For our Foot Pack, we're using RRRLKVA, and the Fit Kit for the Volkswagen, we're using DK306. We already have our front bar on and loaded up. We're going to show you how we put the last foot pack together, and then we'll show you how we load up the back crossbar. The first things we'll do is take this bolt, here, on our Foot Pack, and loosen that up. We'll then place on our clamp, and we'll tighten that bolt back down just enough so that it holds the clamp in place, and that it's not going to fall off. Then we can flip the Foot Pack over.
We're going to pull off this plastic piece on the bottom, and we'll take our rubber foot. We're just going to close all the seams on here. In the instructions it will go into more detail, but they want both of the arrows on the rubber piece and on the plastic piece of the foot to face out whenever you have it on your Foot Pack, so you're going to face it towards the clamp right there. We can take our Foot Pack and we'll fit that onto our crossbars. We're just going to line up that nut and slide it in. Our measurement for the inside strip here is going to be 18 cm. We'll mark that and adjust out Foot Pack.
We'll then take our tool and tighten down this bolt here, at the bottom. Double check this before we load it up here on our car. We can open up our vehicle doors, and we can load up our crossbar. We're going to take the crossbar, and the side that I did is going to be on the passenger side. Again, that'll go into more detail in the instructions about how to know which Foot Pack goes to each side. I'll just readjust those.
The clamps are going to sit right up under here. They won't be tight yet, until we start tightening down that bolt. Your foot packs should sit with that rubber piece right up against that edge there. We can take our flat tape, and we're going to measure from the center of the front Foot Pack to the center of the back, and we're going to have 70 cm between the two. If you ever have your clamp get stuck like that, you can just lift it up and it'll readjust there. From the center of the front to the center of the back.
With that side even, we'll check the other side. A good thing to remember is that anything you do to one side you want to do to the other, so we'll measure one side, and we want to make sure the other side is even as well. Double check that our Foot Pack is sitting right, and then we can start tightening that down. How I like to start tightening it down is, I'll tighten the clamp all the way up against the door frame, like this, and then I'll go back and forth, doing about five to ten turns on each side, until it's completely tight and secure on my vehicle. Doing it back and forth like this is, again, just going to keep it even, and make sure that we're tightening it down the right way. It's also going to prevent our crossbars from pulling to one side or the other. If I tighten this side down too much, it's going to pull that Foot Pack this way, and it's going to completely mess up our crossbar, and you won't be able to use it, or put any of your accessories on there. We want that to be extremely tight, but not too tight so that it damages your vehicle. We just want it tight enough that if we mount any accessories on there, they're not going to fly up or fall off or sit lopsided on your vehicle. With both of those sides tight, I'll take my End Cap for my crossbars on this side. I'm just going to fit that in there, and then we also have a tool that comes with it, and that's just going to lock up that end cap, and keep anything on your roof rack system secure. If you have any T Track mounted accessories, you're not going to have any problem with theft or tampering, because that is going to secure them on there. We'll take our end cap cover, or foot pack cover, and secure that down in place, and that's going to secure your crossbars to your vehicle. That's going to complete our look at the Rhino-Rack Vortex Aero Crossbars, and how they fit on our 2013 Volkswagen Jetta.
Ratings & Reviews




Kate F.
7/21/2026
Glad we could deliver the right fit for you Ellen! What body of water do you like to take your canoe out on? If you are feeling really adventuress, we have the MR340 here in Missouri. It is a 340 mile paddle from Kansas City, MO to ST Charles every summer.
Kate F.
5/6/2026
Install looks great Raymond! Great work with making your own deflector as well. Glad we had the right parts for transporting your ladders =)

Pete

6/28/2025
After a year, holding up strong. I carry 13 foot aluminum foldout ladders.

Brooke M.
5/20/2025
You aren't the only ones who have just jumped in without reading first. That's basically a way of life for me, too. Ready, fire, aim, haha! So glad you got it done and now have that much more room for storage! Where will you be headed in July??

Do you have a question about this Accessories and Part?
Info for this part was:
At etrailer we provide the best information available about the products we sell. We take the quality of our information seriously so that you can get the right part the first time. Let us know if anything is missing or if you have any questions.





















Lazer S.
3/24/2026
Glad we had what you were looking for, Keith! I will let Alex know everything fit as well! Where you headed for your road trip?