
Summer Starts Here - Save up to 70%
To see if this custom-fit item will work for you please tell us what vehicle you'll use it with.
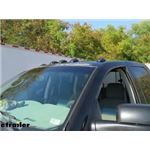
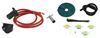
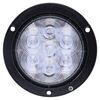
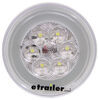
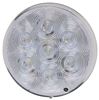
Designed to look like the factory lights on 2003-2017 Dodge trucks, these roof lights make your Dodge Ram Pickup more visible to traffic and give it a big rig look. Amber lights come with incandescent and LED bulbs. Wiring and hardware included.
Features:
Specs:
Installation
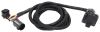
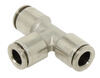
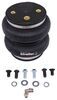
These truck cab lights come with everything you need for an easy installation. The illustrated instructions include a handy template that you can use to drill holes for mounting the lights. And the wiring diagram walks you through every step to make sure everything operates as it should. The light bases conform to both flat and curved surfaces for a tight fit.

California residents: click here
Videos are provided as a guide only. Refer to manufacturer installation instructions and specs for complete information.
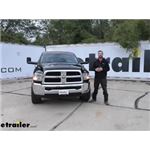
Hi there, Ram owners. Today on your 2007 Ram 3500, we're going to be taking a look at and showing you how to install Pacer Performance's Hi-Five LED truck cab lights. They're going to give it an almost factory appearance, but I like it even better due to the smoked lenses that we have. They have amber LED bulbs inside each one. It also comes with incandescent bulbs if you wanted to use them, but LEDs are significantly brighter than your incandescents. And they also last about 50 times as long.
They also draw less power, which is great, especially since we're adding these in line with our running lights circuit. Because with it drawing less power, it means we don't have to worry about any over-amperage causing some issues with our truck, because LEDs draw almost no amperage in comparison with an incandescent.These lights are also going to improve the visibility that you have at night. So people around you will know where you're at at all times. And it also just adds that rugged large truck look, especially on our lifted truck here. If you've got a lifted truck, this really is the topper that makes it look like it's just even that much bigger and beefier, especially at night when this thing's behind you and all you see is the headlights and the lights on top.
You're going to think, "Man, is that a. What is coming up behind me It must be huge."Included with your kit, you're going to receive your five lights. The assemblies have gaskets that go underneath each of them to keep it sealed, so no moisture can enter inside of the cab. You'll receive all of your mounting hardware as well as all of your lights. And what's cool about this kit is you get that double kit.
So if you want to look old school, you do get the incandescents, but if you want to have a more modern type look that's you can't really tell too much different. There is a slight different in the incandescents because they are brighter. So that dimmer bulb, the incandescent, has that retro look where, the brighter LED bulbs give you a little bit more modern look.With all of the hardware that you get, you got everything you need there to install. You'll also receive wiring and quick splices, so you can easily connect all these lights together and run it down to whatever power source you like, whether it be tapping into your running lights circuit, so that way they come on when you turn your lights on, or if you want to use the included switch, that you can install and hook directly to your battery with an inline fuse. The fuse does come included with them.
So that way you can just have them where you can turn it on and off whenever you'd like.We'll begin our installation by just taking the cab lights out of the package and just setting them up on the roof. We need to get an idea of where we want our lights to position. I'm going to be setting it up in an orientation like this where the three in the center are slightly closer together than the two on the outside. And we're going to hop up there, and I'll show you how I've determined that position, as well, to make sure everything's evenly spaced.So here we got another angle with our lights laid out. And the way I got it up here, you can see I've got a piece of measuring tape, and I just use some painter's tape to tape that across the top, so that way I know the distance from side to side. So I know where center is, so that way I could mark center and get the center light marked. And I also, once I found the center, I then measured eight inches back from the front because that's where I want these lights to be is eight inches back. Now, this roof does have an angle as it contours to your windshield.So now that I got center for this one, I went at each light where I wanted it positioned, and I went ahead and spaced these eight inches apart from the center one. And on these outside ones, I went four inches in from the outside. But then I also went here to the front and I measured eight inches back to each light. The ones on the outside, I measured nine inches back to space it just a little further back to give it a more contoured look.So now that we've got those laid out, we will be using the gaskets as a template to drill out the holes. But before we drill any holes, we need to go on the inside because we just don't want to start drilling straight down. Our headliner's there. We might have some wire and other components underneath, and we don't want to damage anything. So we're going to head inside now and just take a look underneath to make sure that we've got everything cleared out of the way.So now we're inside the cab. And across the top here, we've got some stuff in the way. We're going to drop the headliner down a bit to make sure that we can ensure everything is clear, and see on the inside, and so we can get everything mounted up properly. We're going to remove our center console here. And these have screws underneath the plates here where your lights are. To get these off, we're just going to use a small flat-bladed screwdriver, and we're going to come in from the side, kind of towards the front. If you look, you'll almost see a small bump sticking out on each side. And that's where we want to be. We're just going to go in right there on the side, and we're just going to pry it down. And then we can usually just pull it off of the other one. But if you want to, you can also stick your screwdriver on that side to help pry it off. You can see the little ears there where that went up onto.We're going to do the same thing over here on this side to remove this one. And if we look up in the hole right here, you're going to have a Torx screw. We also have one on the other side. We're going to be removing those. And that is going to use a T20 Torx bit. So we're just going to take both of those screws out. And that's going to allow us to drop this down. We don't want to pull it down all the way just yet. You want to check to make sure, because sometimes there can be additional hardware or pushpins. And it looks like towards the very front there we do just have some, they're just pushpins that hold it in. So we're just going to make sure we grab it near where those are, and then we can pull straight down, and that'll get those released.And then just to get this guy from hanging in our way, we're just going to disconnect all the electrical connectors. So this one, the little release tab's on the inside. My finger's a little too fat to get underneath there. So we can use our little bladed screwdriver here to assist us with that. So we're just going to push up on the release tab there, and then pull out on the connector. Can be a little tricky because they did put the release on the bottom. And another thing you can also do is you can use the wires to your advantage, and. like that to help on those difficult connectors. Just don't apply too much pressure to anything.Now this connector here, this one you're going to have to reach your hand in. It's also on the bottom side, but you should be able to get your finger in there and pressed on it. And then you can pull this guy out as well. And again, if you can't quite get it, you can always use those wires to your advantage. Again, we're going to use our screwdriver and try doing it like this. Got it released. And then we can just set this guy aside.So now we're going to move on to our visors, and we're going to get those guys out of the way so we can better see. So to remove the visors, you're going to first flip them down, pop that guy out, and then give yourself some more room. These actually just slide off to the side. And then there's three access holes here for your visor. We're going to go ahead and just turn this guy out of our way here. And this one is also going to use Torx bits, same T20. So we're just going to remove those three. May have to angle it differently to get to the next screw hole. And once you remove the last screw, this guy will drop down. But you want to be careful because there is a wire to it as there are lights that go to it. So we're just going to turn it right here for now, and just set it like that. So it's resting on our dash. We'll then remove the one on the other side by removing the same three screws on that side.Now we're going to remove our A-pillars here. We're not going to completely remove them, just enough to where you can get it popped out so we can move the headliner out of the way. There's two covers, here and here. We're going to pop those covers out. Once again, use our little flat-bladed screwdriver. Just get up in there and pop that guy right out of there. It doesn't come all the way, its get the little tether there. And down inside of there, you're going to have a bolt head, and we're going to go ahead and remove these bolts with a 10-millimeter socket. May have to get a ratchet for the other one here due to the steering wheel. Or you may be able to adjust your tilt out of the way to get your tool in there.So once you got the screws removed, we can just take your finger and you can peel back on the weatherstripping a little bit. And then we can just pull that guy right out like that. Sometimes it comes all the way off. Sometimes there's a tether that's in here. Particularly if you have airbags in the A-pillar, there's going to be a tether on this and it's not going to come completely out. It's going to only come back so far, and that tether's going to hold it. But since we don't have any air bags right here in this location, we don't have that issue. So we're going to remove the one on the other side the same way.Back onto our visors. We have the clips here. These are also going to need to come down for the headliner to come down. To remove these, we're going to grab the section here that's towards the front of the vehicle, and we're just going to pull down on it. And sometimes it can be a little stiff. If that's the case, you can use your screwdriver to get between the gap to help you pop it down. But it does just pull downward to release. And once you pull that down, the whole thing can just pop out of there at that point. So we're going to do the same thing over here on the other side. That one popped down considerably easier. And then the whole thing just pops down out of there. Sometimes it's a little bit better if you go back behind it like that, to help it from behind with the headliner. And then we can get it the rest of the way out of there.But at this point now, our headliner is loose here in the front. So that way we can look up in there, and we can access with our hand to get to any of the bulbs that we're going to be routing, the wiring we're going to be routing, and everything else.So now that we've got our headliner out of the way and stuff, I went ahead and just peeked under there and made sure there wasn't anything that we we're going to hit or damage, and any components. We're all clear, and our headliner, if we can pull it down, and that little bit of leeway, too, is going to also help us when we go to drill down in case we accidentally go a little bit too far. Since our headliner can push down now, there's a higher probability that we're not going to just drill through the headliner. It'll just push down. We do still want to be very careful when drilling through it to not go too far down though, because we don't want to push our luck.So now that we've got our lights in their position, I went ahead and marked all the way around them. You don't need to, but that's just to help make sure in case it does move, I can line it back up again to the same spot. We'll then use a center punch to mark our holes, where they're going to mount. And you don't really need to push that hard with your center punch. You really don't even need to use a hammer or anything like that because we can easily see where the dimple is, where we had made our marks there. So since we can see it. I know it's a little hard to see on camera, but you can easily see it in the paint once we've stabbed it with our little center punch there.So now that we've got those marked out, we can go ahead and drill that with a 1/8 drill bit. And it's not a bad idea, too, to just double check with your gasket and make sure that those also line up right over top of the marks that you just punched in there. And they are going to line up over the marks that we just made. So that's good. Because these are going to go on first. I didn't have those on there when we we're lining them up just to make sure the light was going to sit flush due to the contours of the roof. I wanted to make sure it was in a spot where it was going to be as flush as possible.So now we're just going to take our drill, put it where we've made our mark, and just carefully drill through it. So we got through the first layer. Now we got to get through the second. And there we go. We're through. So we're just going to repeat that with our other hole. And then we're going to go down and do that for all the remaining lights.So I've got the gasket set up on the holes that we had just drilled out here. And if we look at the bottom of our light, we can see this is where the bulb would go for the light there. And that's going to line up with this opening in our gasket. So we're going to be using this opening here just as a template to drill out another 1/8" hole. And you could actually even drill out a little bit wider. Here we have the wiring for your lights, and you can see here that it doesn't need to be very thick. Our positive wire's going to pass down through. And our other wire here is actually just going to ground to one of the screw holes.So I've decided I want to put the ring terminal on the inside when we go to screw it down. So we're going to go ahead and enlarge our wiring hole to 1/4". So that way we can pass both the wires through.So now we're going to go ahead and clean up our mess that we had made here, because we're ready to start installing them. So if you've got an air compressor, you can blow off any of the debris. We're going to use our vacuum to suck it all up. And then we're going to clean off any of the marks that we'd made with our paint stick, and get all of this stuff out of the way so we can start mounting it.Included in your kit, you're going to receive both LED and incandescent bulbs. I recommend the LEDs because they're going to last significantly longer, and they're going to be quite a bit brighter. The issue with the LEDs is that they're not marked, and LEDs are directional. They only can be powered up if power's on the correct side and ground is on the correct side. Incandescents, you can put them in, you can put them in backwards. It doesn't matter. They're always going to work. As long as they have power and ground, they don't really care about the direction that the current is flowing. So we need to test this out to determine which way is which since they're not marked. So you can use the battery if you pop the hood on your truck, and then just check it that way.We're going to use our jump box, just because it's a little easier with the leads here. So we're just going to strip back our positive side. And then we're just going to clip the positive side here on one side. We're going to go ahead and hook the negative side here onto the negative side. And we're going to turn our jump box on. Our light did not illuminate, which tells me that the bulb is in there backwards. So we're just going to pull the bulb out. We're going to flip it around to the other side. We're going to plug it back in. And there she is.So now that we know that this is the positive side over here, I'm just going to go ahead and put a little dot on it, blacked out for positive. And we're just going to repeat this test with the remaining bulbs and mark those. There is a small little hole on top, so it's possible that they may all use that hole as a marker, but there's no indications in your instructions. So we're just going to put them in one at a time and make our own marking, so that way we can ensure we don't get it wrong. Because if we get it wrong, we'll have to take it back apart, and then just turn that bulb around. That's a lot of unnecessary work. And we're just going to do this for all the remaining bulbs.So now we can start getting our lights mounted up. We're going to take our harnesses here. We already tested our bulbs, so we're going to make sure we put that positive side on our positive wire, which is our red wire. The bulb then installs here in the back slot. So just line up the plus shape and then give it a little twist to lock it in. We can then take our gasket. We're going to feed it around our wiring. And then we're going to take our screws now. Our screws here, you can see, we put the small rubber gaskets that come included with it on each of our screws. We're then going to slide the screws down from the top, line up our ring terminal here. And we're going to feed our wire down through our hole. And then we're going to make sure that that ring terminal stays on your screw. Line it up with the hole towards the rear. And then I like to just get a couple turns on it, just to make sure that it's going to stay in there.We can then just twist our light until it lines up with our other hole, drop our screw down in, and then secure them. And I like to push down a little bit when I'm securing on these, because we don't want to screw these down too tight because it's just real thin sheet metal for our roof, and you can easily strip out the sheet metal. So I just keep a little bit of pressure on it and get them until they're snug. And that way our gasket will have good compression. It's going to keep out moisture, and we're not going to stress our sheet metal too much. We're then just going to repeat that for the remaining four lights.So now we're going to take the wires that we passed down through the roof and the extra red wire that comes in our kit to jumper all of these wires together. So that way all of our positive wires are connected to a single one. I'm just running this long wire across our roof, starting on the passenger side, heading towards the driver's side. This is the quick splices that you get in your kit. We're just going to take the wires we passed down through our roof, we're going to push it into one of those slots. And the wire that we're running across our roof, we're just going to take that and push that into the other slot just like that.And then we can just take the cover here, flip it over, and then just give it a nice squeeze until it stays shut. You can use a pair of pliers if you want, but you should be able to do these by hand. Right there. And we're just going to continue on, moving on from light fixture to light fixture and all the way down until we get to the one closest to the driver's side. And we chose to have the driver's side be over there because we wanted to make our connection for our wiring, because we're not going to use the switch that comes included with it. We're going to hook it right into the running lights circuit. So whenever the running lights turn on, these are going to turn on.Now that we've got all the quick splices hooked up, on the other end of your red wire, you've got a spade terminal here. We're just going to touch this to the battery positive post underneath the hood here. And that should illuminate our lights. Because before we go putting the headline and everything back together, it's a good idea to make sure they all work. Otherwise you've got a lot of work ahead of you to take stuff back apart. So I'm just holding it onto the battery positive here. And if we look up on top, we can see that all five lights light up. If I take it off, they go off. On, off, on, off. So just check to make sure. If you've got any issues where one doesn't light up, double check that bulb to make sure you've got it inserted properly. If it's LED, you could have it backwards. And check your quick splices. Quick splice, if you don't got them squeezed just right, it's possible that they're not making good contact with the wire.So now that we've got our wire hooked up, we know it all works. We're going to need to now power it up. Now you do get a switch that comes in your kit. I just pulled out this little spot here to see if it would go there. The thing is, is that nobody really wants to have to turn these lights on and off every time you want to use them. Most people just want this to work all the time. When their lights come on at night, they want these to come on. So that's how we're going to be wiring it.The easiest way to do that, since this doesn't have automatic lights, they have to physically turn their lights on. We can actually tap right onto this switch here and use that to power our lights. This panel comes off the side right here. So we're just going to use our screwdriver just to get it started so I can get my fingers back there. Sometimes you can grab it right there, work your hands around. And this just pulls straight out. It is pretty stiff. Just work your way around until you get it off of there. And we can then just reach right in, and we can reach the harness here.So then you needed to determine what the correct wire is that we want to tap into. So we're going to just take our test light here, and we're going to just splice them. I normally don't like to poke wires like this, but since this is inside the vehicle, we really don't have to worry about moisture and corrosion getting into the little poke that we made. So if we poke our wire, we're just going to test them one at a time to see which ones light up our light when we turn the lights on. And this is our boy right here. So this is an orange wire with a black stripe.Now the only thing unfortunate about this is that there are two orange wires with black stripes. So we're going to go ahead and test the other orange wire with black stripe, just to make sure that we're not going to have something that's going to be an issue if we tap into there. So we're going to test the other orange wire with black stripe. And we get nothing from this one. So you will need to determine the correct orange wire with black stripe. This is the way you would want to do it. Just test it. Turn your lights on. This is ground right here for your little clip. And if your light lights up, that's going to be the one you want.So now that we've identified our wire here, we're going to tap into it. We're just going to use quick splices, like we did before. I'm going to go ahead and take this and just get it down here in the relative location that I want it to be. And we're going to cut off some of this excess. So we're just. There we go. Put that over there. And one of the other ways you could wire this up, you could wire it up onto your switch to where you go through the switch and then get power from here. So if you have it in the on position, every time you turn your lights on, it just automatically comes on. And then you could use this if you wanted to work at as a kill switch to turn it off. But we want to make sure that our customer's lights come on when he turns his lights on. So we're just going to be omitting the switch.So we're just going to take our quick splice then. We're going to push the wire that we had just trimmed into one side, take the wire that we tested, slide it in the little groove, push it down. And this is just like the wires that we we're connecting up top. There's no difference between these here. Squeeze it until it comes together. And once again, this is a great opportunity to test and make sure everything's working. So we're going to go to the first position, look up top and we have lights illuminating. Fantastic. So then we're going to go to the next light position, turn it on. Fantastic. We still have lights. So we know when either we turn our running lights on, or our headlights, these lights are also going to come on. So we are now good to go. So we can go ahead and turn that off.At this point, we're going to go ahead and just re-install all the components we had removed in reverse order of how we removed them. And that's basically it. Now that completes our installation of Pacer Performance's Hi-Five LED truck cab lights on our 2007 Ram 3500.
Average Customer Rating: 4.7 out of 5 stars (226 Customer Reviews)
Designed to look like the factory lights on 2003-2017 Dodge trucks, these roof lights make your vehicle more visible to traffic and give it a big rig look. Amber lights come with incandescent and LED bulbs. Wiring and hardware included.They look great! Pretty simple install, everything you need is included and the easy splice makes it even easier to wire everything together. They give you 6, so I just used the last one to tap into my headlights and they turn on automatically whenever those are on. LED’s are pretty bright and that’s what I went with, but they also give you the classic bulbs to choose from as well. 4 stars for now just to see how they hold up!
The smoked lens look great! On my 2017 black 3500 RAM. Install took about 45 minutes. LED bulbs need to go the right way to work. Shipping was quick, and thanks to Jason and everyone at etrailer for making the ordering process easy.

Very well made cab lights. My only suggestion would be to buy a better set of led bulbs and swap them before installation. I had bulbs that burnt out after 9 months.
Ordered these for my 2011 RAM 2500 to replace the old ones, very easy to install! Will order some more soon for my 2008 3500
Came as advertised. Easy install. Perfect fit. Could not be happier.
fairly quick shipping..my truck has never had lights...but have installed them on every truck I've owned ( 4 ), This is my 5th. Everything was in the box. It even came with little washers for the screw heads. I used silicone just in case. I was very skeptical of the supplied ground wires but they all worked!!.. I decided on the old style bulbs this time. Might switch if they don't last then I will go to the LED's. I used a different toggle switch than the one supplied. Really like the set so far. I have never seen a truck like mine with cab lights. Maybe others will try it now?
Look good on the truck, one of the center lights became loose so it was not making great contact and therefore was out. I got it working again, but it was a hassle taking the light off the truck to just spin the light a little bit.
The cab lights I ordered came in a timely manner and they were oem quality!
Great product, I replaced existing lights with these. Hole pattern was exactly the same as my old lights. I had two issues not related to the product. My old lights only had one wire through the cab. They had a jumper wire that went from bulb socket to mounting screw for the light.
As far as replacing existing lights goes, this product is great.
For a complaint, the instructions nor video showed me what the little rubber washers were for. Since there were 10 of these I assumed they were for the mounting screws. I used mine for lens cover screws.
I also used silicone under foam pad, on top of foam pad, on mounting screws, and after install was complete I added it at base of lens and around base of light. All not needed but cant hurt to keep water out.
Definitely reccomend this companies products.
The Pacer Performance High-5 lights on my 1992 Ford F350 are high quality. They fit the original screw holes perfectly. The LED lights are bright. The wire connectors were different, but that was no problem. I cut off the connectors and used crimp-on connectors, then taped the connections securely with electrical tape.
One year on, these lights are holding up very well. Installation was pretty simple, I did have to break out a drill to enlarge the factory holes - I believe the factory lights used sheet metal screws to attach to the top of the cab through the lens and these use a metal stud attached to the light base with a nut that tightens from inside the cab (it's been a year and my memory is fuzzy). Outwards though these lights look completely stock. They sealed well and I've experienced no issues with water leaks. 100% suggest these to anyone wanting to replace or upgrade their stock lights to LED while retained the OE look.
Lights and everything arrived quickly, everything needed was in the packaging. The only thing I did differently was I wired the lights into my existing light switch instead of a separate switch, just bought 16 gauge wire from hardware store. I added some t10 LED lights which look awesome at night! During the day LED or incandescent bulbs are not very visible anyway. Overall awesome product!
Good set of lights , actually need another set. Very happy with them
I have ordered many times and have always had great experience!!
After reading not so good reviews on other cab lights I found these and saw nothing but good things about them and when I had them installed I was more than happy with them. I would recommend to anyone wanting to put cab lights on their truck
The lights were purchased as replacement for the existing lights already on the truck, so all the hard work of drilling the holes and running the wiring was already done. What little installation I had to do was fairly easy, and simple. The lights match the originals exactly and you can't tell them apart from the old ones. The package was shipped promptly and arrived undamaged within a few days. Overall I'm extremely pleased with the order and I will be using your company for future purchases and I will definitely recommend your company to other people who need the type of things you supply.
Purchased and installed the cab lights from etrailer.com. Shipped quickly, reasonably priced and a very easy installation. They look great on the truck. There some great write ups on the web explaining how to easily drop the headliner. Thanks etrailer.
Bought these lights about a year ago and they look and work great! The lighting makes a perfect red and they are very bright as well, but that can depend on the bulbs you decide to use. Easy installation too!
Great lights looks amazing on my GMC, i could not be happier. I had the installed as no one wants me wiring anything. The LED bulbs are nice and bright. I would recommend these lights to anyone.
Lights exactly as described. Package came with both LED bulbs and incandescent bulbs. Easy to install. I watched the installation video which was very helpful. I only installed 4 as my vintage truck has a middle rotating beacon.
Straightforward install. Worst part was dropping the headliner. Tapped into the power source at passenger side kick panel in my 97 Ford. Very happy with my purchase.
Had these lights on my truck for a year now and they work great the installation was pretty easy. I installed them on my ram 1500
Do you have a question about this Vehicle Light?
Info for this part was:
At etrailer.com we provide the best information available about the products we sell. We take the quality of our information seriously so that you can get the right part the first time. Let us know if anything is missing or if you have any questions.


Thank you! Your comment has been submitted successfully. You should be able to view your question/comment here within a few days.
Error submitting comment. Please try again momentarily.