bing tracking image

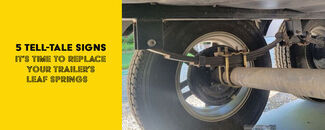
This Old Trailer: Replacing Leaf Springs

content loading

Customers compare SP01-160 to these similar products


Products Featured in this Video


Replacing Leaf Springs Episode of This Old Trailer


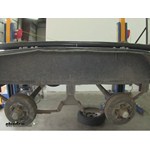
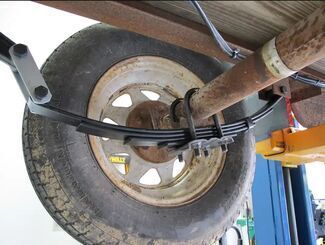
Today on This Old Trailer, what we will be doing is replacing a broken leaf spring. In this case, the style of the spring is a slipper spring. The first thing we need to do is take off our wheel, which we have already done. We will go ahead and point out the problem. You see this edge on the top leaf of the spring, it used to be right down here, connected in one piece. :33

The only thing that is holding this all together is this band around the springs, which is from the factory to help keep all the leaf springs in alignment. Good thing there is one on both sides, because judging by the rust, it has been sitting like that for awhile now. Now we will give you a list of parts that we are going to use. The leaf spring itself is going to be part number WIE3, and we are going to add two new U-bolts, part number SP01-160. The u-bolt plate itself is going to be part number 117594. 1:09

Now we are going to use two of all these parts because we are going to repair both sides of the trailer. The reason we are going to do both sides is because you have one spring that is weak and the other that has been in service for a very long time, it is always a good practice to replace in pairs. The first thing we are going to do is take out the u-bolt right here. We are going to remove it and throw it away. We are going to replace one side at a time, having the other side still bolted up will help support the axle, but we still have a jack stand here to help set it down onto and hold it while we put the new spring in place. This is going to be replaced by a new u-bolt set that is a little more conventional, it will not cross over like the old one did, it will be a plate on top. The next thing we will do is take out a bolt on the forward hanger. It is a good idea to use a pry bar to pull this out. I am going to show you a few things right off the bat. This is our old spring, you will notice it has a rubber bushing inside there, and it uses a 1/ 2inch bolt. Our new spring is going to use a 9/16ths bolt and has a built in nylon bushing in there. So it makes it easier to put together, however, our hole in the hanger is still 1/ 2 inch. We will take off the old hanger and put on a new hanger with the right hole. 2:58

We will go ahead and start working on the slipper spring. We will go ahead and put it on the part going back towards the back of the trailer, that is why they call it a slipper spring. It operates by getting flattened out by the weight when it rubs against it like this. We will go ahead and start going up to the front hanger, you can see the front hanger has plenty of play. Usually it would be just a spring and the hanger together, but in this case we are going to take up the play with a hardened flat washer with a 9/16ths hole, and we are going to use that to take up some of the gap. We will start our bolt first, slip on the washer, but o n a heavy duty application you probably want to go ahead and replace the hanger, but this is such a light duty application that it will be perfectly fine. Then we will put our lock nut on. You will notice, on this nut here, it has this stamped edge right here to tell you it is a lock nut. Underneath the head of the bolt you have these lines, which will dig in to the steel and go in flush like this. That will happen on the other side of the spring. We will leave that alone for now, because we want to keep everything loose and we will go ahead and do the u-bolts and plate for the axle. 4:46

If you remember from before how the u-bolt was over the top like this, now we will change it all up and put our u-bolt on top and then run them from the bottom, upwards. Then we will install the nuts. The bolt that goes through the middle of the spring, which is called the center tie bolt is going to fit into the hole that is in the axle here. That is what keeps the axle from moving back and forth. The u-bolts obviously keep everything together. This is going to use up most of the threads, but that is fine. At this point we can start snugging down and tightening the bolts. We will start with the u-bolts first and tighten those down evenly, and then move to our shackle bolt at the front hanger. When you torque these down, you can torque them down to about 70 pounds, somewhere in there. Basically, when you tighten them down and the plate starts to flex, you are pretty much there. At t his point we have a lot of threads coming through here. It will not hurt anything, but if you think your trailer is going to bounce up and down a lot it is a good idea to take a Sawzall and just trim off the bolt. We have this side already finished, now lets go on the other side and repeat the same process. Our job is complete, we have better suspension than there probably was before, a lot tighter, and a lot better riding setup than there was originally. There you have it for This Old Trailer on replacing leaf springs.


Dave

1/3/2014

position of shackle up to hanger:45 deg to right of vertical, [away from spring] ok?

Patrick B.

1/14/2014

If it is a single axle trailer, you should be OK. We have a tech article on the subject that you may find helpful. I have added a link to it.

Info for these parts were:

Employee Kathleen M
Video by:
Kathleen M
Employee Cole B
Installed by:
Cole B

At etrailer.com we provide the best information available about the products we sell. We take the quality of our information seriously so that you can get the right part the first time. Let us know if anything is missing or if you have any questions.


^
About Us
photos and videos
1,056,204
Original Photos & Videos

Produced to make sure you know what you are getting and you get exactly what you need.

installations
35,570
Installations Completed

To make sure products work and fit the way they are supposed to.

etrailer call center
2,476,511
Phone Calls & Emails Answered

1,125,924 phone calls and 1,350,587 emails to help find the right solution.

etrailer training
400+
Average Hours of Product Training

We get to know our products firsthand so experts can better help you.

etrailer service
77
Years of Quality Customer Service

Assisting our neighbors and customers, face to face at the counter.

etrailer experts
193,357
Pages of Expert Information

Created to make sure you have all the answers to your questions, from real experts.