

Installing an Electric Trailer Brake Controller on a 1996 Toyota Land Cruiser with Tow Package
Updated 12/03/2012 | Published 02/15/2011
Products Featured in This Question

Question:
I have a 1996 Toyota Landcruiser with hitch/ and tow. I was advised that in order to tow a popup trailer 2009 Coleman E3 I am renting this summer I have to meet these regulations. 1. 7 round electric plug for power from truck to trailer 2. And Electric brake controller under dashboard As far as I can tell, all I have for plugs and wiring coming out around the hitch is a 4 hole flat looking plug. I am wanting to make sure I order the correct parts so my dad can install it all and save me money.
asked by: Jennifer S
Expert Reply:
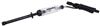
In order to install a brake controller and 7-Way trailer connector on your 1996 Toyota Land Cruiser, there are a couple of parts you will need. First, you will need a brake controller. The Tekonsha P2, # 90885, that you have referenced is a good choice. It is a popular model because it is easy to use and works well.
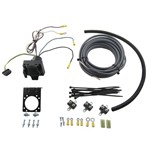
Since you already have a 4-way flat trailer connector, the only other parts you will need are the 4- and 7-Way Installation Kit, # ETBC7, and a circuit tester like # PTW2993. The 4-way flat on your vehicle will plug into the back of the ETBC7. You will then need to hardwire the remaining 4 wires.
The white wire will connect to the vehicle frame. The black wire will connect to the black wire on the included duplex cable and the blue wire will connect to the white wire in the duplex cable. The black and white wires will then be routed under the vehicle, avoiding areas that may pinch or burn the cable, up to the front of the vehicle.
The black wire will get routed into the engine compartment and connect to the positive battery terminal via a 40-amp circuit breaker. The white wire will get routed through the firewall and connect to the blue wire on the brake controller. Keep any excess wire as it will be needed.
The remaining wire on the ETBC7 can be connected to the reverse light wire behind one of the tail lights if the trailer has reverse lights. If it is not needed, it can be taped up and stowed out of the way.
The last connections are for the brake controller. Use some of the excess wire and connect it to the white wire on the brake controller, route it through the firewall, and attach it to the negative battery terminal for ground. Using the remainder excess wire, connect one end to the black wire on the brake controller and route it through the firewall and connect it to the positive battery terminal via a 20- or 30-amp circuit breaker (see brake controller instructions for which size to use).
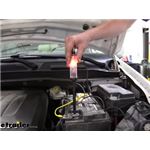
The last connection is the brake controller red wire. Using the circuit tester, find the wire on the brake switch, located above the brake pedal, that carries a signal ONLY when the brake pedal is pressed. Connect the red wire to this wire. After mounting the brake controller installation will be complete.
I have included links to a couple of FAQ articles that explain the installation of an ETBC7 kit along with a video showing installation.


Featured Help Information
Miscellaneous Media


Continue Researching
- Article: Brake Controller Installation: Starting from Scratch
- Q&A: How to Test Brake Controller without Trailer Connected
- Article: Best Bike Racks for Electric Bikes
- Article: Towing a Trailer? Let's Talk About Brake Controllers
- Article: 2005-Current Volkswagen Touareg, Audi, or Porsche Cayenne
- Article: Brake Controller 7- and 4-Way Installation Kit (ETBC7)
- Q&A: Dexter Brake Assembly Recommendations to Replace Part Number 023-357-00
Todd
12/1/2012
Per the instruction you have listed and the video link wouldt the brake controller have continuous power? Is there a way to wire the power into a circuit that is tied into the ignition so that the controller is only on when you car is on?