

 Arrives before Christmas
 To see if this custom-fit item will work for you please tell us what vehicle you'll use it with.
Thank you! Your comment has been submitted successfully. You should be able to view your question/comment here within a few days.
Error submitting comment. Please try again momentarily.
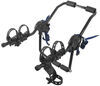
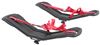
These custom-fit clamps and pads let you mount 4 Inno XS200, XS250, or INSU-K5 feet to your vehicle's naked roof to help create an aftermarket roof rack system. Clamps mount to feet with bolts. Kit includes 4 clamps and 4 pads.
Features:
Specs:

Videos are provided as a guide only. Refer to manufacturer installation instructions and specs for complete information.
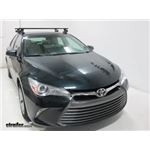
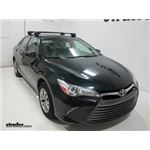
Today, on our 2016 Toyota Camry, we're going to be test fitting the Inno Aero roof rack system consisting of part numbers INXB130-2, these are the Inno Aero crossbars, 51-inches long, part number INXS250, and these are the Inno through feet for the Aero crossbars, and part number INK872, and this is the custom fit kit for the Toyota Camry. The Inno Aero roof rack system is great for putting accessories up on your roof and freeing up space inside your vehicle. With removing our end cap here, you can see it has this nice rubber strap along the center here. Now, that coupled with the aerodynamic features of the bar will cut down wind noise and drag. Also, by pushing down on this, you can install T track accessories for your roof rack. Now, a lot of other roof racks will require you to remove the rubber strip and cut it to length, but this, all you have to do is push it down. Then reinstall your end cap. All of our through feet have these locking end caps here, so once you install this onto your roof, it's going to be secure to your roof.
The two bars combined have a carrying capacity of 120-pounds, although you always want to check with your vehicles manual to make sure it can withstand that weight. Now that we've gone over some of the features of the roof rack system, let's go ahead and show you how it installs. We have a rear bar partially assembled on our table here, and we'll show you how the other half goes together. Slide this out on the inside, and you'll see that on the bracket here, we have this little marking here and it's going to fit in perfectly like so. We'll slide it all the way back in, and then get ready to install our foot. Unlock the end cap here.
Then we'll line up this top piece of our foot with this empty slot here on the inner bracket that we just installed. Then line up our screw with this portion here. We'll push it into place, and then push it down the channel. Next, we'll get our measurement set between our two feet, as prescribed in the instructions. We'll slide our foot back till it's set. Once everything is set between the two, we'll completely tighten them down using our included Allen tool.
Now we can start installing our fit kit. Our fit kit will consist of two items. We're going to have the rubber pad here and our clamp. Now, the rubber pads are labeled, so make sure that the right pad goes with the right foot. Also, you'll see that it has these marks here that actually fit with these indentations on the foot.
Just line them up properly, and they just push right into place. Next, we'll install our clamp, which just you unscrew the end here, place the clamp on, and then reattach it loosely just to hold the clamp in place. Finally, we'll put our end cap into place. Now we're ready to install it on the roof of our vehicle. The measurement we're going to set here is going to be from the center of the door jamb to the center of our rear bar. We'll do this on both sides to make sure that the bars are parallel. We'll tighten up the clamps just so they're snug up against our door. We'll do this on the other side as well. The tool that we have here actually clicks once it's completely tightened down so you don't over or under tighten. Our final step is to put on our locking end caps, we'll do this on both sides as well. We'll take our hook ends here, place them on these portions, and you just push up and lock it in place. Now, there is one other thing I'd like to go over. You'll notice on the table earlier, we had this foam pad here. You would actually push this to the inside, here, and then cut it to length to take out the noise that would be created by this gap here. For demonstration purposes, we'll leave that out. Now we're ready to load up our accessories and hit the road. There you have it for the Inno Aero roof rack system on our 2016 Toyota Camry.


The spacing of the parts is *almost* perfect for my car. Nonetheless, it's held up for many moves now without slipping a bit.
I followed directions and the rack went on without a hitch. The measuring tape provided was a bit confusing but my tape measure did just fine. It pays to watch for any movement of the stays as you tighten them. It fit perfectly. I was impressed with the quality of the unit. The torque wrench provided was a nice bonus. I attached a boat rack for my rowing shell and I’m confident it will be safe all the way to the water.
Firstly, I need to thank Joseph ([email protected]) at etrailer. I needed a roofrack in a short period of time for a trip from MO to WA for summer vacation for my wife and kids to have extra storage. Joseph went out of his way to walk the warehouse to ensure the product I needed was easily accessible to get to for shipment. Joseph's customer service, knowledge of the products, and understanding of the logistics was incredible. I ordered the product on 25May and received my roof rack on 26May. My jaw dropped when it arrived so quickly. This is the customer service that makes it so if i ever need products offered by etrailer that I will order directly from your company and not browse Amazon for subpar products. Overall, I'm impressed thanks Joseph and the etrailer team!
It’s NOT good for a Toyota Camry. It put dents in the side rail (top of car) that it attaches to. The product it’s self works well and has held up outside of the foam tubing that protects your items from rubbing against the uprights.
Working as hoped. Easy on and off, protects the car well.
Amazing! Great product and great servic e!

Do you have a question about this Accessories and Part?
Info for this part was:
At etrailer.com we provide the best information available about the products we sell. We take the quality of our information seriously so that you can get the right part the first time. Let us know if anything is missing or if you have any questions.


Sierra K.
9/7/2021
The feet shouldnt be on so tight that it indents the roof. We actually have a video of the install on this model vehicle:
Helpful Links
ink872.aspx
inxs200
tv-install-inno-aero-roof-rack-system-2017-toyota-camry-inxb108-2