
Most Popular Roof Bike Racks for Honda Civic
change vehicle# 1
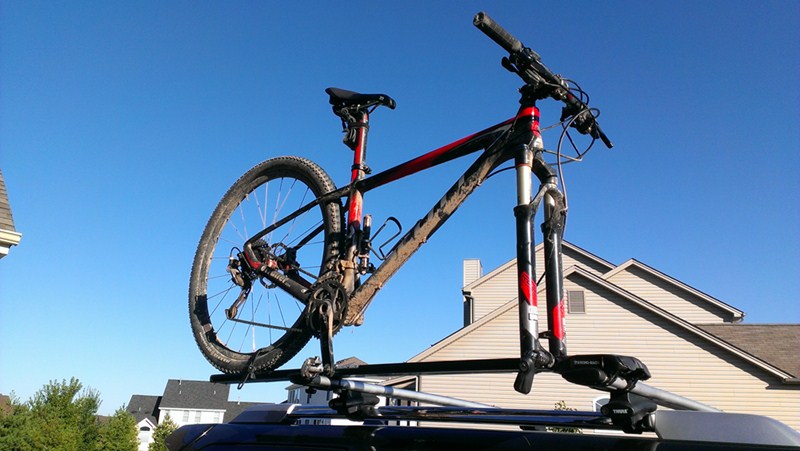
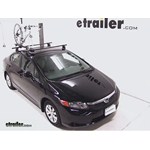
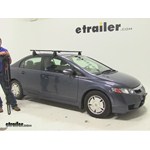
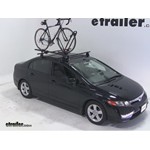
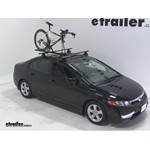
Swagman Upright Bike Rack for 1 Bike - Roof Rack Crossbars - Frame Mount

- view all Roof Bike Racks
- Frame Mount
- 15mm Fork
- 15mm Thru-Axle
- 20mm Thru-Axle
- 5mm Fork
- 9mm Fork
- 9mm Thru-Axle
- Bike Lock
- Factory Bars
- Round Bars
- Square Bars
- Disc Brake Compatible
- Clamp On - Standard
- Black
- Swagman
More Information >

by: Jamey06/28/2023
Planning on bringing bikes while camping. I mounted 2 of the Swagman bike racks to my new Sportrack on my pop-up camper. The bikes fit perfectly. The racks seem sturdy enough. Not heavy duty, but for my needs they should be fine. Assembly was relatively fast and easy.


View More
View Less
by: Larry S02/14/2020
We have used the Swagman Roof Rack a number of times when we have needed the additional bike carrying capacity. It took a couple attempts to get the initial spacing of the bike rack properly balanced on the van’s roof rack as recommended by the instructions. But it was easy to do and once set was very easy and quick to put on and take off. The rack works great, the bike is easy to put into place and secure. The bike and rack are very stable and quiet and haven’t required any mid-trip adjustments. We always put the cheapest bike on the roof (lol) but do use a bit of duct tape to protect the finish just Incase. We are very satisfied with the rack and consider it quite a deal for the money.


View More
View Less
# 2
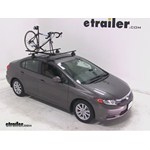
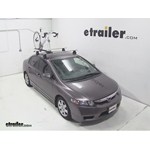
Rhino-Rack MountainTrail Rooftop Bike Carrier - Fork Mount

- view all Roof Bike Racks
- Fork Mount
- 9mm Fork
- Bike and Rack Lock
- Aero Bars
- Factory Bars
- Round Bars
- Square Bars
- Disc Brake Compatible
- Clamp On - Quick
- Black
- Rhino Rack
More Information >
by: Jordan09/05/2016
Love this bike rack! It fits perfectly with my Rhino Rack Cross Bars. I'm very impressed by the lack of wind noise. With the bike mounted on the rack, you can barely hear the wind noise at 60mph. With the sunroof open you can hear wind noise, but as long as the window is closed, you can only slightly hear anything if the radio is off and you are trying to hear it. Amazing! Can't wait to get more use out of it in the future!


View More
View Less
by: Kevin B - etrailer.com employee10/04/2013
I have used a lot of bike racks and this is the one I keep on my 4Runner. It just works. It is the easiest to take on and off, which is important for me because between me, my wife and kids I have 4 bikes that need to be rearranged often. We also use a roof box, kayak racks and a SUP rack so I am always taking things off and on. The front straps loop over the bar and tightens with an allen key, the back is a couple wing nuts. Since there are 2 straps up front the rack is very stable when a bike is on it. I like that it comes with locks and the skewer is super easy to adjust, clamp and unclamp. If it is cold, dark and damp at 6am and I am tired, late for a ride and still waking up this is the rack I go for because it is easy. There are a couple things to be aware of though... You will need to put a drop of oil in the skewer every 6 months or so to keep it opening and closing smoothly. Otherwise is can stick. Sometimes if the skewer is turned just right there will be a bit of whistle because of a hole in the clamping mechanism. If I turn it to a different angle the whistle stops. And after going through the car wash with the rack on my roof a dozen times or so the black paint began to have a bit of a rainbow sheen. Not sure if it is the bike rack or the soap my car wash uses.


View More
View Less
# 3
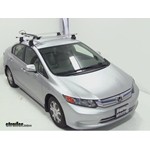
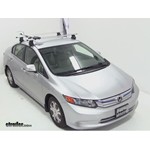
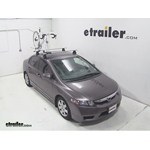
Yakima FrontLoader Wheel Mount Bike Carrier - Roof Mount

- view all Roof Bike Racks
- Wheel Mount
- 15mm Fork
- 15mm Thru-Axle
- 20mm Thru-Axle
- 5mm Fork
- 9mm Fork
- 9mm Thru-Axle
- Bike Lock
- Aero Bars
- Factory Bars
- Round Bars
- Square Bars
- Disc Brake Compatible
- Clamp On - Quick
- Black
- Yakima
More Information >
by: Rodney10/11/2023
Overall I am happy with these bike carriers. They mount to the racks over the bed of my Tundra TRD Pro. Installation is simple. I think they could be just a bit sturdier because there is just a bit of wobbling when driving on bumpy roads but I'm not too worried about them coming dislodged. Take note that although they come with a cable lock to attach the bike to the carrier, the key is sold separately.


View More
View Less
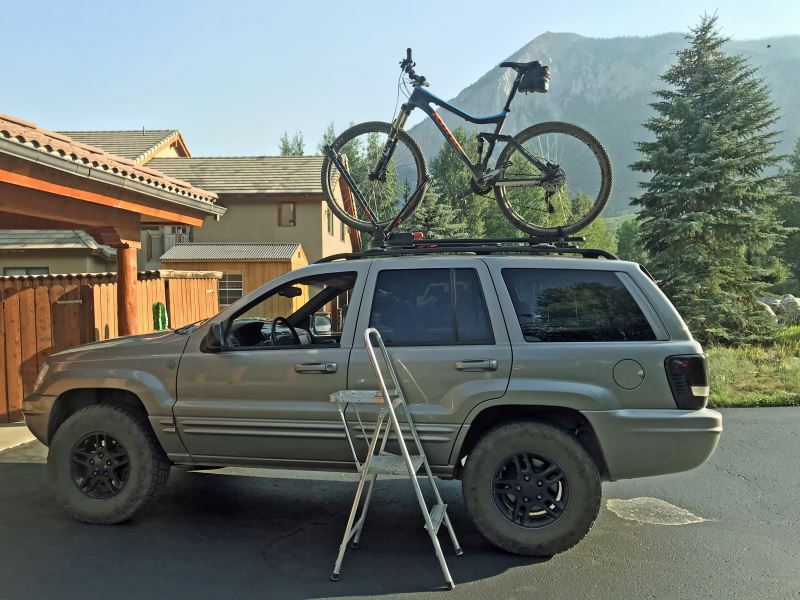
by: Karey08/08/2018
Very good product. It holds the bike securely on the roof without contacting the frame. It is easy to adjust from my road bike to my 29er mountain bike. Our drives are all relatively short, so I like that I do not need to remove the front wheel to lock in the bike. It's also nice that the SKS locking system allows me to use the same key for this rack that I use for my Yakima roof box and hitch rack. This is my first roof rack and I chose this route for a couple reasons. Some of the roads we travel to get to our trail heads are a bit rough and with a roof rack I don't have to worry about bottoming out a hitch rack hanging off the back of the vehicle. Also, it takes up less room in the garage. Our vehicle is a 2000 Jeep Grand Cherokee with an additional 4 inches of ground clearance. That makes it a bit of a reach for my 5'4" wife, so we take our two-step along to help her. This is my third time purchasing from etrailer, and each experience has been very good. They are a very customer service oriented company. I really appreciate all the additional information they provide on their products, especially all the videos they produce to aid in reviews, assembly, and use.
View More
View Less
Bike Rack Videos
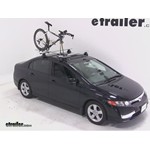
Yakima FrontLoader Roof Bike Rack Review - 2012 Honda Civic

Today on our 2012 Honda Civic sedan, we'll be test fitting the Yakima front loader roof mounted wheel mount bike carrier, part number Y02103. Now with the roof rack system already on our vehicle, we'll start off our test fit by placing the carrier onto the vehicle's cross bars. In no specific order, we'll loosen up the back bracket and the front bracket to bring the back bracket around the rear cross bar and the front clamps around the front cross bar. We can then turn the black T handle at the rear of the carrier to secure the rear bracket to the rear cross bar, and turn the black T handle at the front of the carrier to tighten down the jaws on the front cross bar. Now that the carrier is secured to the cross bars, we're ready to load up our bike. We'll unfold the front part of the wheel mount and undo the tray strap.
Yakima ForkLift Roof Mounted Bike Rack Review - 2012 Honda Civic
Today on our 2012 Honda Civic sedan well be test fitting the Yakima Forklift roof mounted bike carrier, part number Y02098. To begin our test fit well simply place the carrier onto the vehicles cross bars and in no specific order loosen up the front bracket as well as the rear bracket to bring the brackets around the underside of the front and rear crossbar. Youll want to make sure that the bike carrier is perpendicular to the vehicles crossbars to ensure that the brackets fit correctly on the crossbars. Once weve established this position we can then tighten down the black T handle at the rear of the carrier to secure the rear crossbar to the vehicle, as well as tightening down the black T handle at the front of the carrier to secure the front of the carrier to the front of the crossbar, that when loosening up or tightening the black T handle, you may need to remove a skewer from the head of the carrier in order to remove the front black plastic safety cap. Once we have the carrier secured to the vehicles crossbars were ready to load up our bike. Well loosen up the skewer at the front of the carrier and move to the rear of the carrier and undo the tray strap.
Swagman Fork Down Roof Bike Rack Review - 2012 Honda Civic
Today on our 2012 Honda Civic, well be test fitting the Swagman Forkdown roof mounted bike carrier, part number S64710. To mount our carrier up on our vehicle, well set it in place on top of our load bars. At the head of the bike carrier well feed our U-bolts up from the bottom, below our crossbar, and through the plate at the head of the bike rack. Then well use the wing nuts to tighten them down. At the rear, well fit the U-bolt through the top of the bike rack, around our rear load bar. Well fit the clamp from the bottom side, and tighten it down again with wing nuts.
Thule Domestique Roof Bike Rack Review - 2012 Honda Civic
Today on our 2012 Honda Civic Hybrid, we're going to be test fitting part number TH513, the Thule Domestique Fork-Mount Bike Carrier. Now, our vehicle is already equipped with the Thule Rapid Aero Roof Rack System so we're ready to go ahead and fit our bike rack to the vehicle. To begin, we'll set the bike rack on top of the crossbars. We'll place the head of the bike rack directly over the front crossbar. We can then bring the clamping device underneath the crossbar and tighten it down using the Allen wrench included within the bike rack. We'll then move to the back mount while we'll bring the clamp underneath the rear crossbar and clamp it down again using the included Allen wrench.
RockyMounts TieRod Roof Bike Rack Review - 2012 Honda Civic
Today on our 2012 Honda Civic Hybrid, we will be test fitting the Rocky mounts Tierod roof mounted bike carrier part no RKY1014. Now we've already removed the bike rack head cover so we will set the head over the front crossbar and bring the rubber coated steel straps underneath and resecuring them to the head of the bike rack. We can them move to the rear mount where we will bring the clamp underneath the rear bar and tighten it down with the wing nuts provided with our bike rack and with our rear mounts tight we can go ahead and move back to the head of the bike rack and tighten it down using the Allen Key tool included with the bike rack. Once that is tighten out we can reinstall our bike rack head and cover and we're almost ready to load our bike. We will simply make sure the skewer is out and centered and that our rear wheel strap is undone and out of the way. We will then place our bike on top of our bike carrier we will put the front fork into the skewer and tighten it down.
Kuat TRIO Roof Bike Racks Review - 2009 Honda Civic

Rate your transcript OrderClientKevin BrossRef #20519Order #TC1048317425 Today on our 2009 Honda Civic, we're going to be test-fitting the Kuat Trio. This is a roof mount fork-clamp bike rack in the black and chrome. Its part number is TR02.We've got the Thule Rapid Traverse Roof Rack System already installed on our Civic so we're going to being our test-fit by placing the rack directly up onto our crossbars. We're going to take one of the two black rubber-coated metal u-bolts. We'll place it up here at the head of the carrier and then we're going to thread on two of our cylinder nuts.One of the cylinder nut is going to have a hex head. The other side is threaded.
Thule Sprint Roof Bike Racks Review - 2009 Honda Civic

Today on our 2009 Honda Civic, we're going to be test fitting the Thule Sprint. This is a roof rack mounted fork clamp style bike rack. It's part number is TH528. We've got the Thule Rapid Traverse Roof Rack System that we've already installed on the Civic, so we'll begin our test fit by placing the rack right up onto our crossbars. As we do this, we want to make sure that the black rubber coated metal straps on each clamp go around the underside of our bars and that the top of our clamps are sitting right on top of the crossbars. We'll then bring those metal coated straps, or the rubber coated metal straps rather, around the underside, fit them into the indentations and then tighten the black levers here on the rear. For the initial tightening process, having them straight out is going to be the quickest way to take up the slack and then you'll cam them over into a lever position to give you a little more torque. With the front nice and secure, we'll move to the rear and essentially we're going to repeat that exact same process.
Swagman Upright Roof Bike Racks Review - 2009 Honda Civic

Today on our 2009 Honda Civic, we're going to be test fitting the Swagman Upright, this is a frame clamp style roof bike rack with part number S64720. We've already got the Thule Rapid Traverse Roof Rack system installed on the Civic so we'll begin our test fit by placing our bike rack right up onto our crossbars. Here at the front, we're going to bring a U-bolt around the underside of the crossbar and fit up through the head of the carrier and then we'll thread on two wing nuts. We're just going to do these loosely for now to give us a little bit of room to position our rack, we're going to put a second U-bolt through the other side here and we just want to have a little bit of play so we can move it forward and back if we need to. All right, take our wing nuts thread them on this U-bolt as well. I've taken a quick look underneath the rack here just to make sure that our U-bolts are spaced about the same and everything looks square. We'll go ahead and tighten all four of them down. All right with the front secure, let's move to the rear.
Yakima FrontLoader Roof Bike Racks Review - 2009 Honda Civic
Today on our 2009 Honda Civic, we're going to be test fitting the Yakima Front Loader. This is a wheel clamp style roof mounted bike rack, it's part number is Y02103. We've already got the Yakima Q Towers Roof Rack System installed on our Civic, so we'll begin our test fit by placing our bike rack directly up onto our cross bars. Here at the front, we'll have the two outside portions of our clamp on the front side and the one middle portion of our clamp will be on the back side of our crossbar. Bring that down and over. You can let the rack sit there in the middle and tighten it, it will automatically center, but to make it a little easier on us, I like to pull back on it, so that the front portion of the clamps are right up against that bar. We'll then tighten down the black T handle, bringing the rear portion of our clamp up to meet our bar and then tighten that right down. With our front secure, we can now move here to the rear.
Kuat TRIO Roof Bike Racks Review - 2009 Honda Civic ru01

Today on our 2009 Honda Civic, we're going to test fitting the Kuat Trio. This is a roof mounted, fork clamp bike rack. It comes in the orange and the gray. It's part numbers are RU01. Now, we've got the Thule Rapid Traverse Roof Rack System already installed on the Civic. So, we'll being the test fit by placing our bike rack directly up here on top of our load bars. At the front, we're going to have two rubber coated, metal U-bolts and we're going to have four cylinder nuts. We'll place one of the U-bolts around the underside of the crossbar, up through the head of the carrier, and then we'll thread on the two cylinder nuts.
Swagman Fork Down Roof Bike Rack Review - 2009 Honda Civic
Today on our 2009 Honda Civic well be test fitting the Swagman Forkdown roof mounted bike rack, part number s64710. Well begin our test fit by placing the bike rack onto the vehicles load bars. Well pull out our hardware and start up at the front. Well take our silver brackets to go on the underside of the front load bar and up through the predrilled holes at the front part of the bike rack. Well then thread on our black wing nuts and tighten it down. Well then go to the rear where this time well slide the silver bracket down through the predrilled holes of the bike rack and use the black plate to rest on the underside of the rear bar.
RockyMounts TieRod Stretch Roof Bike Rack Review - 2009 Honda Civic
Today on our 2009 Honda Civic we'll be test fitting the RockyMounts TieRod Stretch Roof Mounted Bike Rack, part number rky1011. With the Thule Rapid Traverse Roof Rack System already assembled onto our vehicle we'll begin our test fit by placing the bike rack onto the vehicle's load bars. We'll then remove the black plastic cover at the front to bring the rubber-coated steel straps around the underside of the front bar hooking them into the connection points. We'll then move to the rear and remove one Allen bolt to bring the rear bracket around the underside of the rear load bar tightening back down with a wrench. We'll then move back to the front using the included Allen key to turn the silver bolt to tighten down the rubber-coated steel straps up against the bar. With everything all tightened down and secured we're ready to load up our bike.
RockyMounts TieRod Roof Bike Rack Review - 2009 Honda Civic

Today on our 2009 Honda Civic we'll be test fitting the RockyMounts TieRod Roof Mounted Bike Rack, part number rky1014. Now our vehicle is already equipped with the Thule Rapid Traverse Roof Rack System so we'll begin our test fit by placing the bike rack up onto the vehicle's crossbars. We'll then remove the black plastic cover at the front of the bike rack to bring the rubber coated steel straps around the underside of the front bar and hook them into the connection points. We'll then move to the rear and loosen up one of the Allen bolts to bring the rear bracket around the underside of the rear bar. We'll then thread the Allen bolt back through the bottom part of the bracket and tighten down with a wrench. With the rear part tightened down we'll move back up to the front and use the included Allen key to tighten the silver bolt to tighten down the front straps.
RockyMounts TieRod Roof Bike Rack Review - 2007 Honda Civic
Today, we have a 2007 Honda Civic Sedan and we're going to be test fitting the RockyMounts TieRod Roof Mounted Bike Carrier, part number RKY1014. To fit our bike carrier to our roof rack, we'll place it up on top of our load bars. We'll fit the rubber coated steel straps at the front of the bike rack around our front load bar, re-secure them to the head and tighten them down with an Allen key. Once we've done that, we can move to the rear of the bike rack, fit the clamp around the rear bar and use the included wing nuts to tighten them down. Next, we're ready to load up our bike. We'll make sure the front cover is installed properly on the head.
Yakima FrontLoader Roof Bike Rack Review - 2007 Honda Civic
Today, we have with us a 2007 Honda Civic Sedan and we're going to be test fitting the Yakima FrontLoader Roof Mounted Bike Carrier, part number Y02103. To mount the FrontLoader up on top of our crossbars, we'll set it into place, fitting the front clamp around the front bar and the rear clamp around the rear bar. We'll use the included hand knob to tighten down the front clamp and then we'll use the T-bolt and wing nut to tighten down the rear clamp. With both clamps tightened, we're ready to load up our bike. We'll open up the top wheel hoop at the front of the bike rack and make sure that our wheel strap is open at the rear. We'll pick up our bike, set it into place, and bring the rear wheel hoop up to the back of the tire and tighten that with our hand knob.
Swagman Fork Down Roof Bike Rack Review - 2007 Honda Civic
Today, we have with us a 2007 Honda Civic Sedan and we're going to be test fitting the Swagman Fork Down Roof Mounted Bike Carrier, part number S64710. We've already got our bike rack assembled and now we're ready to mount it up on top of our vehicle. We're going to set the bike rack on top of our load bars. We'll take the U-bolts and fit them around the front load bar and out through the head of the bike rack. We'll use the wing nuts to tighten those down. We'll take the U-bolt for the rear, feed it down through the top of the bike rack and use a clamp on the other side and, again, use the wing nuts to tighten it around our rear bar.
Honda Civic Bike Rack Questions
- The Thule Wingbar Evo roof rack part numbers # TH711420, # TH710501, and # TH145043 that fits your 2022 Honda Civic sedan would work great with the Yakima Frontloader # Y02103 that you referenced as well. Yakima racks work great on Thule roof racks.
view full answer... - Yes the Swagman Upright bike rack part # S64720 does fit on the Rhino Rack Vortex Aero crossbars you mentioned.
view full answer... - The Kuat Trio part # TR02 is compatible with thru axles and a wheelbase of 49 inches so it would work really well for you! I attached a review video for this rack for you to check out as well.
view full answer... - The 2020 Honda Civic Si is a tricky vehicle to carry bikes on because the design keeps trunk mount racks from fitting and there aren't any trailer hitch receivers that fit either. You can go with a roof rack but that stays on the car and will likely get in the way if you have a sunroof. Instead I recommend going with a SeaSucker bike carrier.
SeaSuckers use vacuum cups to mount to your Civic's roof or rear glass. They're surprisingly secure. I've tried pulling one of the cups...
view full answer... - Yes! The Inno Roof Rack Fit Kit for 2019 Honda Civic # INXB108-2, # INXS200, and # INK684 is a great roof rack. Even if you did not link it in your question, this would have been my first suggestion for how it meets your specific needs: not damaging for the car, good for long distances, durable, and cost-effective.
The clamps # INK684 are fitted for each specific vehicle model so, if installed correctly, will fit into the grooves in a way that will NOT damage your car. I often...
view full answer... - I recommend to used the SeaSucker Mini Bomber Roof 2 Bike Rack - Fork Mount - Vacuum Cup Mounted part # 298-BM2006 to carry 2 bikes on the roof of your Coupe. The only disadvantage to this option is you would need to remove the front wheels when you transport them because it's a fork mount carrier. Carrying the bikes on the roof is the only option for the Civic SI because it also has a center exhaust so you can't add a hitch mounted option. The SeaSucker Mini Bomber is the most...
view full answer... - The Yakima CoreBar roof rack crossbars such as # Y00421 measure 2-3/4-inches wide x 1-inch tall, which is within the compatible bar dimensions for the Thule UpRide Roof Bike Rack # TH599000.
If you care to you can add a lock core kit # TH450200 to secure the carrier to the roof rack and the bike to the carrier.
view full answer... - While there is a way for you to carry bikes with your 2017 Honda Civic SI coupe with a rear spoiler, a trunk-mounted bike rack like the Thule one you referenced is not a fit due to that spoiler interfering, specifically with the main body of the rack. Since the SI has a center exhaust, a hitch isn't something that can be installed either, so the only way to carry bikes with this particular vehicle is with a roof rack and roof bike rack.
Let's start with the roof rack for your...
view full answer... - We don't have any roof rack fit info for a 2017 Honda Civic hatchback so it's really hard to say if the Kuat Trio # RU01 would fit and clear the hatch to allow it to open. But what we have found is that in situations where there is a clearance issue you can run the bike rack in reverse and the hatch will open just fine.
view full answer... - The Rhino-Rack XTray Pro Cargo Basket and 2 Bike Carrier # RRRMCB03 will work just fine with your 2014 Honda Civic Sedan.
This cargo basket will fit onto round, square, aero, elliptical, most factory crossbars, has a maximum weight capacity of 165-lbs, and measures 58-1/4" long x 41" wide x 6" tall.
It sounds like you don't have crossbars quite yet for your vehicle. I recommend checking out the:
-Thule WingBar Evo Crossbars # TH711420, with the clamp feet # TH710501,...
view full answer... - The Rhino Rack cargo basket part # RRRMCB03 is a great solution to carry cargo on the roof of your vehicle but does require a roof rack with crossbars installed on your 2013 Honda Civic so for that you'd want the Rhino Rack roof rack part numbers # RRVA126S-2, # RRRLKVA, and # DK319 and you'd be set.
Then to carry 3 bikes you'll have to use a trunk rack since the hitch options for your vehicle are limited to carrying only 2 bikes since it's a lighter duty vehicle. So for a...
view full answer... - You can certainly install a roof rack on your 2006 Honda Civic Si 2 door. I recommend the following parts:
-Yakima Round Crossbars - Steel - Black - 58" Long # Y00409
-Support Towers # Y28TR
-Adapters # Y03536
-Fit Kits # Y06148 AND # Y06161.
If you do not yet have a bike rack then I recommend using two of the Thule ProRide XT Roof Bike Rack # TH598004. This is an easy to use carrier that clamps around the bike frame with the twist of a knob. The knob also locks when used...
view full answer... - We offer several roof rack options for your 2002 Honda Civic that can be seen on the included link. The fit of these racks will sometimes depend on which version of the Civic you have, 2-, 3- or 4-door. At the top of the linked page is a drop-down menu box where you can choose the Civic you have to see only the racks that are compatible with it.
For example, if you have a 4-door with a bare roof you can use a quiet aero rack, the Vortex system made up of parts # RRVA118B-2,...
view full answer...


What our customers are saying:
"I purchased a hitch, wiring harness, bike carrier and bike adapter for a newly redesigned 2007 Hyundai Santa Fe. Everything arrived in a matter of days and either fit or worked perfectly. Great prices, quality and service support. Rest assured, I'll be recommending you to anyone who asks. Thanks again."