
To see if this custom-fit item will work for you please tell us what vehicle you'll use it with.
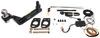
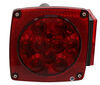
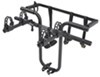
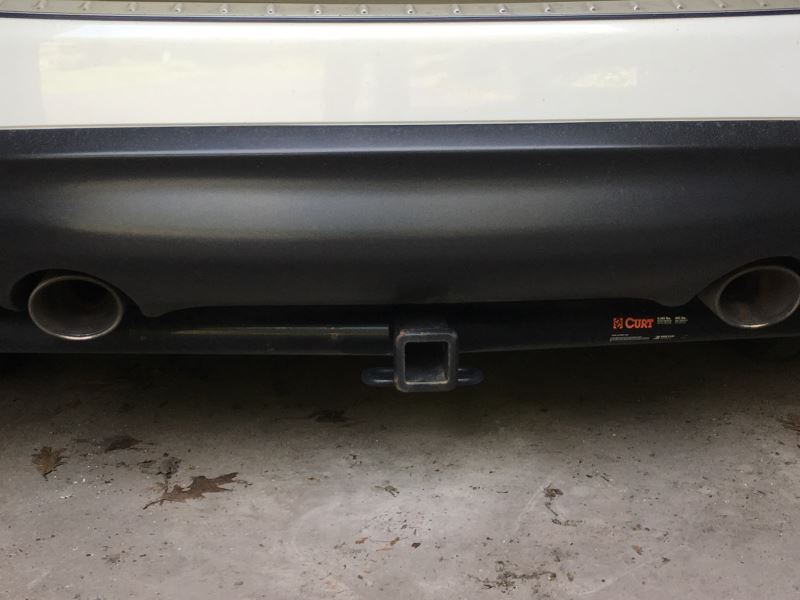
This fully welded trailer hitch receiver bolts onto your Infiniti FX35's frame with no welding required. Matte black, powder coated steel is durable and corrosion resistant and creates a rugged look.
Features:
Specs:
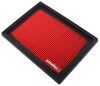
The sturdy steel construction is protected with a matte black finish for added durability. This unique powder coating gives etrailer hitches a carbide-like appearance and a rugged look that sets them apart from traditional glossy hitches. In addition to being rust and corrosion resistant, the tough matte coating hides dirt, scuffs, and dings better than a glossy finish.
At etrailer we're committed to the products we sell, and to our customers. Our experienced and knowledgeable staff are available via both phone and email to address your questions and concerns for the lifetime of your hitch. The technicians at etrailer perform hitch installations on a daily basis, making them a valuable resource for do-it-yourselfers. The one-on-one, personal service you'll receive comes straight from an expert in the towing and automotive field. We've installed it, we've wired it and we've towed with it, so whatever your question, we can answer it.


Tech Tip
Hitch installation requires the removal and reinstallation of splash guards and underbody panels. Driver side tow hook will be removed. No drilling required for installation , Underbody trimming required (not fascia) , We recommend that all non-trailer loads (bike racks, cargo carriers, etc) should be supported by stabilizing straps, such as 18050, sold separately
Videos are provided as a guide only. Refer to manufacturer installation instructions and specs for complete information.
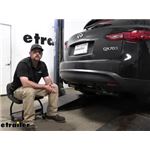
Hey everybody, Ryan here at etrailer. Today on our 2015 INFINITI QX70, we're gonna be showing you how to install the etrailer.com class three trailer hitch receiver. But before we do that, why don't we check this out and make sure it's the right hitch for you. With the QX70 being a relatively capable SUV, a lot of people want to do a lot of different things with it, whether it's pulling a trailer around or using accessories like a bike rack or cargo carrier. So putting a trailer hitch back here is going to open up your opportunities and allow you to do those types of things. With that in mind though, if it we're me and I was looking for a trailer hitch for my INFINITI, probably the first thing that would come to mind is the appearance.
How it's gonna look Really nice vehicles and I would want to do the best I could and not take away from the looks of it. And honestly, with this trailer hitch, I think it's going to look the best compared to all the other ones available and really that just has to do with the finish of it. So the other ones are gonna sit. It's like this one you're gonna be able to see them. It does hang down a little bit, but really the main thing that separates this one is the finish.
So it has a matte black carbide finish and it almost matches the bumper plastic. It's almost spot on. And so to me, because of that, whenever you're looking at it, it just blends in a little bit better and looks like one whole deal as opposed to a whole separate hitch sitting below your INFINITI. This is gonna have a two-inch by two-inch receiver tube opening. And this is a very common size.
Lot of different accessories are gonna work with it. At the end, there's a reinforced collar for some extra strength and it is going to use that standard 5/8 pin and clip. Keep in mind though, pin and clip doesn't come included with the hitch. If you need one, not really a big deal. You can always grab it here at etrailer.
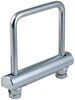
You're gonna have loop style safety chain openings and these are gonna be large enough to allow us to use just about any size hook that our trailer might have on it. Now we'll go ahead and give you a couple of measurements and you can use these to help figure out which hitch mounted accessories will work best. From the ground to the top inside edge of the receiver tube opening, that's gonna be about 13-1/2 inches. So if you're planning on towing, chances are pretty good. You're gonna need to get a ball mount that has a rise in the shank. From the center of the hitch pin hole to the edge of the rear bumper, that's gonna be about 5-1/2 inches. And you can use that measurement to figure out exactly if any of those folding type accessories you might have can be stored in an upright position without contacting the back of your INFINITI. Something I did notice about this one, the hitch does sit back a little bit and that's great for the appearance, but you will lose a little bit of clearance. So particularly, if you plan on using a folding type accessory just keep that in mind. If it has a really short shank, you might run into issues here. But generally speaking, the majority of you that have a folding accessory, you're still gonna be in pretty good shape. I just wanted to throw that out there. So not really a big deal but I do wanna address too the fitment with this one. This is gonna work with all the different types of models of the QX70. So for example, today we have the S version. Bolt it up just like it should and everything else, which brings you to my next point. As far as the installation goes on this, it's really not bad. There is a lot of nuts and bolts and different types of hardware that you're gonna have to pay attention to where you're putting it. So that's probably one of the tougher parts is getting all that lined out and making sure you have it right. But if you'd like to follow along, hopefully we can make it a little bit easier on you. But speaking of that, why don't we go ahead and put the hitch on together now. So to begin our installation, we're gonna be underneath the back of our INFINITI. And what we need to do is remove these small underbody panels that are here just behind our rear tire. There's gonna be some push pin fasteners along the edge here that we need to take out. So you can take a flathead screwdriver and pry underneath the head of it and you're able to pull it out. The same thing with this one as well as this one. And then it feels like there's gonna be at least two more along this back edge here tucked up in this slot. If you look up in here, there's gonna be those other two push pin type fasteners. And so we'll go ahead and get them removed the same way that we did the other ones. With all of those removed, now we should be able to work this out from underneath of our vehicle and set it to the side. We're also going to remove the panel over here on the passenger side, and essentially this one's set up the exact same way as the other side. Really the only difference being just the exact location of the ones here along the back, but they're still visible and you can still get to them. So go ahead and repeat that process over here as well. Now, over here on the driver's side, we can remove this tow hook. So you're gonna have two bolts here, two bolts on the side. These are gonna be a 14 millimeter head. We can get this out of the way 'cause will not be reinstalling it. Now over here on the passenger side, if you look, there's gonna be this flange and we're gonna have two bolts. We need to pull those out. And so I'm gonna use a 12 millimeter socket to get them removed. Over here on our driver's side. I wanna go over our attachment points and the hardware that we're gonna be using because there's quite a bit going on actually. So on this side, we're gonna have a total of six attachment points. We're gonna have these two weld nuts here and then this one a little bit further back. For these two, you're gonna use the M10 by 1.25 bolts, which are the ones that are a little bit thinner and you're gonna put on a conical tooth washer and make sure the teeth face up. So when the hitches up here, these are just gonna thread right in. This hole back here, that's going to use the larger M12 by 1.25 bolt and then we're gonna have three on the side. So couple more M10 size weld nuts and then one more M12 size weld nut. And with these weld nuts, I do suggest cleaning them out. So spray them down with some type of penetrating oil and then you can use a brush like this just work it back and forth in there to clean out any potential debris or anything. Sometimes this can get really rusty and if that's the case, so I like to clean them out and then just take our bolt and try to get it started. If you can, great. If it's super rusty in there, you might have to use a tool like this. This is called the tap. And of course you wanna use the appropriate size depending on what hole either M12 or that M10. And with these, essentially just place it in there and start to turn it. And essentially, what this does is cut the threads back out. So it'll cut through all that rust and all that junk and make the whole like new again. So if you run into that, this is your fix. But if you do use this, make sure you use lubricant. Take your time, get this going up straight and just take your time a bit. But with that said, why don't we go ahead, look over on the passenger side now. We'll go over those attachment points. Passenger side, again, there's a lot going on. So we're just gonna do our best, go through this one by one and see what works the best. But for these two holes on this flange, you're gonna take the bolt, split lock washer and a flat washer. And that's gonna thread into those weld nuts. Same combo for that hole as well. And then, pretty tricky to see, but right here in this area just like the other side, there's a weld mut. And so that's gonna be an M12, probably 1.25 bolt that's just going to thread into there. And then right here, there's gonna be some type of bracket we gotta put on the hitch and which will eventually connect to this U-bolt. So I think we might put this U-bolt in. Just have it in already. So you just take one end of it and feed it through, both those holes, just like that. Now with an extra set of hands, we can take our hitch and raise it into position. And you wanna make sure to get at least one bolt started on each side, hand tight. That way the hitch will support itself while we work on the rest of the hardware. With the hardware in place and hand tight, now we can come back and snug it down. For the smaller bolts, I'm gonna use this 17 millimeter socket. And then for the larger bolts here, I'm going to use a 19 millimeter. On the passenger side here, these smaller bolts, you're gonna use a 13 millimeter to tighten these down. Now what we want to do with the hitch up here like this is we wanna torque down all of the hardware to the amount specified in the instructions. If you don't have a torque wrench, you can always get one here at etrailer. Or a lot of times, if you go to your local auto parts store, they'll have one there available that you can rent. So once all the hardware that's currently in place is torqued down, you can take this bracket over here on the passenger side, and you're gonna take the side as of two holes, put it a round outside of the hitch. And then this is gonna, these slots in it are up around in the U-bolt like that. While holding that up, you're gonna take a half inch bolt. I already got this one going and feed that in. You might have to turn them if it's a little tight. If it don't line up perfectly, not really a big deal. We'll just work those in, that way we can get the nuts started on the other side of it. So where our bolts come out, you can then take the matching flange nuts. We'll get them started hand tight. And then as far as our U-bolt goes, the hardware that we're gonna use on that will be two flange nuts. So get these started as well. With all this hardware now in place and hand tight, we'll come back and snug it up. For these, you can use a 19 millimeter or 3/4 inch wrench and socket. For these ones, it's a 14 millimeter. If you have a thin wall socket, that's probably ideal 'cause not a lot of room here. And with this being a U-bolt, you wanna try to tighten these up evenly as well. And with this hardware now snug, don't forget to come back and torque these down as well. To get our passenger side underbody panel back on, we are gonna have to trim it out some that way it'll clear the hitch. So there's a diagram and measurements in the instructions and I just trace that out roughly. This is just plastic. So I'm gonna use a pair of tin snips to get this cut, but you can also use a Dremel tool or whatever you got around the house settled, that'll work. With this one trimmed out, I went ahead and reinstalled it the opposite way that I removed it, and same deal on the driver's side. That one you don't have to cut. You just put it back up and resecure it. And that'll finish off our look at and our installation of the etrailer.com trailer hitch receiver on our 2015 INFINITI QX70..
Average Customer Rating: 5.0 out of 5 stars (4 Customer Reviews)
This fully welded trailer hitch receiver bolts onto your vehicle's frame with no welding required. Matte black, powder coated steel is durable and corrosion resistant and creates a rugged look.So glad I found this site. Everything including the installation videos and the people that I spoke with are great.
Great east to install
Was quic delivery. The one end haf a bend to it. Had to pry n use 3lb hammer to get it to fully line up. So maybe dropped by ups and damaged corner but git it installed
By me installing this solo, it allowed me to get some new tools (aviation snips, torque wrench and small screwdriver), so that was a plus. It took me ~2.5 hours to complete the job. The pain point was having to remove rust from an existing threaded hole on the car using copious amounts of WD-40 and a thread chaser. I plan to connect my Saris 4 bike rack to the Class III receiver. The combination of the written and video instructions were helpful enough for this novice to get it done alone. Ideally, a jack stand of some sort would have helped me complete the job a bit faster.
I brought the hitch to a professional installer. At one point he was having trouble with fitment, & told me that he thought the hitch may have gotten bent during shipping & that he couldn't put it on & I would have to get another hitch sent out.
I called etrailer customer support to see about exchanging the hitch I had with another one& explained to her what the installer had just told me. She started explaining that the hitch is meant to be bent a little in order to get it to fit. I asked her if she was willing to speak to the installer... She was.... I put her on the phone with the installer & she explained the proper method to use to bend the arms of the hitch & also sent an email showing the procedure.
One hour later I was driving home with the hitch installed thanks to the great customer service from etrailer!!!
I always buy from etrailer. I think this is my 5th or 6th hitch from them. Their knowledge, experience, quality and customer service are always world class.
The quality and style fits perfect with some minor splash/ molding modifications. The biggest suggestion and tip, see where all the bolts go first by testing as they are not labeled. Then when installing the hitch, you will need to back one of them out to get the passenger side angle bracket in.
This is my second Curt Hitch and they are very clean and true to the model of car with a low profile.

Fits well easy install. Best choice for those with FX Infiniti.
It’s a good quality hitch. I had hard time to fit one or two bolts on there. They didn’t want to go in but there are 10 bolts in total. Other then that everything is good. I put the bike rack on there and had no problem with it.
Ordered the hitch receiver and the wiring kit. Items were shipped quickly, and between the video online and the directions installation was easy. Great folks, great products and great communication before and after the purchase. Thanks!
FIT PERFECTLY, QUALITY PRODUCT
this is the 3rd hitch and wiring package I have purchased from etrailer.
I always call direct and get great service and quick delivery.no need to look anywhere else they have this sh** down....thanks
Great quality product, got it installed at a local shop and my Yakima FullSwing bike rack fits in great.
Perfect fit for my FX35.
Hitch fit perfectly with no frame, suspension or body mods and I was able to install in under 1 hour
Delivered to me 3 days after I ordered it. Decent box with handles with all assembly hardware inside.
My dealer couldn't order the part on a 2015 vehicle yet. I found it here at a reasonable price with free shipping. I received the item quickly. I'd definitely recommend this Company
Great service by eTrailer guys, fast shipping and easy installation by my mechanic.
Great product! No problems! We use it to carry our road bicycles.
Great product, easy to install with proper tools and help.
Shipping was alright. Product contained components. Certain bolts didn’t fit.
Works well, not as heavy as some, would recommend
Info for this part was:
At etrailer.com we provide the best information available about the products we sell. We take the quality of our information seriously so that you can get the right part the first time. Let us know if anything is missing or if you have any questions.


Thank you! Your comment has been submitted successfully. You should be able to view your question/comment here within a few days.
Error submitting comment. Please try again momentarily.