

 Arrives before Christmas
 To see if this custom-fit item will work for you please tell us what vehicle you'll use it with.
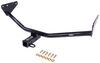
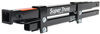
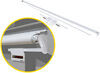
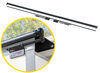
Get excellent traction in extreme conditions. Grooved links and ladder pattern provide traction for your dually truck in snow, ice, and mud. Reversible design allows for wear on either side for longer-lasting chains. Cams allow easy tensioning.
Features:
Specs:
Note: To determine whether you can use snow chains on your vehicle, or if they might affect your ABS/EPS functionality, consult your owner's manual.
These pewag ladder-patterned chains are great winter weather chains for your dually truck. Not only do the grooved square links dig into deep snow and ice better than rounded or standard square links, but the reversible design of these chains also allows them to wear under standard use much longer than other chains. And if you're partial to American-made products, you'll be happy to know that these are made in Colorado.
If you know your tire size, you may think you won't need to test fit your new chains. But there are a lot of variables that can affect whether chains will fit your specific tires, including your tire type, the amount of air pressure in the tire, the amount of tread wear, and the tire manufacturer.
We recommend that you order chains as early in the season as possible to give yourself plenty of time to test fit the chains and reorder if needed. This way, you won't be stuck out in the cold later with snow chains that don't fit.
You can test fit these chains in your garage or driveway, but you'll want to wait until there's snow on the ground to actually drive with them. Likewise, if you're out in the snow and come across bare pavement, you'll want to pull over and remove the chains. These chains can cause damage to the bare pavement, your garage floor, or your vehicle if they break from the wear of riding on a harsh surface.
Installing these chains is simple.
1. Lay out the chains on the ground to make sure there are no twists or kinks.
2. Drape the chain over your dual tires, making sure that the prongs attaching the cross chains to the side chains face away from your sidewalls. Drive forward about half a tire rotation.
3. On the back of the tire, pull the chain tight and hook the ends together. Repeat this on the center chain and the side chain on the front of the tire, then clamp the lever to fasten extra chain links and keep them from flapping as you drive.
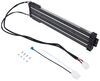
4. Insert the included tool into the cam and twist to tighten the sidewall chain. Twist as many cams as it takes to get a tight fit.
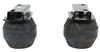
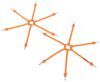
5. Drive forward 2-3 vehicle lengths and recheck the chain tension. Tighten any loose cams. If needed, rubber adjusters (sold separately) can help you get a tight fit. Make sure the hooks on the adjusters face away from your tire so your wheels don't get scratched.
Quick Tips:
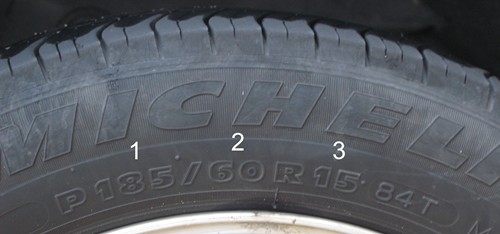
To choose the right snow chain, you must match your tire size. Those measurements can be found on the side of your tire.
185/60-15
These chains fit the following tire sizes:
Videos are provided as a guide only. Refer to manufacturer installation instructions and specs for complete information.
I'm Matt with etrailer. Today we're gonna be talking about the Pewag Assistant Tensioning Tire Chains on our 2022 Ford F450. So let's check 'em out. Now, we do have these on some dually tires today on our rear axle, as what the manual recommends. And something else about these, they are gonna be on tire size 225/70R19.5. Now, that's just our tire size we have today, they will fit a variety of other sizes, and that's why I recommend putting in your vehicle's tire information into our fit guide so we can make sure we're getting the right one for your needs.
But these are gonna be a great set of chains because, one, I'm a fan of cams. I know some people don't like 'em, but where I think cams really come into hand is if you're really struggling with trying to get these as tight as possible, these cams come in the hand. And another thing that I really like about them is it's made by Pewag, and Pewag makes a really nice premium chain, when we compare it to some of the other ones out there. So with these chains, they are gonna come in a kit of two. And with the links, specifically, they're gonna be a square link design.
Now, with a square link design, what I like about that is it gives you a ton more bite when it comes to breaking through ice and snow, so great for your moderate to heavier conditions. Now, we're also gonna have these grooves cut into 'em, and those grooves also do give it a little bit more traction compared to other square links out there. And you'll see that this is gonna connect here in the center, 'cause I know some dually chains just come in two separate ones. These are gonna be one continuous chain that reaches across. I like that because it's less likely of you losing anything.
And these are gonna be in a ladder pattern. Ladder patterns are great for giving you that initial traction when you're starting and you're stopping, so you're a bit safer on the road. And then here in the center, you notice this is fairly tight and that's gonna be 'cause, again, these cams help us out a bunch. We're actually gonna have three of them here in the front, and then we're gonna have two on the inside. I will just say, those two on the inside are typically pretty hard to reach, but the way this works is you have this tool and this very end that's kind of bent just goes into this section.
You turn it, this either loosens, we have a lot more slack now, or it tightens up. Now, even though we do have the cams on here, I do strongly encourage investing in some rubber tensioners, 'cause what happens when you're driving down the road is things are gonna shift. They're gonna move around a little bit, and when they do they loosen up. And what these rubber tensioners do, they keep things nice and tight even if they do loosen up. And you can find a lot of different sizes here on the website, but I'd recommend, if you have a larger truck like we have today, then get some larger truck chain rubber tensioners. Now, these chains are gonna come in this light-duty bag. You'll get two of these bags 'cause the chains themselves are fairly large. Now, if you're using these fairly consistently, they're probably gonna rip through this bag fairly soon after a few uses. So what I'd recommend doing is investing in a small tote or box to keep your chains in, so they just last longer and they're easier to manage too. If you're not a big fan of the cams, there is gonna be another option by Pewag without the cams on them. Now, when it comes to the installation process, it can be a little bit tricky but we do talk about some tips and tricks to get this on a little bit easier. So let's check it out. So the first thing we wanna do when we get a chance is just inspect them, we wanna make sure there's no damages to 'em, nothing's tangled up, and everything's in the right orientation. And I'd recommend grabbing some gloves to make this a little bit easier so you don't pinch your hands. And the orientation that we want this in is you're gonna notice we have some hooks on here, we want these hooks facing up so they don't damage the tire, because the way we're installing it today is we're gonna drape the chains over the tires. And a method of doing that is actually to fold over one half of your chains starting from the inside, going over to the outside, over. (chains rattling) Once we get this all the way across, I'm gonna grab it kind of from the center. One hand here, the other hand at this point, and we're gonna drape it over the outside tire. (chains rattling) Pulling it over, and back in across like this. With it laying at this point, we're gonna grab the top section now and we're gonna drape it over the second tire. (chains rattling) And then we can just go from this point, kind of adjusting this chain to sit in the center of the tire, and that we have enough excess on either side. Now, there's a lot of different ways to make these connections through this chain. What I find easiest, though, is to grab a bungee cord or some type of longer item with a hook at the very end of it, and we're gonna start with the center hooks and connect those, pushing this through in between your two tires. You could also use your rubber tensioner, but this is a little bit larger so if you do have a bungee cord it's gonna be probably a little bit easier that way. I'll show you how I do it. So you're just gonna go underneath here. Again, I'm gonna push this between those two tires until it reaches the other side. And you can try to get it to latch on from over here, I just find it easier just to get up and make that connection like this. Once you have that connection made, then we go back to the other side. And then we're just gonna pull this across so it's pretty tight. We're gonna grab the hook from over here, there it is, and you're gonna grab onto one of these links. I find it a little bit easier to go to the second link because I don't wanna make this too tight because we still gotta put on those other chains. If you find this is still a little bit loose, once you get those other two hooks here connected, we can come back through and tighten that back up. But connecting these ones is a fairly simple process. You can start from the inside, obviously do that most times but I'll show you how to do it on the front side since it's a little bit easier to see. As you can see there, I'm able to make a connection. We can try to get it a little bit tighter. You just have to pull in fairly tight. I'll probably leave it like this for now, though, just in case it's too tight on the backside. Now, when you got that backside connected too, it's gonna be the same process. I'll come back through and kind of pull on this so it feels fairly snug. And sometimes you might find some extra slack there. I'll see if I can get this on a little bit tighter. In this case, I was able to, so it's a good idea just to double-check. And from here, I'm gonna grab our tool to tighten up these cams some. So I'm just gonna start at this point here and work my way across. It's just gonna turn this about 90 degrees. This is feeling a little bit tight now. Now I'm just gonna do the same thing for this side on the inside. At this point, we have everything tightened down. Then we grab our rubber tensioner and start putting this on. Just make sure when you put these hooks in place, they're facing on the outside so they're not gonna puncture a tire, 'cause you might have to reach a little bit but we wanna make sure we do this in a star pattern, so it's gonna distribute that tension evenly across these chains. This is something I always recommend when you are putting on tire chains, especially ones like this that don't have a built-in tensioner on them. But with it installed like this, just come by, give it a good old pull, and then I'd recommend pulling forward, backing up some, to make sure nothing shifts. If it does, just tighten it up a bit. And once you're done you're gonna repeat this on the other side. But that pretty much does it for the installation. If you guys have any other questions, let us know here at etrailer. And, again, I'm Matt. Thanks for watching.

Not impressed with pewag chains at all why In the hell would you put cams on the inside of the chains think there engineers needs to get the hell out of the office & come see just how the real world works I was very impressed with the customer service from etrailer no complaints with them just pewag
Ordered the snow chains, they look to be of quality. Haven’t used them yet, but will in due time. They look to be a great product.
Superb quality workmanship and material s.
Info for this part was:
At etrailer.com we provide the best information available about the products we sell. We take the quality of our information seriously so that you can get the right part the first time. Let us know if anything is missing or if you have any questions.


Thank you! Your comment has been submitted successfully. You should be able to view your question/comment here within a few days.
Error submitting comment. Please try again momentarily.