
To see if this custom-fit item will work for you please tell us what vehicle you'll use it with.


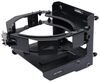
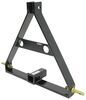
Install your Westin molded running boards; molded, lighted running boards; Sure-Grip running boards; or Grate Step running boards quickly and easily with these custom-fit brackets. Includes all necessary hardware.
Features:
California residents: click here
Videos are provided as a guide only. Refer to manufacturer installation instructions and specs for complete information.
Hi, everyone. Jesse here with etrailer. Today we're gonna be taking a look at the Weston Custom Fit Brackets for running boards. These brackets are made for the shore grip running boards and the great step, and also they're going to be vehicle specific because they are custom fit. They will all install pretty similarly. So just be sure to use our fit guide to ensure you get the right fit for your vehicle.
These will be a good option for you if maybe you're replacing some damage brackets or even if you're swapping your running boards over to a new vehicle. We'll be installing them on our Ford Explorer and it's a pretty simple process, but if you've installed them before, maybe you just have some tips or tricks to share with us. Please feel free to leave a review or comment or even if you just wanna share some photos of what they look like on your vehicle. But now let's get into the installation process. I'll walk you through it all.
When it comes to getting our mounting brackets installed, you'll first want to come underneath, we're on the passenger side here, and you'll want to identify your three mounting points. There's gonna be a piece of the pinch wheel that comes down farther, and has three holes in it. So there's one in the front, one in the middle, and one on the back. Starting here on the front one, we'll have to get our nut that has a clip around it, installed up into the frame of the vehicle. We'll simply slide this into the square hole here, push it in.
Sometimes they'll fight you so you may want to grab a screwdriver, and help you get that pushed in. Try to get that lined up. And then we'll just continue that with the other two spots. Now I'll have some serrated flange nodes to kind of slip into place in between this plastic and our pinch weld, and on the passenger side, these are gonna go in the front hole. So I'll just peel back that plastic a bit with my screwdriver, and then that will hold it in place.
But as I said, passenger side, we will do the front hole, on the driver's side, you'll do the same thing, but you'll be using the back holes. We'll take our brackets, they'll be installed in this position because our running boards will be mounted on this part of the bracket. But all we'll do is line it up with those two pieces of hardware we installed. Build a skinnier longer bolt with a flat washer, and a split washer that's gonna go in top. (bolt tightening) We're just gonna loosely install these for now. So get that threaded on. And then for the flange node that we slipped into place, that'll get one of the thicker bolts with a washer and a split washer. Before we lift our running board over into place on the vehicle, you'll want to set up your brackets first. So when it comes in, these bolts will be pretty tight. You'll wanna loosen those up, kinda eyeball it, get it adjusted to where you think the mounting brackets are gonna be placed, and then snug it down. Just tighten up so that you can freely move it without them falling off, but you are still able to adjust them by hand. So now with your brackets on there, but still loose, this is the point where you're ready to put your running board on top, and get everything adjusted and tightened out. (metal clanks) So now really you can just have your running board kinda resting on it as you get everything lined up. We'll start with the middle one, get this slid into place, drop our bolts down through the slotted holes, and then I'll do that same process with the front and the rear. When it comes to adjusting, depending on the length of the vehicle, there's really no measurements in the instructions. It just comes down to personal preference. If you wanted to get it as even as possible, that's fine. You just wanna make sure that you're not gonna make contact with your tires at all. So make sure there's plenty of clearance there. But once you have it adjusted where you want it, we can take one of our locking nuts and washers, and start getting those installed to each of those studs. Now before we tighten those nuts down, you'll want to tighten down your threaded bolt that's in there until we see this bottom bracket start to bend. That means it's gonna be locked into place, and we don't have to worry about the running boards sliding around. Now we're gonna tighten everything down. I like to start by tightening the mounting bracket just because the angle's gonna move. So if I need to make any minor adjustments with my running boards, I'll tighten those down. Last, but our side bolts up here, I'm gonna use a 16 millimeter socket, and then a 15 millimeter wrench to hold the nut. We'll get that snug down. (bolt drilling) And our top bolt here will be a 13 millimeter. (bolt drilling) Once you have those brackets tightened down, I'd just give it a look, make sure everything still looks right. But once you're satisfied, we can tighten down the running boards to the brackets with a 13 millimeter socket. (bolt drilling) Now we'll go over everything with a torque wrench, and make sure it's torque down to these specifications in the instructions. (bolt drilling) And that's gonna do it for our look at the Westin Custom Fit Brackets for running boards.
Condition: Installed
Notes: There are slight install marks from previously being test fitted. All hardware is included.
Info for this part was:
At etrailer we provide the best information available about the products we sell. We take the quality of our information seriously so that you can get the right part the first time. Let us know if anything is missing or if you have any questions.


Thank you! Your comment has been submitted successfully. You should be able to view your question/comment here within a few days.
Error submitting comment. Please try again momentarily.