


To see if this custom-fit item will work for you please tell us what vehicle you'll use it with.


Thank you! Your comment has been submitted successfully. You should be able to view your question/comment here within a few days.
Error submitting comment. Please try again momentarily.
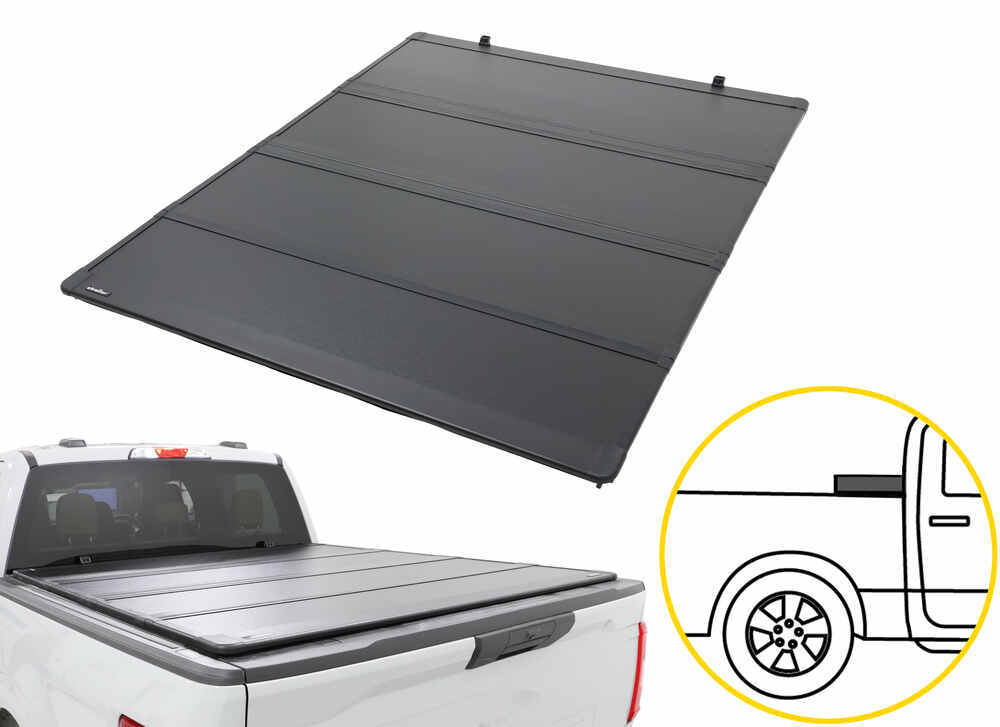


When you’re hauling tools or groceries, the last thing you want is rain or dust getting into the bed. This hard folding cover uses weather seals to block out water without needing drain tubes. It also closes securely against a locked tailgate, so your gear stays protected from both the elements and unwanted hands.
A lot of tonneau covers can flex or fade over time, but this one is built tough. The panels use fiberglass-reinforced plastic with a honeycomb-patterned internal structure for strength and rigidity. It has a 200-lb weight capacity (evenly distributed) and a textured matte black finish that keeps its color without chalking or peeling.

Installing some covers can get complicated, but this one mounts inside the bed rails using simple clamps—no drilling or special tools needed. Once it’s on, pinch levers on both sides let you open the panels easily from either side. The low-profile design sits just 1" above the bed rails, giving a clean look without bulky edges.
When you need to haul larger loads, the folding design gives you 3/4 bed access without removing the cover. It folds flat and locks into place so you can carry bulky cargo while still keeping part of your bed covered. That means less hassle when switching between work gear, weekend projects, or road-trip cargo.

You don’t need Bluetooth controls or motors to get reliable protection. This cover keeps things simple—strong materials, easy operation, and a clean look that works every day. It’s a dependable hard cover that gives you solid performance and long-term value without paying for gimmicks you’ll never use.

Videos are provided as a guide only. Refer to manufacturer installation instructions and specs for complete information.
Hello neighbor, this is Curt with etrailer, and today we're taking a look at the etrailer hard fold-up tonneau cover, and we're gonna see how it fits on our 2024 Chevy Colorado. Now, a tonneau cover is an excellent way to protect any of your cargo in your truck bed, either from the elements or from theft itself. And a hard tonneau cover, especially in the anti-theft department, is gonna do a much better job than a soft roll-up tonneau cover that somebody could just come over and slash open with a knife. It has a really nice weather seal all around it, a good bulb seal here at the tailgate, and a nice seal all around the edges. In fact, this is pretty sealed up, I think. Now, no tonneau cover out there is 100% waterproof, but judging by the way that this is closed up all around the edges, I'd say this would do a pretty good job of keeping any water or any road dust or anything like that off of your cargo.
So construction is a fiberglass-reinforced plastic, which is gonna give you a lot of great protection. It gives you a distributed weight limit up here of about 200 pounds. Now that doesn't mean put 200 pounds all in one spot, but generally speaking, if there's some items you need to place up here, it's gonna do a good job of holding them up. Okay, so just to show you a bit of the function, we'll go ahead and open our tailgate here. Now, it does have a pinch mechanism here that's gonna allow you to open both ends, and we'll have that on every panel.
So we'll just pinch, fold up, pinch and fold up all the way until we get to the front where we've got these two retention straps that we can clip into place and keep it in this open position. Now installation just involves a couple of clamps. There's no drilling into your truck bed. We do have to use the stake pockets though for our rear clamps, so this tonneau cover is not going to be ladder rack compatible. However, if you do need one that is similar to this that is ladder rack compatible, I suggest you check out the Bakflip G2.
That could do an excellent job if you need something to go with your ladder rack. Now, I had mentioned how simple this installation is, so follow along and I'll show you exactly how we got this in the bed of our Colorado. So to start our assembly, it's always a good idea to kind of lay out the parts that are gonna be needed. So what we've got is we've got a trim tool. We're only gonna use this once to pull one of the plugs here in the bed.
If you don't have a trim tool, a flathead screwdriver would be fine. We've got two of our clamp assemblies with the knobs. We've got three of our bolts to go with our five millimeter Allen wrench. Our mounting block, and our GM assembly block right there. The other thing we've got is going to be our rail. Now to identify the rails, they do put a sticker on it that would say left for driver, right for passenger. But in case those fall off in transit or anything like that, they're really easy to identify. This rubber stripping right here, this weather strip, should be going on the outside up on top of the rail. And this metal tab is gonna be all up at the front facing the cab. So if you don't have that yellow sticker on there to identify it, that is an easy way to figure out which rail you have in your hands. So the first thing I wanna do is take my clamp assembly. Now in the instructions, it tells you to put it in and kind of get it closer up here to the front. But the way that the bed on our Colorado is, it doesn't really allow anything up here as far as the clamp to move in front of this position. So we're gonna be inserting our clamp right here, as close to this spot, without actually going over it. So I'm gonna just go ahead and insert this into the T-slot. The bracket should fit, by the way, so that the back one with the teeth is resting on top of the front one. So we'll slide that right in there, lift that up into place, and we're just gonna try to kind of work it in back there. And when it's all said and done, it should look something like this. Now what I'll need to do is take one of my bolts. We're gonna insert it through the front and through that hole right there. I'm not gonna tighten it down. I'm gonna leave it fairly loose for now. So I'm just gonna hand-thread it in a little bit and let it grab. So I've got the bolt set in there, and I've got this set in a way that it's not covering up that gap in the rail at all. It's just a hair, maybe a quarter inch to the left of it. I'm not tightening this down completely. Again, I'm just kind of getting it to where it's snug. So I'm just taking my five millimeter Allen key, and I'm just gonna get it till I start feeling a little bit of resistance. Then I'm gonna take my knob, and through the bolt hole on the bottom here, I'm gonna start threading that in. And this is the knob that I'm gonna use to actually do the tightening on it. So what I'm doing now is I am actually tightening this in as far as it'll go. There we go. And now I've got a really good grab there, and we'll move on to our next part. Now I'm gonna take my mounting plate and I'm gonna put that up here in the T-slot and I'm gonna slide that over somewhere in the middle of the rail right here. This doesn't get bolted in, so this is gonna stay maneuverable for now. Now we're gonna install our back clamp. And, again, we can't do anything to move it back this way. We're kind of forced to bring it up here. So we're gonna install that just right, again, right next to that gap, but not over it. And we just did the same thing on this clamp. We got this bolt to where it's snug and we've tightened our knob up completely. And now we've got a really good grab on our rail here and we're ready to put in the final bracket. So the first thing we need to do, we're gonna be using the stake pocket on this bracket, so we're gonna need to pop out this plug. So if you have your trim tool, go ahead and grab that. Just kinda work that under. We're gonna get rid of this plug. All right, so the next thing we're going to do is take our GM bracket, it's gonna be two pieces. This piece with the T-slot right here, we're gonna put in through our gap and we're gonna slide it till it's right over where that hole was for the plug. Next, we're gonna take this part, the back part of the bracket. And with the flat side facing our inner bracket, we're just gonna pop this down in here, and we're gonna have to look in here and line up those bolt holes. Now, I'm gonna be using this bolt hole here, not the one all the way at the bottom. So once you have that lined up, just stick your bolt through. Get that started. And then once that's done, I'm just gonna hold my back bracket in place, take my five millimeter Allen key, and I'm gonna start tightening it in, tightening it down. Now I'm holding it in the back to keep it from spinning on us or anything as I tighten it. And that's it for the rail installation. It's the same exact process over on our passenger side. And now we'll be able to grab our cover and get that mounted. Now to get our tonneau cover mounted, you're gonna have an end down here that has this big rubber flange to it that's gonna go over our bulkhead. So I'm gonna set this up here toward the front of the truck. And I'm gonna kind of work this out of here. Sometimes it's easier to do it from underneath. We're gonna attempt to get it done from up here. It is kind of trained to curl like this though, as you could see right around our bulkhead like that. And that's a good thing. It could be a little bit troublesome at first, you know, with it curling back up on you, but generally speaking, it's not too hard of a process. Now, from underneath here on either side, we're gonna have a bolt that will drop down and it slides along this track. And what we're gonna do is bring it over here to that loop that was set in the, oop, that was set in our rails here. And we're gonna take one of our spacers, thread that up there. And then we're gonna lift our cover and drop that into the slot. Now, that weather stripping up top might pop in like it just did, just before you set it down. You could just poke it through from underneath here. And now we've got that in place. So it didn't have a lot of room here by the bulkhead for this knob, so I shifted it forward just a little bit. And we're gonna go ahead and thread this knob on here. We're gonna get this nice and snug. And after that, we're gonna take our wing nut and we're gonna tighten that up underneath there. And once we've got that tightened up, we're gonna place this little knob at the end here just to protect any cargo from getting scratched or getting any damage done to the end of that bolt. So our next step is gonna be to take this mounting block that's sliding and moving back across the middle. We're gonna move it right under here. Right here, there's a threaded hole to use for one of the knobs. So I'm just gonna get that lined up and thread that in and get it tightened down. So with everything anchored down and tight, as far as our forward panel on the tonneau cover goes, now we're gonna go ahead and reach in and we're gonna depress these tabs and release our retention straps here. And we're just gonna start folding it out and going down the line. And we're doing this to ensure that we're gonna be completely lined up and that we're gonna be in a good place back here in the back to get our tailgate closed. Okay. So we do have a good latch on both sides. I'm gonna go ahead and hop down and just make sure that we get this closed up nicely. We're gonna open it, and also, we're gonna kind of check everything, make sure it lines up. So we're gonna go ahead and do our release latch. There we go. Okay. My bulb seal is lined up really nicely along the track here, so I'm very happy with that. But yeah, everything's folding and unfolding very, very nicely. So as you could see, the installation on this is really simple. If after watching this video you decide that the etrailer tonneau cover is the tonneau cover for you and your Colorado, you get it and you install it and you use it a few times, please share with us what you think about it in the comments below. We would love to share your experience with our other neighbors, so they can make the best decision for themselves. So once again, this is Curt with etrailer. Thanks for stopping by.
Customer Satisfaction Score:
96% were satisfied with this product
4% of customers were not satisfied
Ratings & Reviews




Kate F.
6/25/2026
Happy that you are happy with your new cover Dave! I like to hear that our cover is holding up great against the harsh elements.

Lazer S.
2/10/2026
Glad you like it, Greg! Good call on checking the instructions before you start as well. We are of the opinion it is better to have too many parts rather than too few. : ) What are you keeping in your bed?
Do you have a question about this Tonneau Cover?
Info for this part was:
At etrailer we provide the best information available about the products we sell. We take the quality of our information seriously so that you can get the right part the first time. Let us know if anything is missing or if you have any questions.






















Brooke M.
12/11/2024
Sweet! So glad to hear that. A simple install has got be a good feeling!