
Rhino-Rack ROC25 Roof Rack for Naked Roofs - Vortex Aero Crossbars - Aluminum - Black


To see if this custom-fit item will work for you please tell us what vehicle you'll use it with.


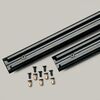
This quiet, aerodynamic roof rack with a from-the-factory look lets you carry gear on your vehicle's naked roof. Sturdy, lightweight aluminum crossbars include top channels with noise-reducing Vortex strips. Integrated locks deter theft.
Features:
Specs:
The low-profile, aerodynamic Rhino-Rack ROC25 roof rack lets you carry gear and accessories on your vehicle's roof quietly and with little wind drag. It's designed for installation on a naked roof (a roof without factory raised side rails, flush rails, fixed mounting points, tracks, or rain gutters). The rack's Vortex Aero crossbar has built-in rubber strips that disrupt airflow for a quiet ride, and the bar is constructed of aluminum so it won't rust. This bar blends seamlessly with the support legs to provide a from-the-factory look, and it is custom cut to your specific vehicle so it requires no adjustment during installation. The legs also include built-in locks that protect your gear and the rack from theft.
The rubberized Vortex strips in the top channel of the crossbar disrupt airflow with evenly spaced, wave-shaped grooves. This carefully controlled turbulence minimizes wind noise and whistling, so you won't need to add a fairing to your roof rack. And the slim, elliptical Vortex Aero crossbar cuts through the air with minimal drag - even at highway speeds.
The ROC25 roof rack has a flush-mount design so the crossbar terminates at the legs with no overhang. This provides the rack with a seamless, from-the-factory look, and it also helps to improve aerodynamics by reducing drag and wind noise.
The Vortex Aero crossbar is made of structural-grade anodized aluminum with an H-shaped internal extrusion. This extrusion strengthens the bar without adding a significant amount of weight. And the aluminum bar won't rust so you can leave it on your roof year-round.
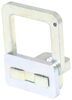
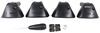
The rack's durable, glass-reinforced nylon legs are designed to stand up to cargo loads and weather extremes. They're also UV treated to withstand long-term exposure to sunlight.
The roof rack arrives at your doorstep almost completely assembled. The crossbar is already mounted into the nylon legs. And the bar is pre-cut to match the width of your vehicle's roof, so you won't need to waste any time centering it. The few remaining assembly steps are straightforward and require only the vehicle-specific fit kit.
The vehicle-specific fit kit includes pads and clamps specifically designed to fit the contours of your roof. To install, simply attach the pivoting plates and rubberized pads to the bottom of each leg. Then secure the legs to your vehicle with the metal clamps. Decals inside the legs and a diagram in the instructions help you to orient the crossbar on your roof.
Once the crossbar is properly positioned, use the included Allen key to tighten it in place. The Allen key is designed to serve as a simple torque wrench. The curve in the blue plastic handle straightens when you've applied enough torque to each bolt.
The crossbar has a built-in C-channel so you can carry channel-mounted accessories such as bike racks, watersport carriers, and ski racks. The Vortex strips in the top channel come in 3 pieces, so they're easier to adjust than a single long, continuous strip. You can remove, trim, and re-insert the Vortex strips around the mounting hardware of your accessories to keep the crossbar channel capped and quiet. Replacement strips (sold separately) are also available if you remove your accessories or switch to clamp-on accessories.
You can also attach most clamp-on accessories to the bar, and the Vortex strips provide a shock-absorbing, no-slip cushion for any accessories that rest on it.
Locking covers on each support leg let you secure accessories mounted in the crossbar top channel. These sturdy nylon covers give the rack a finished look and also help secure the rack to your roof. The cover locks are keyed alike, so a single key opens all locks.
 Alternate Instructions
California residents: click here
Videos are provided as a guide only. Refer to manufacturer installation instructions and specs for complete information.
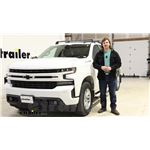
Hi everyone, Aiden here with etrailer and today we're gonna be taking a look at and later we'll be showing you how to install this Rhino-Rack ROC25 Roof Rack system on our 2020 Chevrolet Silverado 1500. Whether you're looking for some extra support on a ladder rack, or you're looking to carry something like kayaks that maybe won't fit very well in your bed, a roof rack is a great way to do that sort of thing. And this particular option from Rhino-Rack is gonna pack a ton of value because it's super affordable for what it is, offer you a pretty solid fit on the roof, and in my opinion, give you a nice clean look. And that clean look is thanks to the flush-mounted design where the bar up top doesn't extend past these tower pieces here. It's just gonna curve down and kind of match the contour over the roof here, giving us a much more factory-like appearance. If you have a ton of accessories you're trying to get on your roof, or depending on the type of accessory, like a loading-assist kayak carrier, you might want bars that have an overhang on them, just to get those accessories a little closer to the edge of this tall roof, or to allow you to use those load-assist features.
But if you only have one or two things you're trying to carry and having it not as easy to access isn't a big concern for you, like a box or a basket that you wanna place towards the middle of the roof anyway, then a rack like this is gonna be just fine. These are their vortex bars which taper off towards the front and the rear. So air is going to travel over those a lot cleaner and quieter. Up at the top you've got their weather strips that will sit down in this channel and keep wind noise down. If you wanted to channel accessories, you would have to remove those strips and trim them to length to fit around your accessories.
So a roof rack like this, I think, is gonna lend itself much better to clamp on accessories where you just don't have to mess with that. These bars are perfect size for most clamps out there and you've got enough room underneath that, even if you had hand knobs or something you needed to tighten, I think you'd have plenty of room for your hand to get in there and you wouldn't be worried about making contact with your roof. If you did want to access that channel though, you would have to take the cover off by unlocking it and that would expose the channel above. So it's just not gonna be as easy to reach, which, if you're looking to keep an accessory in there full time and just keep it secured and locked away, that could be really nice. But if you're frequently swapping things out, that's just not gonna be ideal because it's gonna be an extra couple steps and this cover doesn't fit over, on this particular vehicle, as nicely.
It's just a really snug fit. And when you go to press it into place, it kind of hits the clamp here. So you see that cover flex and it makes it a little bit harder to get that key into the locked position. The one thing about the fitment here that I don't love because it leaves a very small gap right here. But other than that, I'd say the fit is a 10 out of 10.
These pads leave really no wind gaps in here and the clamps that go into your door jambs fit really well too, so you don't have to worry about any poor fitment here as it's clamping onto the vehicle and fitting (door thuds) around your door. If you do plan on channel-mounting accessories or swapping them out maybe for different seasons, like kayak carriers in the summer, ski carriers in the winter, then you might consider a roof rack that's a little bit easier to do all those things. And for that I'd recommend Yakima's BaseLine FX system. It's gonna be an extremely similar roof rack to this, very similar footprint with the flush-mounted design. Their T channels are just way easier to access and slide the accessories in and out. The one downside to that kit though is that it doesn't include locks right out of the box. And I do think it's gonna look a little bit bulkier in the towers, so it might not give you as clean of a look. But I think the overall fitment is a little bit better too. So there's pros and cons to each, whether you go with the Rhino-Rack or the Yakima. A few things to keep in mind with your Silverado though, the bars will have designated places that they attach to, where these clamps are designed to fit properly, and that's gonna place the bars about 27 and a half inches apart from one another. That's important to know if you have any accessories that need a certain crossbar spread, but that number there should work with pretty much everything out there. It's just a good idea to double check. Your antenna on the front here does sit below the line here of the roof rack, so any accessories you choose to mount up there, I don't think it should interfere with that antenna at all, even if it does come down in the front a little bit like a roof box might. And overall, this can support a weight capacity of 165 pounds. Keep in mind that's just what the rack is rated for though, not necessarily the roof on your Silverado. So it's a good idea to check your owner's manual and go by the lowest rated component. And judging from experience, it should probably be that roof on the vehicle that will be the limiting factor, so just make sure you don't overload it. I mentioned earlier the installation process and we're gonna check that out right now. It's a pretty straightforward process. It does have a few more pieces than some other racks, but overall, there's fewer things to tighten down and the process is really straightforward and we're just gonna guide you through that and see what it looks like on our Silverado right now. To start your installation, you wanna get all your pieces laid out because there are quite a few here. But the overall install process is really straightforward. The pieces you wanna watch out for are of course your crossbar and the weather strips. These will be inside the crossbar when you open it outta the box. And then you've got all your different fit kit pieces, which will include the bases, the rubber pads and your clamps. You're gonna have your towers on either end, (towers clatter) some small screws to set those towers in place, the key to open them and the included torque tool. Now two things you want to provide yourself. You're gonna need a Phillips head screwdriver for those screws, and you're gonna need a tape measure to get your measurements right. First we need to attach our towers to our bars. To do that, take your cover off just by unlocking it 'cause we need to expose that hole up top for the screw to set it in place. Line these tabs up with the end of your crossbar, push the two together and right about here, you're probably gonna feel it stop. It's a pretty tight friction fit. What I found works well is taking the rubber pad from your fit kit, using that to kind of cushion your hand a bit and just giving this a tap to get it in place. (part slams) (part clatters) Once that hole is lining up, you can take those screws with your screwdriver, just pop that in, try to keep my hands out of the way so you can see that a little better and secure it down on either end. We can follow both those up though with our weather strips 'cause we can cover those screws up. And just lay one edge in and kind of pull that rubber strip back to seat the other side across from it until it lays flush. This will come in three sections and if you've got any channel-mounted accessories, you might want to just mock those up and see where they're gonna sit and trim the rubber strips accordingly. But if you only plan on using your clamp on accessories, you could just put 'em all in like this, and having a little bit of overhang on the edges of the bar is fine, just like you see right here, because the caps will cover those up. We're ready to flip the bar over and assemble our fit kit. Before you do that, just look at the bar and find the Rhino-Rack logo. That's gonna be the front of our bar, so flip it upside down, and first start off with these plastic bases. All four of these in your kit will be the exact same. You just need to look at that arrow and make sure that it's facing outward and clip this in to the bottom of our tower like this. So we'll get that lined up, (base clicks) push it in, hear it click, and that's gonna be seated properly. And there's that arrow facing out. Next is gonna be those rubber bases. These ones will be different depending on the driver or passenger side. It's really hard to see, but etched in there, it's gonna say M700 or M699 and there will be a small arrow. We want those arrows to be pointing forward. 700 will be passenger side and 699 will be the driver's side. So just get that lined up properly and get all of these tabs to line up with the base that we just snapped in. Just go around the edges, and make sure every bit of that is seating in properly. You'll feel it start to snap in once it does go. We can take that assembled bar to our roof and just set it up top. It can be helpful to have an extra set of hands over at this point, but the bar's not overly heavy, and if you've got a good set of running boards that give you a good foothold, I don't think it's entirely necessary. And we wanna take a measurement here. Your instructions are gonna give you a couple measurements from the center between your two doors here, both from here to the center of your first crossbar and from here to the center of your rear crossbar. Use that as your point of reference for positioning. I need to move mine back a fair bit. And take that measurement on both sides, just to make sure that everything is going to be even, from front to back, as well as parallel with each other. (tape measure snaps) Now your clamp is gonna be the same for all four locations. That simplifies things. You're gonna have a screw that's pre-threaded into this block in your tower. So take that out. And you want to get your clamp lined up over that. Pass the screw through. (screw clinks) This is gonna be super hard to see without my hands getting in the way, but you wanna line that screw up with the block behind it and just very loosely start it by hand. It helps to hold the block with a finger behind it, just to get that first few threads started. And make sure that clamp can reach down into the door jamb like this. Repeat that on the other side, and then we can start to evenly tighten them down, moving back and forth, so we don't pull it all to one side. As we're tightening this down, you wanna make sure that the clamp starts to evenly seat itself into the door jamb there. But the thing we're watching out for is this tool. It's curved on the end here, so as you're tightening it down, you should see it start to flex and flatten out. Once it does that, you're done. It's kind of subjective, but it works pretty well and you just wanna make sure it does that on both sides to make sure it's fully secured. (door slams) It will finish things off just by covering all that hardware up and locking it in place. We're getting a pretty tight fit here. I've had to put a little bit of pressure down in this bottom corner with my thumb when I turn the key, just to make sure it aligns properly. And even then, it's a super tight fit, that leaves a little bit of gap over here, I've noticed. But that's just the fit we're getting with the way these clamps sit. And once it is all locked up, we can give it a shake, just to make sure that nothing's loose or moving around. And when we're happy with the fit, we're ready to hit the road. Overall, if you're looking for a roof rack that brings a ton of value, I think this option from Rhino-Rack is a really good choice. Some things I like about it, these towers are a little bit thinner and I think it gives it a nicer look once it is up here. It comes with locks right out of the gate so you don't have to worry about picking up anything separately. Just a more complete kit in my opinion. And it's really affordable for what it is. So you don't have to break the bank to get a roof rack on your vehicle. The one thing I'll say is that the fitment overall for me is an eight out of 10 or a nine out of 10. It's really good on the truck, but the way these covers flex to get them put on, it just leaves a little bit, for me, to be desired. I don't know, over time, when it's sitting out in the elements, how that plastic would fare being stretched out long term and I'd be worried about long-term reliability issues with that. But if you're just looking for a simple way to carry some stuff on your roof and you want it to be a really good value, I think this is the way to go for your 2020 Chevrolet Silverado 1500. My name's Aiden and thanks for watching.

The racks are sturdy and they fit my car as intended. The plastic legs which attach to the crossbar on either end wouldn't initially fit on though. The plastic didn't sit flush against the metal and it required about an hour of carving plastic out before I could force them on. After that was sorted out, the rest of the assembly was smooth. They seem solid.
Do you have a question about this Roof Rack?
Info for this part was:
At etrailer we provide the best information available about the products we sell. We take the quality of our information seriously so that you can get the right part the first time. Let us know if anything is missing or if you have any questions.


Thank you! Your comment has been submitted successfully. You should be able to view your question/comment here within a few days.
Error submitting comment. Please try again momentarily.