


 Arrives before Christmas
 To see if this custom-fit item will work for you please tell us what vehicle you'll use it with.


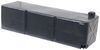
Make your truck more accessible with running boards and adjustable height mounting brackets. The 6" wide boards can be set at 4 different heights depending on your needs. Raised tread provides excellent traction. Custom fit for your Ford F-350 Super Duty.
Features:
Specs:
Videos are provided as a guide only. Refer to manufacturer installation instructions and specs for complete information.
How's it going neighbors This is Ed with etrailer.com and this is a look at the Romik RB2-T Running Boards with Drop Brackets. These are available in black or silver to fit a wide variety of vehicles. Use our fit guide to make sure you're getting the right fit for you. When you add something like a running board or nerf board to your truck, it's gonna give you a little bit more function as far as being able to get in and out of the vehicle easier, especially when it's icy or snow on the ground. And it's also going to add to the appearance of a vehicle. 'Cause I think personally adding running boards and nerf bars to your pickup, it just gives it a little bit more custom look.
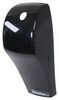
So, let's take a closer look at our running board and see what's special about it. So as far as our running board, this guy is made of aluminum and it's gonna give you a lot of corrosion resistance versus steel running boards that sometimes tend to, you know, rust out from the inside out. This is also gonna have advanced traction of rubber material here that's gonna allow you to not slide onto the aluminum surface in those snowy icy conditions. Another cool accessory that they offer is actually a bracket cover. To give you a more OEM finished look and hide your brackets.
Depending on your fit, you can have a weight capacity between 375 and 450 pounds. Check out our product pages or your owner's manual for your specific capacity. So no matter the fit of the boards, they'll have the same appearance with these nice rounded edges that gives them a smooth edge and sleek look. Installation is easy. We'll go through a typical installation on our Ram today.
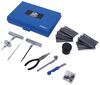
Your installation may be slightly different, but this will give you an idea of how simple it is. You want to check your instructions for the specific details for your vehicle. So we're gonna get our installation started and we are gonna grab a few different things to get this going pretty smooth. You're gonna need a torque wrench. You don't necessarily need one fancy like this.
If you take a look at etrailer.com, we offer a little bit more- less professional style torque wrenches that'll still get the job done. You're gonna need a few wrenches, well a couple wrenches. It would be handy to have a 15 millimeter and a 13 millimeter, as well as your ratchet wrench. And you're gonna need a 13 millimeter socket as well as a 15 millimeter socket. So now we're gonna lay out all of our hardware and the way that it works on both sides is pretty similar. You're gonna have three points of contact underneath and I'm just gonna put together everything that I need for each one of those sections. So you're gonna have both your exterior bracket and the bracket that goes against the inside body on the studs. You're gonna have three of your 15, I'm sorry, your 13 millimeter nuts that go on the studs themselves. (bracket clinks) And then you're gonna connect the lower bracket using your 15 millimeter hardware. So let's go ahead and hop underneath and get started. So the studs that you're gonna make your connection with your bracket with are right here underneath. You're gonna see that they're in different configurations depending on if they're in the front, middle or rear. One step that you don't want to pass up on is actually cleaning the studs off using a M8 dye. You're gonna want to go through to get all the paint and the anti-corrosion off so you can get a real grip with the nuts on the studs themselves. Now you wanna make sure that this ridge is pointing away from the vehicle itself and you can just use a 13 millimeter nut to hand tighten along the studs. Now you don't want to actually start snugging it down too much yet 'cause you're gonna want this maneuverability for when you're getting the running board on the brackets. Now our bracket is adjustable and that's one of the things that's really cool about this setup. But on the 1500 Ram, you have four position setups and you can only go to the third hole. So you would not be able to get that highest level on this particular setup. However, you can go three up and you can take your hardware, you're gonna use your 15 millimeter bolt and nut. I'm just gonna put 'em both through to kind of stabilize it. And then we're still just hand tightening. We still want it to be nice and loose so we can position our nerf bar a lot easier. And I'm gonna go do the same thing on my other brackets. So as far as our running board, you can see that we have four sets of hardware along the track here, pre-installed. On our 2025 Ram 1500, we're only gonna need three of these sets. So we're gonna be able to remove the end cap and just remove a pair of the nuts and bolts with the washers. So now we're gonna just make sure we get it lined up, close as possible to the location. And we're just gonna slide it on top of our brackets. (running board clatters) And now I'm gonna get underneath and make our connections with our fasteners. Now I know you can't see right in here, but there's two 13 millimeter nuts that we're gonna fasten down. We're just gonna pull down onto the bolt that was pre-installed into our running board. So I'm gonna get a little tension on here and I'm just gonna go through, I'm just gonna get everything just snug. And once I get all this tightened down, now I'm gonna go and tighten down my brackets. (wrench rasps) So now that we have our running board attached to our brackets, we're gonna fasten down our actual bracket. So I'm gonna grab myself a ratchet and a box wrench and we're gonna fasten this down to get the position that we want. So I'm gonna start in the center and then just go through and just still going, just snug on everything because we're gonna go back through with our torque wrench to make sure we get the specified torque spec. (torque wrench rasps) (torque wrench beeps) All right, and now that you have everything torqued down to the recommended foot pounds from the manual, you're completely installed. This has been a look at the Romik RB2-T Running Boards with Drop Brackets. Have a great day.
Info for this part was:
At etrailer.com we provide the best information available about the products we sell. We take the quality of our information seriously so that you can get the right part the first time. Let us know if anything is missing or if you have any questions.


Thank you! Your comment has been submitted successfully. You should be able to view your question/comment here within a few days.
Error submitting comment. Please try again momentarily.