


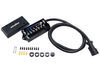
Take your rukRak cargo basket on the move by installing this handy wagon accessory. Simply detach your basket from the carrier frame and use the convenient grab handle to get your gear rolling. Pneumatic balloon wheels cover any terrain.
Features:
Specs:

Videos are provided as a guide only. Refer to manufacturer installation instructions and specs for complete information.
Hi, Matt with etrailer. If you're a big fan of your rucRak but you just wish it was a little bit more mobile so you can take from point A to point B, then the rucRac wagon accessory kit is gonna be a great option to take with you. Now, your rucRak Recruit is already pretty adaptable and it can do a lot of things, especially with how it's gonna work on the back of your vehicle. Now, with this kit we have today, it is just gonna make it a little more adaptable so it can work in more cases. So what's nice about this is you essentially getting the ability to make this more mobile. So if you plan on taking any trips either to the beach or to the campground, this is gonna be a great way so you don't have to go constantly back to your vehicle so you have to grab your equipment.
And really, with these tires and the way they're designed, they're gonna be able to go over most terrains, whether that be sand, dirt, or grass. We threw some things back here, just kind of simulate what this might be like to actually use. So right now, we've got three camping chairs, we got a sleeping bag and we got our cooler. And if I try doing this by myself without the wagon, then trying to carry all this from point A to point B is gonna pretty difficult. On top of this, that's gonna save you a whole lot of time, especially if you're pretty far away from the campground or from the beach.
That's another thing to think about too, is maybe you're arriving somewhere pretty late and you don't have very much time to get set up. This is really gonna save you a lot of time. Another thing to consider when you're moving this is it's gonna have a pretty high turn radius. We're gonna be able to turn this by about 90 degrees. Lets see, we're just making a complete circle right now, and part of the reason why it's able to do that is just 'cause how lightweight this is to maneuver.
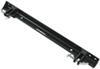
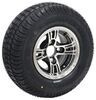
We're gonna show you what I mean is I just come over here, I can pick up the whole thing pretty easy. That's gonna be 'cause of its construction. So not only will the carrier itself be made of aluminum, but so will the handle and the axles on the bottom too. And moving over to the wheels themselves. You'll notice we don't have a whole lot of tread on these and this is gonna be more of a pneumatic balloon beach wheel.
And what's great about this is we're getting a larger footprint and since we don't have too much trim on this, this is gonna allow it to glide over sand a lot easier. One of the biggest benefits of this is you can still attach it to the base of your rucRak without removing the wheels. So if I just put that back on here, you know this is gonna go back on. Doesn't take too long to do at all. You just gotta make sure you secure backs down into place. It will have some latches to do that and then some additional pins that help support it too. Now, something I did notice is sometimes you'll still get a little bit of rattling occurring with this compared to what it's like before, but it does still feel pretty sturdy. So I'd still trust it with my equipment back here. And we're gonna have this optional bracket to mount your handle. The reason why I say it is optional because it can block you from using specific things with your kit. So to really show you what I mean is, I wanna flip this 180 degrees. You notice on the backside right over here we're gonna have the stop into place. The reason why this is stopping right now is what's happening on one side is we're making contact with this bracket right here. Or in some cases, you're gonna make contact with the handle, but either way, it's not gonna let you store it in this position. But to be fair, I honestly wouldn't use this position too often. You can't mount too many things like this, so you're better off just leaving it like this and using the wheels. But we can fold it up into that stowed position in the upright and I just need to make sure I put on these little hand knobs to hold it down. So in some cases, you might not have very much clearance and they might make contact with something. So what you can do in those situations is actually change where these wheels are sitting or at least the front ones, especially since this does kind of pivot some. All you have to do to remove these is pull this little safety clip at the very end. This can be a little bit tricky to grab if you didn't place in a good spot like me. There we go. And now just pull that off and flip around so it's like this. Now, something else to think about is maybe even removing them completely. So you can see that's gonna sit a lot further away from your vehicle, but if the backside's gonna make contact anyways, I'd recommend just removing this completely. As you can see, it doesn't take very much time to really take on and off. The backside's gonna be a very similar process. Only at this time, we're gonna have two pins that you just pull out and you can take this off now. I took off all those extra pieces we have and the only pieces left on there are just gonna be the brackets actually installed on here. The reason why you might wanna consider that is if you just kind of wanna reduce any rattling, I think in most cases, you're probably not gonna hear it, but it is something to consider if you don't wanna hear it at all. Now, we did just get done driving around with this and one thing to note is when you are driving, you wanna make sure it's in this position where you have the front axle 180 degrees away and then the rear axle is gonna be shifted 90 degrees to the side. Now, a couple things we did notice when driving around was this can be a little bit noisy if you're going over big bumps. Other than that, I didn't notice it too much. But when we took it out in the test course, hitting those big bumps, not only could I hear it, but I can kind of feel it a little bit too. But it's just a look at the rucRak wagon accessory kit. I'm Matt, thanks for watching.
Info for this part was:
At etrailer we provide the best information available about the products we sell. We take the quality of our information seriously so that you can get the right part the first time. Let us know if anything is missing or if you have any questions.


Thank you! Your comment has been submitted successfully. You should be able to view your question/comment here within a few days.
Error submitting comment. Please try again momentarily.