


To see if this custom-fit item will work for you please tell us what vehicle you'll use it with.


Thank you! Your comment has been submitted successfully. You should be able to view your question/comment here within a few days.
Error submitting comment. Please try again momentarily.


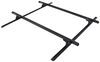
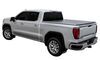
This aluminum ladder rack is built to handle up to 500 lbs (250 lbs per bar), so it’s ready for both work and play. You can load it up with ladders, lumber, or piping during the week and then mount canoes, kayaks, or surfboards when it’s time to get outdoors. The crossbars sit 26-1/2" high, giving plenty of clearance for taller cargo while keeping everything stable and balanced above the bed.

You don’t have to choose between a ladder rack and your tonneau cover. This rack works with many inside-the-rail covers, including Access roll-up covers, and doesn’t block the stake pockets. That means you can keep your gear dry under the cover while hauling long loads above it. The contoured uprights also stay clear of most toolboxes so you can use all your space efficiently.

The extruded, anodized aluminum construction is lightweight, rustproof, and strong enough for everyday use. The finish adds corrosion resistance and holds up well against weather and road debris. Foam padding under the utility rails protects the bed rails from scratches, and the sleek silver finish keeps the rack looking sharp over time.

Square crossbars have mounting channels along the top and bottom so you can secure gear or attach accessories exactly where you need them. The removable rubber strip reduces vibration and gives easy access to the top channels. Utility rails include their own mounting channels for additional tie-downs or gear mounts. The uprights can slide along or be removed from the rails to fit the size of your load, and load stops are included to keep gear from shifting.


You can install this rack without drilling. The aluminum stake pocket inserts and included hardware let you mount the foam-padded rails directly to the bed. That setup makes it easy to remove or reposition the uprights whenever you need the open bed space for larger items.


Videos are provided as a guide only. Refer to manufacturer installation instructions and specs for complete information.
Speaker 1: Assembly threaded clamp and alignment plates to cord. Then tie knot at top of cord. Insert channel nuts into rack rail. Insert end caps into both sides of rack rail. Tighten end cap retaining screws. Repeat for remaining rack rail.
While holding knotted end of cord, drop clamp into stake pockets. Line up clamp and alignment plates with stake pockets. With clamp and alignment plates flush against stake pockets, place washer over slotted hole, and turn hex bolt until finger tight. Repeat for remaining stake pockets.For easy removal of internal parts later, make single knot at each end. When complete, fully tight rack rail bolts.
At top of upright, thread hex bolts from bottom into mounting bracket. Leave mounting bracket loose, for now. Repeat for each upright. Measure and record mounting distance between inside rack rails at front and rear locations, as box width may vary. Slide mounting bracket into crossbar channel.
Space bottom of uprights to match measurement recorded earlier. Center crossbar, then turn bolts snug. Then install end caps to both sides of crossbar. Repeat for remaining uprights.Set upright assembly between rack rails. Uprights should fit snug.
Next, align channel nuts with bolt holes in uprights. Thread bolts into nuts and finger tighten. Check for equal distance from box edge to upright. If equal, use ratchet with socket to tighten bolts snug. Repeat for rear uprights.Verify uprights are installed correctly. The crossbar centers without binding between uprights. Then fully tighten all bolts until serrations on flanges are seated tightly.
Ratings & Reviews


Do you have a question about this Ladder Rack?
Info for this part was:
At etrailer we provide the best information available about the products we sell. We take the quality of our information seriously so that you can get the right part the first time. Let us know if anything is missing or if you have any questions.
























Brooke M.
3/26/2025
I gotta agree with you, Brian. It looks AWESOME. Would you have any tips or advice for anyone else looking to install this on their truck?