
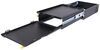
Pair the built-in tongue weight scale on this hitch with the easy-to-use instructional app, and get the perfect towing setup. We love how Weigh Safe makes it easy to get totally balanced, but we love the smooth ride this hitch offers even more.
Features:
Specs:
Note: Some Bulldog-style sleeve-lock couplers may not work with this system because of the limited space between the hitch ball and the lead screw in the system head. There is approximately 2-1/2" between the screw and the center of the hitch ball.
The most important thing you can do to ensure a safe, smooth ride when towing is making sure that your tongue weight is evenly distributed. If the balance is off, well, you've probably been there before, bouncing all over the road and getting pulled in every different direction. Simply put, when your load isn't properly distributed, your steering goes kaput.
Getting things just right can be a huge pain. First of all, depending on your trailer (and everything loaded into your truck), you may not even be able to adequately redistribute your weight on your own. You might just plain need a weight distribution system to help.
Standard weight distribution systems can be a bear. You need to manually tweak and adjust every little thing, and even then, there might be so much play in the setup that you'll still have issues with handling. The go-to for picking up that slack is typically adding sway control, but that can lead to other issues, like not being able to back up or tow in the rain.
The True Tow is designed to make solving these problems as simple as possible. No more fiddling around with hard-to-adjust parts. No more guesswork when setting things up. No more terrible sway on the highway. Just follow the setup process to get a perfectly balanced system and hit the road.
The setup steps are easy:
1. Hook your trailer up to the ball on the system head.
2. Take note of the weight on the built-in scale to make sure your tongue weight is in that sweet spot (10% to 15% of your GTW).
3. Pop into the companion app on your phone and answer a few questions, then wait for the app to give you an exact "distributed tongue weight."
4. Hook up the spring arms so the system is fully in place.
5. Adjust the lead screw on the hitch head until the scale shows the "distributed tongue weight" that the app had you shoot for.
Once you've completed all the steps, just make sure all your connections are secure and head out on your journey!

California residents: click here
Videos are provided as a guide only. Refer to manufacturer installation instructions and specs for complete information.
Hi, I'm Matt with etrailer. Today we're gonna be talking about the Weigh Safe Weight Distribution Hitch on our 2016 Dutchmen Kodiak. Now this will be a great option if you're still kind of new to weight distribution in general or you have a trailer that's constantly shifting with the load. So let's take a closer look at it. So weight distribution in general is gonna be great, especially when we start getting into those larger trailers like this Kodiak I have back here today. Now there's a few things to think about what this does and essentially it is just redistributing that weight that's gonna be on that ball originally.
So it's gonna make it a better just ride experience when you're pulling that trailer. 'Cause what's happening is we don't have as much sag at this centric point here. It's gonna level everything out and that does a few things for us with these borrowers on the side. We're not gonna get as much sway when we're driving down the road. So you're gonna feel a lot more comfortable and you're gonna have more control on the vehicle side of things too.
'Cause since we're not having as much sag, our front axle is gonna have more contact on the ground. So when you're making those turns, you're gonna actually feel that connection. And what makes Weigh Safe stand out compared to the other options out there is a few things. The biggest thing is gonna be the scale right here. So once you load your trailer on here, it's gonna let you know what that tongue weight is exactly.
So there's not gonna be any guesswork involved. And the other thing too is gonna be these bars we have on the side and these bars are great 'cause most four-point systems, when they're making contact over here 'cause it relies on friction, it's quite noisy. This comparatively to the rest of them is gonna be not as loud. And something else I really like about this is gonna be the installation. After you install it the first time, the following times only takes about 10 or 20 minutes after you get this all in place.
And we do have an app that makes you be able to calculate everything a lot more simply. Now, something I did wanna check is gonna be our wheel well clearance. So we have this Kodiak back here and it's roughly around 6,600 pounds. So when I get this and I don't have my weight distribution hooked up at the moment, this is sitting at 41 inches. Without us being hooked up, this sits at about 42 inches. Yours might be a little bit different depending on what your suspension looks like. But when I actually put on the weight distribution arms, that's gonna raise it up to 41 1/2. So we're gonna get less sag back here. Now if we had a larger trailer, you'd probably notice a larger difference with that. But when you do have any type of trailer back here with your weight distribution, you do just want a little bit of sag still. So let's take a closer look at some of the details of this. So with that scale, this is gonna go from 0 to 5,000. And 5,000 is a pretty large number, typically referring to your tongue weight. But the way this works is it's applying extra tension since we have these bars in place. And the app will tell you specifically how to reach the correct number that you need to haul. Now the next thing is gonna be our drop. The one we have today is gonna have a 8-inch drop. But if you need a different variation, we're gonna have other options here on our website along with the shank. 'Cause like I said earlier, this is gonna be 2 1/2-inch shank. It goes into your receiver. If you need a 2-inch one, also have that here and it is gonna come with a locking pin. So I know we can come by and take your weight distribution hitch. And when it comes to maintenance, the big thing is when you're not using this, you can just throw it back in your trailer and we are gonna have some grease points. So we're gonna have a Zerk fitting right here at the very top. And then, we're gonna have another grease point right here. You can grease this up and now I'll let these arms pivot a little bit more smoothly. Now you're gonna have a recommendation in your instructions to let you know when and how often you should do this. We are gonna have these bars. So this is a four-point system like I was saying earlier. Typically pretty noisy, but this one is quiet compared to the rest of them. Now when it comes to how it's gonna mount back here, we are gonna have a bolt-on bracket. So this is relatively easy to take off. It's gonna be two bolts, one on the top, one on the bottom, and two more that secure the side of the bracket. So you don't have to make any permanent modifications to your trailer. But with that said, we can jump into the installation. I will say I'd recommend finding a level surface and chocking up your trailer so you can do this accurately and safely. So the first thing we're gonna be doing is just making sure we get this installed into our hitch. It's gonna be like any other type of ball mount out there. Once you got that pinned into place, then we can come back over here. I'm gonna lift my trailer up just a little bit so we can connect this and I can check the weight. (tool whirring) Now I'll be able to take this number here and like that app I was talking about earlier, I'll be able to download that if you haven't already and we can input that number into the app. This is what the app's gonna look like once you actually get there. So right here, it's gonna say actual tongue weight. I'm just gonna put in 650. That's what it looks like roughly what we have right now. Now I've uncoupled and what I'm gonna do over here is make sure everything is level. That's why we want to have this on flat level surface. So what I'm gonna do is grab a level here. Place it there. I can tell it's a little bit off and lower this down. I'd also recommend just go and by with a tape measure, measuring on the front of the frame and the back of the frame to make sure it's the same measurement. (tool whirring) Now that our trailer is relatively level, we're gonna come back through and get a measurement. What we're gonna get a measurement of is gonna be the top of that coupler and that's gonna be around 19 inches for us today. And what I wanna make sure is the top of the ball on your ball mount is gonna be around an inch higher than this. So kind of roughly like this. So where we're sitting at right now, I'm at 18 inches for this. So this is gonna have to go up some. The way we're gonna do that is we're gonna remove these bolts and hold it in place right here and go up by one hole. Secure this back down. Double check my measurement, and we're looking pretty good there. And then, we're just gonna come back through and secure these down with a flat washer, a split washer, then your nut. And then, once you get them hand tight, we'll come back through and torque 'em down the spec. Now you're gonna have a label on here that'll let you know what to torque it down to. There we go. Now this is gonna be a good point where we can put our brackets on. I'll talk about that process in a second. Let me show you how to get that measurement of where they're gonna go. So we're gonna measure from the center of your coupler to about right over here, I'm gonna go about to 32 inches typically. Typically that'd be the max range I'd recommend going to, but there's gonna be some brackets that hold up our batteries. So what I'm gonna do instead is find a point that's gonna be able to avoid those brackets. So I already have a marker right here and this is gonna be just under 29 inches for my case today. So again, make sure you have a paint marker, mark that out. And then, we can grab that bracket and line it up to the center of that. You are gonna want both sides be at that same distance And essentially, I've already got the whole system put together but I'll remove some of it so we can kind of break it down from the beginning. (tools clanking) So when we're starting off, I recommend having a carriage bolt through here, one of your longer ones, and having a split washer and a nut there. I'm just gonna extend that out. I'm gonna remove the one on the bottom completely and we're just gonna put it right over here. You notice the orientation have this, this is gonna be a big gap and we want the grouping of those square holes together in the bottom. So I wanna just stick that through here, making sure that's lined up. And we're gonna grab this carriage bolt, slide it through the one that's closest to your frame. In my case, it's the bottom one here. But if you had two opening, then you'd go with this one instead. I'm gonna push that through and connect it to the other side. And my case right now, this top one's a little bit tight so I'll just loosen that up some. There we have it. I wanna make sure it's relatively straight and I'm gonna put this split washer, and then nut on the backside. Then, I'm gonna grab this other bracket, just make sure this is pretty snug on there. And then, the way we're gonna put this on is I'll just roughly put it in place for the time being. Oh, that's my hole. If you don't get this lined up, it won't hold it in place. Now it is. And essentially what we wanna do is I'll take this piece right out of here so it's a little more clear. We wanna measure from the top of this bracket here to the top of where your coupler is sitting. In my case, the top of my coupler is lined up with the top of my frame. Just double check yours. And we want there to be a nine-inch difference here. You can tell mine's a little bit lower than I want it to be. So I'm just gonna raise it up by one, and then double check it there. There we have it. Double check one more time and we're pretty close. So that should do it. We'll put our carriage bolts back into place, and then put a split washer and a nut on 'em. And there are gonna be torque settings on this bracket here. It's gonna be at the bottom and you'll just torque these down to the specs. We can come over here now and grab these bars. And the way you're gonna do it is you see that cut out there We're mainly gonna be lining up these holes on the side though. Put the holes on the side here. So just stick it right in. Already done this on the other side. And then, sometimes when you have the newer one, you might have some burrs in here, so you might have to break those up some. This one we've used a couple times now, so it should slide right into place. I recommend doing this from the outside in. Because if you do it the reverse way, if these are kind of pulled in pretty tight, they're gonna be really hard to remove. So try to keep it on the outside. And then from here, we'll push this out a bit, and then couple up to our trailer. (tool whirring) Now that we're coupled up, I got all the weight on the ball mount now. Make sure it locks into place and we put a pin in it. From here, we're gonna get a couple measurements. You're gonna have a couple measurements in your instructions. So we're gonna get one where we adjust this bar and it's gonna be pretty stiff when you first get it. You wanna make sure this is around about 90 degree with the ball mount, kind in this orientation I have it now. And then, I'm gonna measure from the front of this bar right here for all my measurements today. So we're gonna go from that bar to the center of our rear axle on the truck. So now today, I'm getting 57 inches to my setup. Then, I'm gonna go front of that bar again, it's about the center of that bracket. That's gonna be pretty close to 27 inches. And then, we're gonna do one more and you might need to get a friend for this one. I might today, we're gonna go from that bar to the center of our axles over here. So this is gonna depend if you have a single axle. If you have a single axle, you are gonna go from the center of the hub. If you have a dual axle like I have today, I'm gonna go in between those two tires. Now just keep those measurements, we're gonna use them here in a second. Before we do that, we need to put these bars on here in this bracket. So what I'm gonna do is I'm gonna move this pin out of our way just for the moment. And if I try and lift it up one, and this is pretty stiff, it's kinda hard to move, but I can't get it up there. Now we do have this tool and we could use it here, but instead of that, I'm gonna use my jack and this I do recommend a 5,000-pound jack. Now you are gonna notice this bar is gonna start going higher and above that bracket. (tool whirring) Right about there is probably gonna do. And let's say your jack gets fully extended but you're still not gonna get clear this bracket yet, then you could use this tool. All you'd have to do is have the end of this, go into that hole where we took the pin out of the bracket, put it underneath here and lift up, and push it into place just like that. Now I don't have to do that today 'cause I should be able just to lift it up, push it inwards, put this pin back into place with that clip. We're gonna do the same thing for the other side. And then, lower this back down. So I loaded my jack back down so all the weight is back on our ball mount and we can go over the app now. So when you open it up and you get through all the menus of like agreeing to the terms and services, we'll get to this point here. It's gonna ask you the putting your vehicle's information. So you can put that in a couple different ways. Once that's put in, put in your trailer's information. So we wanna put our GVWR. That's the biggest number, the most important one we wanna put into place. And then, we're gonna put in our hitch information, which in our case today is gonna be the true tow middleweight. Once that's all put in place, that number we originally got of the tongue weight scale, if you had already put that in here, it might clear once all three these go into place. You might get a red upside down thumb. If you just put that in, all three, these should have three green lights. Now if you do, you're on the right track. Now what we're gonna do here is put in a couple more things. So we need to let it know we're in the drop position. If you're in the rise position, we put it there. And then, we wanna make sure we're showing how many holes are visible. That's gonna be five holes in our case today that are above my highest bolt on there. Once all that information is put in place, then it's gonna opt in to calculate. The way I calculated earlier, it asked me for those three measurements we had. So make sure you have written those down, put 'em into place. And right now I have this number, so I'm gonna tighten this down to 1,700 pounds. And the way you do that is by coming over here. And here's a closer look at those five holes right here. Now to tighten this up, we're gonna take our tool. And if we need to raise that foot pound, which we're probably gonna have to in our case today, we're gonna use this hole at the very end of it, and go clockwise. And as you're doing this, you're probably gonna want to jostle this around a little bit so it doesn't get caught up anywhere. Now what I like to do though is just grab a socket and wrench to do this instead 'cause it's gonna be a lot quicker and it's not gonna take up as much space. And now we're gonna grab a torque wrench and we're gonna come over to this little nut here. It's gonna be right next to your scale. We're gonna tighten this down to the torque setting it has listed here. So I'll get this nice and tight till we hear that beep. And we should be mostly good. (beeps) And once you have everything properly tightened down, make sure you hook up your trailer to your trucks. So your safety chains, breakaway switch, and your power. Once you get that done, you're pretty much good to go. And if you guys have any other questions, let us know here at etrailer. And again, I'm Matt and thanks for watching.
Customer Satisfaction Score:
94% were satisfied with this product
6% of customers were not satisfied
Ratings & Reviews

Info for this part was:
At etrailer we provide the best information available about the products we sell. We take the quality of our information seriously so that you can get the right part the first time.


Thank you! Your comment has been submitted successfully. You should be able to view your question/comment here within a few days.
Error submitting comment. Please try again momentarily.