To see if this custom-fit item will work for you please tell us what vehicle you'll use it with.
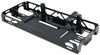
This hitch lets you bring more on your adventures - tow a trailer, haul bikes, or carry gear. The 2" receiver fits accessories for work and play. Bolt-on install means no welding, and the powder coat finish resists rust for lasting use.
This hitch is ideal for towing mid-sized loads, including utility trailers or small boats. With a 3,500 lbs gross trailer weight capacity and 525 lbs tongue weight rating, it provides a secure towing solution for moderate applications. The 2" receiver size offers versatility for various towing setups.
Perfect for bike racks and cargo carriers, this hitch allows you to transport bikes, camping equipment, or extra luggage with ease. The 2" receiver accommodates a wide range of hitch-mounted accessories, enhancing your vehicle's cargo capacity for road trips and outdoor adventures.
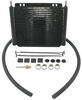
Skip the stress - this hitch features an easy bolt-on installation with all necessary hardware included. No welding or complicated modifications are required, making it a straightforward project whether you're in your garage or driveway.
From road grime to unpredictable weather, this hitch is made to withstand the elements. The dual-layer finish - an industry-leading powder coat over a protective base - helps prevent rust, chipping, and wear, keeping your hitch looking great and performing reliably for years.
No bulky hitch sticking out - this model features a concealed main body that tucks neatly behind the bumper. The result? A clean, factory-style appearance without sacrificing strength or towing capability.
Keep your hitch in top shape with an open-back receiver design that allows for easy cleaning. Say goodbye to dirt and debris buildup inside the hitch tube, making it easier to maintain and use over time.
California residents: click here
Videos are provided as a guide only. Refer to manufacturer installation instructions and specs for complete information.
Hi, this is Scott with etrailer and today we're taking a look at and installing our CURT class three hitch on our 2025 Subaru Crosstrek. So for first impressions on this hitch on our Crosstrek, I really like this one. It looks pretty good on there. You don't see a lot of the cross tube, but you will see just a little bit of it hanging down. Most of the thing you're gonna see is just your receiver down here hanging out. Other than that, another nice thing about it is, it's gonna have a really good gloss finish on it.
And it is gonna be a powder coat, so it's gonna hold up well over time to chips, scratches, and corrosion. So that's gonna be really nice. Another nice thing is it's gonna be a two-inch by two-inch receiver opening, and that's gonna accommodate most of your popular accessories that are on the market today. And it's a pretty heavy-duty setup. This hitch is also gonna have a 5/8 pin hole opening, and that's gonna be the pin that holds in any of your accessories that you put through this.
Now, this one won't come with the pin and clips. You may need to pick one up here at etrailer. Or keep in mind, a lot of your accessories that are on the market now will already have a pin and clip with 'em. And a lot of your accessories, like your bike racks, will have an anti-rattle feature with them that will act as your pin. For your safety chain loops, you're gonna have a welded-on style.
It's gonna be the wire style. These are gonna accept either your S-style hooks or your clevis-style hooks. So either one of those are gonna work for your trailer towing needs. As far as measurements go for this hitch, from the center of our pin hole out to the edge of our bumper, we're looking at right around 2 1/2 to three inches. Now, with that measurement, you'll be able to decide on if any of your accessories that fold up or stow away will make any contact with the back of your vehicle.
Now, from the ground to the inside of our receiver, we are looking at right at around 14 3/4. With that number, you'll be able to decide on if you need to have any rise in the shank, if any of your bike racks or your cargo carriers for clearance. As far as weights go for this hitch, we're looking at a tongue weight capacity of 525 pounds. That's gonna be the weight of your bike rack with your bikes loaded down on it or your cargo carrier loaded down with all of your gear. Now, it's gonna have a gross trailer weight rating of 3,500 pounds. That's gonna be the weight of your trailer and everything you have loaded down on that. Now, if you have any questions or comments about this hitch, you can always leave a comment down below in the comments section. Or you can get ahold of one of our experts here at etrailer. They'd love to answer any of your questions. Now, as far as installation for this hitch, it's pretty straightforward and it really isn't too hard to do. It's something you could definitely do in your garage or in your driveway in an afternoon. Now, if you don't have the time or the tools or the space to do it, you can also take a look at your dealer locator and get something done for you locally. If it's something you feel like tackling yourself, stick around and watch our video and we'll help you get it installed. To start our installation, we're up underneath of our vehicle. On both sides, we're gonna have these three rubber plugs. We're gonna take out this one. We're gonna leave the middle, and we're gonna remove this one as well. These are pretty easy to remove. You can usually get your fingers in there and just get those to pop out. Just get those to pop out. If you can't, you can use a screwdriver. And again, we're gonna leave this center one. We're gonna follow that same procedure on the other side. To get our hardware into our frame, this rear hole is going to be our access hole. Now, it's not quite big enough so we can get our hardware to come through. There's a couple different ways you can do this. I'm gonna use a step bit to enlarge this a little bit. You can use a burr bit and just kinda slot it on each side if you wanted to. The main goal is to be able to get our hardware in. So what I'm gonna do is I'm just gonna use my step bit and just enlarge this hole a little bit. (drill whirring and clicking) Now we got it enlarged a little bit, makes it a nice clean hole doing it that way. The main goal is, like I said, we need to get our hardware in. As you can see, our carriage bolt is going to fit. And the spacer block is also gonna fit. So that's what we're looking for. Now, another thing we're gonna need to do is we're gonna need to clean up some of this sealant that we have around here. So that way, our hitch will fit up nice and flush. So I'm just gonna come back. You can use either a putty knife or a utility knife and just get this trimmed back and cleaned up. That way, we have a nice flush fit. Now I'm just gonna use my multi-tool cutter and just kind of see if I can get this to come off. The stuff can be pretty hard to remove, so just take your time, but you'll get it off of there. (tool whirring) With our sealant trimmed back, I just came back through with some black paint and just shot this around this area and just cleaned up anywhere there's any bare metal. What that's gonna do is keep it from corroding or rusting in the future. While our paint's drying, we'll jump over to our hitch and we'll get our spacers installed. In our kit, we're gonna have these spacers that look different than the other four that are in there. These are gonna be, we're gonna have two of these, and what they're gonna do is these are gonna go on the back of our hitch. And what that's gonna do is basically level it out. You wanna get it over the hole on the rear part of our hitch, and I'm gonna take some clear tape, just get that put on there so it's gonna hold it in place. Now after I do that, we're gonna need to get a hole back through that. So I'm just gonna use my knife and cut around that. Now, you can use a utility knife, whatever you need to do. So that's just gonna be able to let us get our hardware through. Now that our paint's all dry, we need to get our hardware in place. And in our kit, we're gonna have what we call our fish wires. We're gonna run one of them with the coiled end through our rearmost hole, all the way forward, up to our access hole that we enlarged. Gonna pull that through. And after we've done that, we wanna take one of our spacer blocks, run that up onto our fish wire, then we'll follow that up with threading on one of our carriage bolts out of our kit. Just wanna run that up right to the end of that. Now, we'll take our spacer block, push that through the hole, followed by our carriage bolt. (metal clanking) Pull that through and just pull that down through the back part of our frame, and we'll leave our wire on for now. Now onto our back side. We're gonna do this one a little bit different. We're gonna do this one what they call reverse fish wire. We're gonna run on our spacer block, and then we're gonna do the same thing. We're just gonna run our carriage bolt onto our fish wire. We're just gonna run our carriage bolt up into the hold of our frame, followed by the spacer block. (metal clanking) Now, we'll just pull our bolt down through. And again, we'll leave our fish wire installed for now. Now all we have to do is get our hitch lifted in place. I have Daniel helping me out with this. It's always easier with an extra set of hands. 'Cause now all we need to do, we need to get our wires through the corresponding holes. (metal clanking) Once we do that, we can lift our hitch over. (metal continues clanking) Now we'll just use our fish wires to pull our hardware down through. Now we can just either pull off our fish wires or you can unscrew them. Take one of the nuts in our kit and get that started. After we have all of our hardware installed, we're just gonna snug everything down. (drill whirring) (drill whirring) After we have all of our hardware snugged down, we'll come back through with our torque wrench and get everything torqued down to the specifications listed in our instruction manual. If you don't have a torque wrench, you can pick one up here at etrailer. We do have some options available. Or you can take a look at your local auto parts store. You should be able to rent one there. (machine beeping) After we have everything all torqued down, that will do it for our installation of our CURT hitch on our 2025 Subaru Crosstrek. I'm Scott with etrailer and thanks for watching.
Got installed by a local shop, love the hitch, super sturdy! Works great on my 2025 Crosstrek!
Not the easiest installation ive done but not hard at all. Possible to do with one person but had my wife hold the hitch in place while I hand threaded the nuts on the driver's side. The drivers side is the tighter side of the 2 to be able to get the hitch up in there over the exhaust, you could take the exhaust off to make it easier but I wasn't trying to do all that. I definitely recommend a step drill bit to make the frame hole bigger, I tried a die bit and I would've been there all day.
Perfect hitch for my wife’s 2025 Crostrek. Great price. Fast delivery. Easy enough install. Fit the car perfectly. Good quality as far as I can tell. Couldn’t have been any better as far as I’m concerned.
Built better than what the dealership offered and at a better price.
A perfect fit and a piece of cake to in stall.
Do you have a question about this Trailer Hitch?
Info for this part was:
At etrailer.com we provide the best information available about the products we sell. We take the quality of our information seriously so that you can get the right part the first time. Let us know if anything is missing or if you have any questions.


Thank you! Your comment has been submitted successfully. You should be able to view your question/comment here within a few days.
Error submitting comment. Please try again momentarily.