


To see if this custom-fit item will work for you please tell us what vehicle you'll use it with.


Thank you! Your comment has been submitted successfully. You should be able to view your question/comment here within a few days.
Error submitting comment. Please try again momentarily.



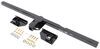
With a 3,500 lbs maximum gross trailer weight and 525 lbs tongue weight, this hitch is built for everyday towing and gear hauling. It’s ideal for mounting bike racks, cargo carriers, or pulling small trailers when you want to make the most of your vehicle’s capability. The sturdy, square-tube design gives it the strength and stability needed for consistent use.
The fully welded steel construction is finished with a textured black powder coat layered over protective e-coat for superior rust and corrosion resistance. That means it holds up against moisture, salt, and road debris season after season while keeping a clean look under your bumper. The matte texture also helps hide scratches from normal use.
This hitch bolts straight onto the frame with no welding required. It comes with a complete hardware kit and step-by-step installation instructions so you can get it done with basic tools. The precision, robotic welding ensures everything lines up as it should, saving time and frustration during setup.
Every weld is done with robotic precision to maximize strength and guarantee a secure fit. Once mounted, it’s ready for real-world use—whether that’s towing to the campsite or adding a cargo platform for extra gear. And because it’s crafted with attention to detail, you can count on dependable performance every time you hitch up.

Videos are provided as a guide only. Refer to manufacturer installation instructions and specs for complete information.
Hi everyone. Jesse here with etrailer. Today we'll be taking a look at and I'll show you how to install the Blue Ox custom Fit trailer hitch receiver on the back of our 2021 Subaru Forester. Adding a hitch to the back of a Forester really makes a ton of sense. It's gonna give you the ability to add extra storage space onto the back of your vehicle, whether it be an accessory such as a bike rack or a cargo carrier, or you can even do some towing with it. Just remember when you plan on towing, there are a few other things that you need to get your vehicle ready to go, and that includes trailer wiring to keep you safe and legal out there by sending a signal from the vehicle to the lights on the trailer to get those to function properly and also a ball mount among other things.
So if you have any questions or concerns about getting your vehicle ready to tow, reach out to us, we'd be happy to help you out. The cross beams are going to be visible, but they're kind of tucked back under there. So really, unless you're crouched down, you won't be able to notice 'em. All you'll really be able to see is your receiver here with a nice matte black paint finish and that opening on your receiver is gonna be your standard two inch by two inch opening. Behind that is another standard five ace inch pin hole.
The pin and click non-included with the hitch. However, we have many options available here at etrailer. Also, any accessory that you add on will most likely come with one included. Then we have a pretty sturdy safety cable loop down under here. Very easy to access with whatever style safety chain you might have.
For example, an S like that, or even a large clevis like this. We'll take some quick measurements starting with our ground clearance. From the ground to the top of the inside of the collar, we're sitting at just over 14 inches. Then from the center of our pinhole to the edge of our bumper here, it's right at about four and a half inches. That's a number you'll want to keep in mind for any folding accessories that you might add on to ensure they don't make contact with the vehicle.
As for our weight capacities with this hitch, we have a gross trailer weight of 3,500 pounds. That's the amount of weight that you can pull behind the vehicle. Then we have a maximum tongue weight of 525 pounds, the amount of weight pushing down on the hitch. Always be sure to double check your vehicle's owner's manual, compare those numbers and go off the lowest rated component. All in all, if you're looking to add a hitch to the back of your Forester, I think you can't go wrong with this Blue Ox option. I really like the way the matte black paint finish looks on the back of our neighbor's vehicle. As for the installation, you do have to get down under your vehicle and lower the exhaust, but it's really not too difficult to get everything up in place. If you're not looking to do it yourself. Check out our installer locator. You can find someone local to you that would be happy to get you set up. If you are looking to see how this gets installed then follow along and I'll walk you through the process. We'll begin our installation by lowering our exhaust and before we do that, you wanna make sure that you have something supporting the exhaust. Since I'm up in the area, I'm using a cam strap, but if you're working on the ground, you can use a floor jack, just whatever you have to kind of support it a bit. So we'll start with this rear rubber hanger on our muffler here. Kind of tricky to get to, but if you find the right spot to get some leverage, should be able to pop that off with a pry bar. And I did spray some soapy water on that beforehand just to make it slide off a little bit easier. And then we have another one on the back side of our muffler, kind of tucked up here. It's gonna be pretty difficult to see and also to get any sort of leverage on. We'll try to get that popped off. Once you get those two removed, we will just follow our tailpipe up and get this center one removed. Then we can just kind of relax our strap a little bit to give us a little more clearance. Now we can move on to removing this heat shield right here. This is just held in by some 10 millimeter bolts. Get those removed. We'll get this pulled out and set aside. On the driver's side, we have this plastic panel here that we need to take down. So we have a series of push pin fasteners on the outside. Helps to have a trim panel tool like this, or you could just use a flathead screwdriver. But essentially we need to get under the center portion and separate it from the other piece. So depending on the age and how much debris is built up in there, they can be pretty difficult. I did spray some soapy water in there to kind of help break down some of that built up debris, but we'll just keep working our way down, getting all these fasteners removed. With those removed, we'll move on to the two 10 millimeter bolts that are holding this up. (drill whirring) Another hidden push pin fastener on ours. So I assume if you have a mud flap like our vehicle does, you're gonna also have this last push pin fastener that you'll need to pop out. And there is one more push pin once again on our mud flap that's holding this panel up. Kind of tricky to get to, but it's gonna remove the same way as those other ones. All right, now let's pull it up. There is one more tricky fastener right behind our tire here, but then we can pull this out. Now on both sides of our frame rail, we're gonna have some rubber caps here. Just gonna remove those using a flathead screwdriver, get each one of those popped off. These three here are gonna be our actual mounting holes, and then we have a fourth one a little further up. This is gonna be our access hole, so we'll also remove that one. And what we need to do with this access hole is I'm gonna use a step bit to step this up to about an inch and an eighth, just big enough for our hardware to fit through. (drill whirring) Once we have that access hole drilled out so that our hardware will fit through, we'll start fishing our hardware into the mounting holes. So we'll start with the one furthest away, feed your coil, then up through that. We're gonna want to get that all the way back to our access hole and get that pulled out. And this, this first one we're starting with will be the hardest one. The other two, you're a bit closer and it's easier to get out. And once you get that fed through, we'll slide our spacer block on, tuck that up into the frame. We'll thread our carriage bolts on. We can do the same thing with that. Depending on how big you made your access hole, it may be easier to just kind of flip your curve, pull around and send it through upside down. Then we'll pull on our fish wire and get that carriage bolt to drop down here for us. Get that carriage bolt to drop down. Then we'll repeat that process with the other two holes. And on the other side. (bolt clattering) I had grab an extra set of hands. I have my friend Scott here to help me out. We already fed our fish wires through their corresponding holes. So once you get your bolts to feed through the holes, take off one of those fish wires and take your nut and thread it on. That's gonna hold the hitch up so we can get the rest of our hardware off. We'll take our 3/4 inch socket and tighten all of our hardware down. (drill whirring) I'll take our torque wrench and torque all of our hardware down to the specification in the instructions. Before we can reinstall our heat shield here, we will need to cut out this section that I have marked out just to give us clearance for our hitch. Let's make this cut using a pair of tin snips. Once you have that heat shield and that plastic panel reinstalled, then that's gonna do it for our look at and installation of the Blue Ox Custom fit trailer hitch receiver on our 2021 Subaru Forester.
Customer Satisfaction Score:
97% were satisfied with this product
3% of customers were not satisfied
Ratings & Reviews

While I have not had time to install the hitch yet, it appears to be very well made and sturdy. I like the textured coating which hopefully will hold up better than plain paint to our northeast rust!
Product itself is 5 star. Yes, very easy install and functions perfectly.
If I had not read the instructions and watched the etrailer video about installing a blue ox hitch on an Subaru Outback it would have been a bit more difficult to complete this install on my Subaru Forester. A lot is the same (but not the hitch!), but the instructions for the Forester lack details about exhaust hangars, fishing the bolt wires, and the modest trimming of plastic and heat shield that is contained in the Outback instructions and etrailer video. Perhaps etrailer cold add a simple on line reference within the Forester info to that extra detail that is in the Outback instructions/video.
etrailer.com impressed me again. Excellent service, tracking, delivery time and instructional videos for us do it yourselfers.
GREAT price and selection. Even helped with locating a local installer. Couldn't be happier with the whole process!
Info for this part was:
At etrailer we provide the best information available about the products we sell. We take the quality of our information seriously so that you can get the right part the first time. Let us know if anything is missing or if you have any questions.





















Rop
7/26/2026
Hitch has been working great and still as good as new. We use this for attaching our E-Bike rack.