
4,500-Watt inverter generator delivers on-the-go power to your campsite, tailgate, or large RV. Combine with another Champion 4,500-watt inverter generator and parallel kit (sold separately) to double your power. Remote start from up to 80' away.
Features:
Specs:
Includes:
Note: Gas generators produce carbon monoxide, which is poisonous. For your safety, always be sure to operate this gas-powered generator outdoors.
Gas-powered, 4,500-watt inverter generator has (1) 120V 30-amp RV TT-30R outlet that provides an RV connection point to power large appliances and power tools with greater electrical demands. It also features (2) 120V 20-amp 5-20R outlets for powering small household appliances and electronic devices and (2) USB type-A 5V DC, 2.1-amp outlets to charge tablets, cell phones, and other sensitive electronics. Lastly, it comes equipped with (2) ParaLINK ports used in conjunction with Champion parallel kit (CH84FR sold separately). All outlets and ports have covers to help keep out moisture and debris.
This Champion 4,500-watt generator (3,500 running watts) has built-in parallel capability, which lets you pair it with another Champion 4,500-watt inverter generator (sold separately). This increases your power and allows you to easily start and run equipment with higher electrical demands, such as (2) 15,000 Btu air conditioners and other go-to RV appliances. You can pair it directly with another 4,500-watt generator using the Champion parallel kit (CH84FR sold separately), to double your power output to 9,000 starting watts and 7,000 watts running watts.
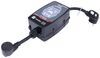
Start and stop your generator from up to 80' away with the push of a button. Simply flip the generator's battery switch to "on" and turn the EZ-start dial to the "run" position. The remote system automatically opens and closes the choke, so there's no need to manually adjust it. Fasten the remote's nifty D-ring clip to your belt loop for security and easy access.
Champion's Intelligauge with power meter lets you know exactly how your generator is operating. It features two separate displays to monitor the generator. The digital LCD screen on the left continuously cycles through each setting every few seconds to display the generator's voltage (V) and frequency (H) outputs, run time (R) for the current session, and total run time since the generator's first operation. The LED power meter on the right displays the power output in percent (%) with 100% at the top.
1. Low Oil Shut-Off Sensor: If the oil level is too low for safe use, the indicator will flash letting you know there is an issue with the oil level. If the generator gets to the point where low oil can damage the engine, it will automatically shut off.
2. AC Overload Reset Button: In the event your generator is becoming overloaded, the indicator light will begin to flash. If the generator is overloaded and shuts down, this button allows you to restart the generator. Simply unplug one or more devices, push the button, and restart.
3. Circuit Breakers: The generator is equipped with 20 and 30-amp breakers to stop power flow to connected devices if overload is detected.
Electronic devices are made with delicate circuitry that requires steady, controlled electrical current. The current produced by standard generators, however, is uncontrolled, allowing extreme fluctuations in power. These fluctuations can damage your sensitive electronic devices. This generator, on the other hand, has a built-in inverter that controls the voltage that is produced. This important feature ensures the generator is safe to use with sensitive electronics such as cell phones, computers, audio and stereo equipment, and medical devices.
When choosing a generator, you need to match the generator's starting and running output with the electrical demands of the equipment you want to operate.
Starting (surge) wattage is the power a device requires at startup. Running (rated) wattage is the power needed to keep the device running. A large appliance with an electric motor such as a furnace, refrigerator, air conditioner, or washing machine may require 2 to 3 times more starting wattage than running wattage.
It is always best to start your generator with no load connected, then add each device one at a time. Additionally, a good practice to consider is connecting your devices in order from highest starting watts to lowest starting watts. As you connect and start devices, your available wattage decreases. This order of operation allows you to start devices with the highest power demands when there is more power available.
At etrailer, we perform numerous tests on generators that put them through real-world experience. An extensive part of this testing includes starting and running RV air conditioners. The following table will help you decide if the Champion 4,500-watt inverter generator has enough power to handle this critical function in your RV.
| Air Conditioner | Will it start and run? |
|---|---|
| Single 13,500 Btu | Yes |
| Single 15,000 Btu | Yes |
| Dual 15,000 Btu | Yes |
| Appliance | Running Watts | Starting Watts |
|---|---|---|
| Air compressor (1/2 hp) | 1,000 | 2,000 |
| Air conditioner (15,000 Btu) | 1,600 | * |
| Air conditioner (13,500 Btu) | 1,300 | * |
| Air conditioner (10,000 Btu) | 1,000 | * |
| Blender | 400 | 850 |
| Cell phone charger | 11 | 0 |
| Clock radio | 4 | 0 |
| Coffee maker (high setting) | 1,066 | 0 |
| Crock pot (low setting) | 126 | 0 |
| Crock pot (high setting) | 374 | 0 |
| Desktop computer | 150 - 350 | 0 |
| DVD player | 14 | 0 |
| Electric drill (3/8" / 4 amps) | 450 | 600 |
| Electric space heater (high setting) | 1,450 | 0 |
| Floor fan | 100 | 0 |
| Hair dryer (low setting) | 160 | 0 |
| Hair dryer (high setting) | 1,300 | 0 |
| LCD television (32") | 68 | 0 |
| Microwave | 1,000 | 0 |
| Refrigerator | 800 | 1,600 |
| Washing machine | 1,150 | 2,250 |
| Work light (quartz halogen) | 1,000 | 0 |
* The starting wattage on air conditioners can vary greatly depending on several factors, including the assistance of built-in capacitors and cold starts. Because of this, we can't list a standard starting wattage as every application can be different.
The following section provides calculations for wattage estimates. This will give you an overall picture of your potential power usage and help you decide on the generator that is right for you.
The Industry Standard Calculation is a quick and easy way to determine your required wattage. It may provide some padding in your wattage requirements, which could give you more power than you actually need, but you shouldn't have to worry about not having enough power. The following steps will help you quickly calculate the correct size generator to meet your application.
As stated earlier, you should always start your generator without any load, and then connect each device one at a time. The following calculation requires this approach to work. However, using this calculation removes the worry of connecting devices in a certain order.
1. Determine the starting watts and running watts for the devices that you want to plug into the generator.
a. Find the starting (surge) watts and running (rated) watts for each device that you want to plug into the generator. Look for a sticker or plate on each device or check your owner's manuals.
b. If your device or manual only shows amps and volts, watts can also be determined through a simple formula. (Amps x Volts = Watts)
c. List all of your starting watts and running watts as seen in Table 1 below.
Table 1
| Example Devices | Starting Watts | Running Watts |
|---|---|---|
| Air compressor | 2,000 | 1,000 |
| Refrigerator | 1,600 | 800 |
| Microwave | 0 | 1,000 |
| Blender | 850 | 400 |
2. To find the total starting watts required, add the starting watts for the device with the highest value to the running watts of all the other devices from Table 1.
2,000 + 800 + 1,000 + 400 = 4,200 total starting watts
3. To find the total running watts, add all of the running watts together from Table 1.
1,000 + 800 + 1,000 + 400 = 3,200 total running watts
To run all of these devices simultaneously, you would require a generator with at least 4,200 starting watts and 3,200 running watts.
While the method for calculating your power needs outlined above will work, it isn't the most precise. If you aren't afraid of doing a little more math, you can use the Advanced, Precise Calculation to get a more accurate idea of how much power you will need and potentially save yourself some money. Because the calculation above pads in enough power to ensure you can start your devices in any order, it may point you to a bigger and more expensive generator than you need. However, by following the more regimented, order-of-operations calculation below, you'll get a much more precise idea of how much power you need, which could in turn point you to a smaller and less expensive generator.
Again, you should always start your generator without any load, and then connect each device one at a time. The following calculation also requires that you start your devices in order from highest starting watts to lowest starting watts. When you connect devices in this order, you can start high demand devices when there is more power available.
1. Determine the starting watts and running watts for each device that you want to plug into the generator.
a. Find the starting (surge) watts and running (rated) watts for each device that you want to plug into the generator. Look for a sticker or plate on each device or check your owner's manuals.
b. If your device or manual only shows amps and volts, watts can also be determined through a simple formula. (Amps x Volts = Watts)
c. List out these devices from highest starting watts to lowest starting watts as seen in Table 2 below.
Table 2
| Example Devices | Starting Watts | Running Watts |
|---|---|---|
| Air compressor | 2,000 | 1,000 |
| Refrigerator | 1,600 | 800 |
| Microwave | 0 | 1,000 |
| Blender | 850 | 400 |
2. To find the total running watts, add all of the running watts together from Table 2.
1,000 + 800 + 1,000 + 400 = 3,200 total running watts
3. In Table 3, shown below, the values from Table 2 are used to calculate the highest total starting watts required as devices are connected and running. This number represents the highest power requirement you will encounter as you connect all of your devices to the generator. To find this, add the starting watts of each new device you connect to the combined running watts of all connected devices. The highest of these numbers will be the total starting watts required. And again, remember to always connect devices in order from highest starting watts to lowest starting watts.
Table 3
| Device | Starting Watts | Running Watts of All Connected Devices | Total Starting Watts Required |
|---|---|---|---|
| 1. Air compressor | 2,000 + | 0 (nothing connected) | = 2,000 |
| 2. Refrigerator | 1,600 + | 1,000 (air compressor) | = 2,600 |
| 3. Microwave | 1,000* + | 1,800 (air compressor + refrigerator) | = 2,800 |
| 4. Blender | 850 + | 2,800 (air compressor + refrigerator + microwave) | = 3,650 |
* Even though the microwave does not have starting watts listed, you have to account for the power needed to actually run it.
850 + 2,800 = 3,650 highest total starting watts required
In order to run all of these devices simultaneously, you would require a generator with at least 3,650 starting watts and 3,200 running watts.
 Alternate Instructions
California residents: click here
Videos are provided as a guide only. Refer to manufacturer installation instructions and specs for complete information.
Hi, everybody, Andy here with etrailer.com and today we're gonna take a look at this Champion 4,500 watt portable gas inverter generator with remote start. If you're looking for an inverter generator with the wireless remote, that will provide power for camping, tailgating, and for items in and around your RV or providing backup for your essentials, this might be a great option for you to consider. This 4,500 watt inverter generator provides a portable power source for home, work, or on the road that will allow you to safely charge and run your sensitive electronic devices like your HDTV and computers. Now taking a look at the control panel here, we see that we have this Intelli gauge that is going to allow you to monitor your voltage, your frequency, your power, and your operating hours. And on this gauge, we also have an AC overload reset button, a low oil warning indicator, and then the economy mode switch, a wireless pair indicator, and also our choke button. Moving on to take a look at these outlets, we have one 120 volt 30 amp RVTT 30R, then we have two 120 volt, 20 amp, 5-20R outlet, and then for your USB devices, we have two USB type A five volt DC 2.1 amp port here.
Again, that's gonna be good for charging your smartphone, tablets, and other USB power devices. And then the para link ports that we have right here, and they're gonna be used to parallel two inverters together for increased power output and parallel kit is necessary for that. That is sold separately, but we do carry that here at etrailer.com. We have an easy to access ground terminal, and then a 20 and 30 amp circuit breakers. All of those are going to help ensure safe use.
As you notice, these outlet covers are going to help keep out moisture and debris, and the power line frequency is 60 Hertz. On the opposite side, as you no doubt already saw, we have our muffler, and then we also have a fold away handle. Let me go back to my wide view here real quick and show you this. We have a fold away handle. So that's what its gonna look like when it is fully extended.
And then we have five inch in diameter wheels. They are flat free wheels that are going to help you provide mobility. So it's gonna be very convenient to move this around with the handle and the wheels. Now, the electric start engine with key fob remote is going to offer you a hassle free start up from up to 80 feet away. This features a 212 CC four stroke overhead valve Champion engine that uses standard unleaded gas.
So there's no need to mix gas and oil, and the tank has a 2.3 gallon capacity and this is a clean running engine that meets CARB and EPA standards. Now this is going to be a very easy setup when you pull it out of the box. First, you're going to wanna remove this panel, and it does come with a screwdriver here with both straight edge and Phillips to help you access the panels on either end. So you're gonna wanna remove this panel and connect the battery inside. And then on this side, there is an easy access panel here so that you can fill your oil. And this does include a bottle of 10W30 oil. So that's obviously the oil that this generator would take. And so you will go ahead and add the included oil along with the included funnel here, and this has a capacity of 0.5 quarts and the oil fill is right there. And then this panel is gonna be very easy just to pop back into place, and just turn that knob to lock it. And then of course you'll wanna move the generator outside, and then on the top here is where you are going to add your fuel. And this is what I like about this cap, there's a chain here so you're not going to lose that cap for your fuel tank. And then there's also an easy to read fuel gauge that you probably can't see too well from that angle, but this is gonna be a easy to read fuel gauge. It's gonna help ensure that you do not run out of fuel. And then taking a look at our control panel again, we are going to push the battery switch right here on. It's already in the on position so you turn it off that way, and then you turn it on. So that's gonna be our battery switch in the on position. And then our easy start dial, we will turn that to the full on position as you see here. And then from this point, you can do one of three things. First, you can easily just use the key fob for wireless start and you would just press and release the start button on the fob. Or for normal electric start, you would press the choke button first and then you would press and hold the ignition switch here on the easy turn dial or the easy start dial. And then once you push that down and the engine starts, you'll push the choke button again and that's how you would electrically start the engine. Or for the manual start, you would push the choke button, and then you would pull the recoil cord, and then push the choke button again and you are in business. So again, you have three ways in which you can start this generator, and it's all very easy. And then once you have the generator started, you can then plug in your electrical devices. Then when you're ready to turn this off, remove all of your plugs or all of your electrical devices and then just simply turn your easy start dial counterclockwise to the off position, and your generator is going to be off. Now this has a starting surge power output of 4,500 Watts, 37.50 amps, then has a running rated power output of 3,500 Watts, 29.20 amps. And it has a continuous run time at a quarter of a load at 14 hours, and this generator will run quietly. So it's not gonna drown out your campground conversation. It has an economy mode, we mentioned this earlier, that's going to reduce engine noise and conserve fuel to increase run time. The noise level of most normal conversation is around 60 decibels. Measured at 23 feet away at a quarter load, this is gonna register at 60 decibels. So this isn't gonna be loud, and it's gonna be quiet enough to where you can still enjoy your outdoor activities. This has a dry weight of 101 pounds, and just some overall dimensions here. The overall length, we are sitting right at 23 and 3/16ths inches long, and the overall height from the top of our fuel cap all the way down, we are sitting right at 20 and one eighth inches tall, and the overall width we are sitting right at 17 and 11/16th inches wide. Now this does include everything that you see here on my table before me. It includes instructions, and the instructions are very good along with the quick start guide. That's gonna help you get up and running very quickly. I mentioned the engine oil that it comes with along with the funnel, and then you're gonna get some tools. You're going to get a reversible Phillips and flat head screwdriver, and then you're gonna get the remote key fob with this carabiner clip to keep that always at the ready. Then you're going to get a eight millimeter and 10 millimeter wrench, and then a spark plug tool. So everything that you're going to need to get up quickly and up and running with this generator. Now it is important to note that gas generators produce carbon monoxide, which of course is poisonous. So you do wanna make sure for your safety that you do run these outside. And I do wanna mention too that we do also carry a weather resistant storage cover, and I'm including the item number for that cover on your screen if you're interested in that. And then if you are interested in running this with another generator, you do need that parallel kit that will work with this generator and I am including the item number for that as well on your screen. Well, that's gonna conclude our look today. I do hope that it was helpful for you. Again, my name is Andy. Thank you for joining me..
Ratings & Reviews


I bought this generator to provide summer power when boon docking with our 31 ft travel trailer. I set it in the back of my pickup bed
Info for this part was:
At etrailer we provide the best information available about the products we sell. We take the quality of our information seriously so that you can get the right part the first time.


Thank you! Your comment has been submitted successfully. You should be able to view your question/comment here within a few days.
Error submitting comment. Please try again momentarily.