

 Arrives before Christmas
 To see if this custom-fit item will work for you please tell us what vehicle you'll use it with.
Thank you! Your comment has been submitted successfully. You should be able to view your question/comment here within a few days.
Error submitting comment. Please try again momentarily.


Tow Ready Fifth Wheel and Gooseneck Wiring Harness 7-Pole - GM, Ford, Dodge, Nissan and Toyota w/ Factory Tow
Features:
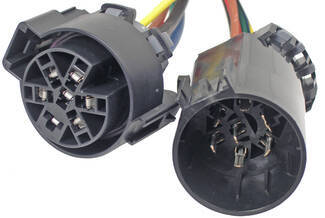
The back of the 7-pole connector.
This is the "T" connection that plugs into the back of the factory installed 7-way trailer connector at the back of the vehicle.

California residents: click here
Videos are provided as a guide only. Refer to manufacturer installation instructions and specs for complete information.
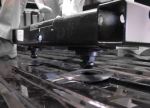
Hi there GMC owners, today on your 2013 GMC Sierra 2500, we're gonna be taking a look at and showing you how to install Tow Readies in bed wiring kit. And this is what our in bed connector looks like when it's installed. You'll be able to take a existing 7-way connector that's on your vehicle, and relocate it here inside of your truck bed. And that has quite a few uses. The most common use is for gooseneck and fifth wheel trailers. Just because those, where the wiring comes out of those trailers, it usually comes out near kind of the middle of your truck bed, maybe a little bit further back but a lot of times the wiring is not long enough on that trailer to drape over the back of your tailgate, and plug into the connector located on your bumper.
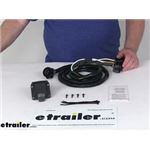
So by adding one back here in the back, we can easily plug in those gooseneck and fifth wheel trailers right into here, to be able to pull those. You can also use it for other accessories, if you have some other accessories that you like to use in your truck that can maybe take power from here, that's also a possibility. The connector that it comes with, is just kind of your traditional 7-way connector. It's got a spring loaded cover on it that stays down to keep out dirt, debris and moisture when not in use, and if we lift up the cover and look on the inside we do have a rubber seal that's there on the face of it to further seal that up to ensure there's no issues. The harness that comes included with it, will give you plenty of length to wrap down, to plug into your factory electrical connector, it has just a male and female factory connector on it so that way when you disconnect your factory one down there you can simply plug this harness in line to allow all those signals that your truck was normally producing to also go up here.
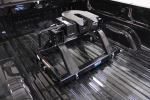
And they're gonna go to both of our connectors, they're still gonna work at our bumper pole one as well. So it just unlocks some versatility for your truck, by being able to utilize a 7-way on a couple different locations. All the connectors that it has that are on our harness are weather packed to help prevent any corrosion, and you do get the hardware that's necessary to get this installed. There is plenty of wire length, so if you didn't wanna put it here towards the back, you could it further towards the front, if you want to. This is just a location that I often put it because there's plenty of clearance between the inner wall and the outer wall here.
So you don't have to worry about damaging any components, or drilling a hole and finding out that your connector is not gonna fit in that location. But you can do your own checking out if you wanna put it further forward, there are other locations that you could make it work. We'll begin our installation here at the back of the vehicle. We've got our tailgate open, and I already just took a quick peek underneath the vehicle, kinda looking straight up in this area. We're looking to make sure we got a nice opening behind our paneling here before we drill.
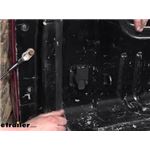
This is a good section, right here for the installation because if you look at the paneling it extends towards us some, it's got a bit a wider gap here, that should allow us to install our components. I just like to kind of hold it up here, and look to see how much we got sticking back and we've got plenty of room there, for this to install. To install it we're gonna have to drill out a two inch hole, in the location we want to mount it and actually what I usually do to make the insulation a lot easier, and you can't tell any difference aesthetically, is I actually step that up from two inch, to two and a quarter inches. That just makes your hardware be able to slide in much easier, but you can see we got plenty of room here that sticks around the outside of our connector that'll cover up that slightly larger hole that we're gonna drill. So we're gonna be putting ours in about this location here. So we just kinda get ready, kinda looking at about right there, so just kinda getting close, it looks like this is pretty well centered right there, and that's looking pretty good. So now we're just gonna drill this straight on through. Okay, now we've got our bit through there. When we drill out this hole, we don't wanna be pushing too hard 'cause once this, we have the whole cuts we don't wanna continue pushing, and ding up the outer fender by hitting it from the inside. So just be careful not to push too hard. So there we go. Soon as we get it cut, we prolly wanna make sure we pull back, we don't wanna hit that piece directly behind it there. So we should be ready to insert our component there. We're gonna go ahead and just kind of double check, make sure there's no or rough ends, fire works as well. I'm just kind of just checking with a pair of pliers, I got there to make sure there was nothing that was standing out. I'm gonna use a little bit of clear code here, just to cover up the exposed metal there, is to help to protect that from any rusting corrosion. We'll then grab our hardware, that comes in our kit here. Get some little self tapping screws, we're gonna need a quarter inch socket to install those, so make you got that. And then we can go ahead and line up our connector in the hole, to kind of start getting some stuff attached. We're gonna get our wiring dropped down first though, so it'll make things a little bit easier on us, and that's kind of why we did that slightly larger hole. 'Cause if we look at the wiring that it comes with here, this connector just ever so slightly barely will pass through a two inch hole, a little tab you see here on the end and stuff like the catch, but we can see with the slightly larger hole we put in here we have no problem passing that through. Now this single side is the side that stays up here. I just kind of showing you for example, we're gonna drop down the other side, which has the multiple connectors on it here. So we're just gonna slide that guy in, and then we can follow it up with the other connector here, that extra quarter inch really goes a long way, in making it easier to drop your wiring down. Well then plug it into our connector here. Looks like there is no dielectric on there, so we're actually gonna grab some dielectric some of these connectors when you get 'em, from certain manufacturers pre put dielectric on it, but the one from Tow Ready here does not. So we're gonna make sure we do that real quick before we plug it in. All right, so we grab some dielectric grease, you can get this here at etrailer. I highly recommend that you do put some on there, 'cause if you don't have any, this is a sealed connector, you can see that the gasket in there and stuff, so it does keep out moisture, but things like condensation and stuff do occur and there is a chance that corrosion could occur. So with dielectric grease here, we can give a nice generous coating there so that when we plug it in, it gives it just a further layer of protection against corrosion. And then we'll just plug it in, line up our connectors, make sure they're all the way plugged in. I usually check to make sure I can't pull it back out, I don't press it on the release tab, I'm just trying to see if it comes off without pressing the release tab, it shouldn't, and it didn't, so we're good. We can then just continue drop that on down, and we can get this right in place here. And you can see it does cover up that hole, so enlarge in it just a little bit over what it recommends, doesn't affect the appearance in any way. It's not gonna obstruct where our attachment screws go or anything like that. So I'm just gonna kind of hold it in there, in place, we're gonna get one screw installed. We're gonna try to hold it roughly level, but it's not as important with this first screw, we just wanna try to be relatively close. We'll adjust it to make it level, before we put it in our second screw. All right, so we got that one installed there. We can see that we can kind of pivot this around as necessary to make it level. It looks like that's probably pretty good, but right there I usually try to use the body lines and make mine parallel with the body lines. And we're just gonna run in our second screw now. So we're gonna hold it until it's nice and level to where it looks parallel, straight up and down, and then we're just gonna run that in. Somehow to get my screw kind of prepared, then we'll adjust our connector til there, it looks good, and that looks pretty good right there. All right, so now we got it installed. We can make any final adjustments here. Tweak it there and just hit those one more time, and then that all looks nice and level, up and down, straight up and down, we can run in our remaining screws. So now we're underneath, we've got our wire that we drop down. After it dropped down, I did just poke it up over the frame here to bring it closer to where our factory connector here is, in the middle. We're gonna disconnect our factory connector here, the release tab is on this side so it's kind of hard to see, and there's a small, all gray lock tab on that side as well. You'll either pop that lock tab back. You can just take like a little pick, or a screwdriver and just pull back on that, we can use a little pick here. It's in there pretty tight. You can tell there's a lot of dirt and debris under here. There we go, we got it to pop out of there, save the lock tab, here it is. It did pop outta there, we're gonna reuse that. Set that aside for now. After you pop out the lock tab, you can then press in on the release button and disconnect it. There's that release button that we we're talking about and the locked tab slides in like this, we can go ahead and put the lock tab somewhat in, you can kinda set it right there, but don't push it all the way back in. All right, so now it's out of there, we can start plugging in our other connectors here. We're gonna once again refer to that dielectric grease, to make sure that we don't have any issues down the road. I like putting it on the female side of the connector so we can see here the factory one, didn't have any on it either. So we're gonna go ahead and get these full of the dielectic. All right, and now we can take our new connector. We're gonna plug this into our factory connector. Plug that in, make sure it clicks, make sure you can't pull it back out of there, and then we're gonna take the larger connector that came with our kit here and plug this into the factory connector that we had disconnected. Make sure that plugs all the way in. Can't disconnect it, and then you can push that lock tab back down in there. So now at this point all that's really left, is we're just gonna clean up the wiring we've got here. You do get some cable ties included in your kit. So just grab some of those, and you can just kind of take the wiring and bunch it up here at the back, that's kind of what I do. I just kind of loop it up like this. A couple of loops there, and then we can tuck it up here. Now, one thing you might notice is that my spare tire is not in place. I did remove that. It does not need to be removed, to complete this installation, but it makes it a whole lot easier for you guys to see at home. So we kinda got that bunched up there. Poke our cable tie through, and bring it around. All right, so here we got our tester. We went ahead and plugged it into our new connector that's located in the bed, and right away the first thing we see here is this is a volt meter for our auxiliary power circuit. We can see we've got nearly 12 volts there, we're gonna go ahead and hit the switch, and that changes our gauge over to the trailer brake controller output, so we can test that. I'll have to verify that the customer has a brake controller but I assume he probably does, if he's got a gooseneck here, and we're gonna run through all of our lighting signals to make sure all the circuits are working properly on our 7-way connector. So now we're just gonna verify that we have our left turn signal, right turn signal, tail lamps, brake lamps. We're gonna check our trailer break output, here it does have a brake controller, and we should see the output here, gonna turn it up again a little bit. There we go. We can see that our brake controller's working, and lastly, we got our reverse light. I'm gonna try it right here with just putting it in reverse, and it may or may not illuminate, if it doesn't illuminate, you may or may not need to start the truck to get that reverse light circuit. So we did have to start the truck, to get that reverse light circuit but you could see there that it was working properly, so with all of our functions working properly, we're ready to hook up our trailer and hit the road. And that completes our installation of Tow Readies, in bed wiring kit on our 2013 GMC Sierra 2,500..

built well, easy install
Great product. Very easy to install.
Perfect, easy plug and play. Thumbs up!
Good Product! Very Fast delivery Thanks
Easily splits your factory plug to a bed mounted plug
Great product makes putting a plug in your bed so easy
Just what I needed. Good price, fast delivery, very easy install.
Good product. Much better than cutting and splicing the factory wires.
FAST SHIPPING-REALLY EASY TO INSTALL- WORKED LIKE A CHARM
Excellent product! It does exactly what its supposed to and was a piece of cake to install.
Thanks!
Excellent harness. Installed in less than an hour even taking my time to measure twice and drill once. Worth every penny.
Simple installation, good directions from the manufacturer. All hardware was supplied, but I did use my own, larger ty-wraps. Etrailer people were helpful, and shipping was fast. All good.
Great ProductEasy to install on a 2010 chev 3500. The video is a great help too.
Great kit... All inclusive and easy to install! And it's shipped fast from an excellent company, Etrailer.com
Installed it on a '05 GMC shortbox in roughly a half hour, and that was taking my time and being careful. Fast shipment, very easy to install, and it looks nice.The video on the website was also helpful.
Great product, quick shipping. Easy install, hardest/longest part was cutting the 2" hole for the plug in truck bed. Where's the "EASY" button!
Good and easy hookup, but it needs just a little more wire wrap to keep wire from rubbing on brace/bumper at bumper connection.
In a nutshell??.... You don't get any better than eTrailer. Fast delivery and excellent service. Part was as described and easy to install, not to mention the excellent how to video on the website.
Great Product. New to the site and they have great customer service along with timely shipping. Site is easy to navigate and helpful in finding what you are looking for.
Very simple to install video posted on your web site was very helpful. Couldnt believe how fast I recieved the item,have waited 3 weeks form other companies so needless to say I will be an etrailer customer from now on!
perfect kit to keep my fith wheel wiring from rubbing the paint on my tailgate. took 20 minutes to install, instructions very staight forward.tie straps too short so used my own
Very easy installation on my 2012 2500H. Once the location for the hole was determined (make sure there is nothing behind where you're drilling), the rest was a piece of cake. I was able to do the job by myself and it took about 30 minutes. Be sure to use the supplied cable ties to secure excess cable to chassis.
This was an easy installation and everything worked fine the first time. I have a bed liner and I mounted the plug on the only flat area provided on the liner. This is about midway between the bed floor and the rail. I had to make a spacer to provide the necessary clearance for the wires to fit inside the bed walls. Other than that it worked great.
Install went well. I see on other comments where some opted for a 2&1/8” hole or filed out a little notch to make bringing the cable plug thru the bed-hole easier. Not necessary! When you get your kit, you’ll see that the bed-plug has two places for something to attach on the outer diameter of the cable terminal. The big, heavy one obviously mates to the back of the outlet. The small one serves no purpose in this application at all and can be eliminated. I just trimmed it away with my knife, but I suppose you could burn it away with a soldering iron. Once that minuscule bit of plastic was gone, there was no need to remove more truck-bed steel. The rest of the install went well for a fat, arthritic grandpa working alone. I didn’t use the four short zip-ties, opting instead for 6-7 heavier 14” ties I got at Walmart. Current thru all contac tested consistent with the bumper plug. Pay no attention to the slightly off-plumb install. I’ve accepted it as my trademark.
Easy install! Took longer to pop the cover off than plugging it all in
Do you have a question about this Custom Fit Vehicle Wiring?
Info for this part was:
At etrailer.com we provide the best information available about the products we sell. We take the quality of our information seriously so that you can get the right part the first time. Let us know if anything is missing or if you have any questions.


Victoria H.
3/8/2025
Looks like you're ready to roll Travis! Towing anything fun?