


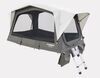
The Sunseeker Freestanding Awning provides quick, reliable side shade for breaks and days spent outside. With gas-strut assisted setup and support that adapts to changing weather, it gives you coverage that's easy to live with throughout the day.
The Sunseeker is designed to provide reliable shade along the side of your vehicle without adding a lot of extra structure or setup to manage. It gives you a comfortable place to sit, cook, or spend time outside during breaks, events, or days at camp, while keeping the overall setup straightforward and contained. You get meaningful coverage that's easy to live with throughout the day, without committing to a larger awning footprint.
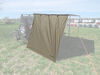
The gas struts help the awning push out smoothly, making it quick to open and easy to settle into shade when you stop. In calm or fair weather, using the awning in freestanding mode with the extension support pole adds stability at the canopy edge without turning deployment into a multi-step process. As wind or rain moves in, using the built-in support poles and staking down the guy lines keeps everything steady. The result is a setup that behaves the way you expect it to, staying controlled and manageable as conditions change.
This awning is built with a heavy-duty polycotton canopy that's meant to stay out and be used, not babied. It handles long stretches of sun exposure and holds up when the rain shows up, making it a great fit for full days at camp or extended stops. The fabric feels substantial without being stiff, and the overall build is made for repeated setup and pack-down over time. When you're ready to hit the road, the awning packs back into its storage case to stay protected during travel and between trips.

California residents: click here
Videos are provided as a guide only. Refer to manufacturer installation instructions and specs for complete information.
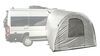
Hi, everyone, I'm Evangeline, right here at etrailer. And today, we have the Rhino-Rack Freestanding Sunseeker Awning. Now, this is gonna be a straight out from your vehicle awning, which has something extra special, which is that it has gas struts, which makes your awning set up seconds long. (fingers snapping) So if you're the type of person that always ends up being the one having to set up the campsite, having to juggle different parts of the awning, setting it up, this might be something you'll be very interested in. But let's go over the series of freestanding awnings Rhino-Rack provides. So we have the Sunseeker, which kind of goes straight out, giving you that quick and easy coverage.
(fingers snapping) You have the Batwing 180, which goes all the way to the side. And then you have the Batwing 270, which wraps around your vehicle completely. So if you're looking for freestanding, then you have the option for different amounts of shape. But if you're looking for quick and easy, that's what makes this awning unique. Those other options do not have gas struts, so it's really about what type of adventure are you planning on going on.
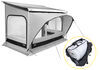
The construction of the fabric is very nicely done. You have your base layer, but then you also have an overlap. That way, if a quick storm kicks up, you'll still be protected. And by protected, I mean this is a watertight and UV-resistant fabric. So you can see how the water just beads up on the fabric.
And if you have your awning set up where it just flows down, then you don't have to get worried about getting wet underneath. With that in mind, the UV protection is gonna be UPF 50. So just like how you have sunscreen for your skin, this will be the same thing, but fabric. Speaking of rainstorm, though, if there's any wind at all, please use your best judgment when setting up your awning. The amount of people I've seen with broken awning arms, just because it was super windy and they still deployed their awning, is too many.
Now, there's gonna be a support bar that is inside your awning that you can use to support the end. So while you deploy the awning in a matter of seconds, this is still an important extra step to take to make sure that you have support all around, not just from the vehicle and from the set, but also from the front. Once that is secured in place, you can just go ahead and bring your hook and loop straps down. (Velcro scrunching) And that will continue holding the end of the awning. Just go through everything and if you feel like it's still very windy, well, you also have your support side poles. Those poles are stored inside. And you don't need these all the time, but if there's any hint of any wind being kicked up, please use them. The leg swings down and this is where you'll adjust the height of your awning too. (leg clinking) If you need a little bit more height, you can totally do that right here. You'll also have included guidelines, plenty for all around the awning. You're gonna have an S hook at one end, which you'll use to secure to these straps up top. And then, you'll also have a tension adjuster, which you'll use once you have this stake down. So always stake down your awning. If you have turf or dirt, that's gonna be super easy with the included stakes. If you have gravel or you're on a parking lot, you can always take a look at stake sandbags, like you would use for a regular tent. And I don't usually talk about storage bags, but this one's just too good to not talk about. You can put all your stakes and all your guidelines in a bag that's already attached to the awning. Do you know the amount of times that I've left behind stakes and just had to use ones for my own tent (hand tapping) Too many. So this definitely solves that issue. So as someone who's worked with a tons of awnings, from materials to how it sets up to the construction of the whole thing, very intuitive, very easy to use, and very high quality. So a lot of people at this point would be like, "Great, I want this awning, I'll take it." Here's gonna be the downside. This actually won't work for every single vehicle because of how it's installed. So let's pack this up so that we can talk about that further. By the way, the trick here, as you fold these gas strut arms in, is that there is a lot of tension here, where the gas strut is engaged, but when you get closer in towards your angle, it's gonna be a lot easier. And here, you'll see how I focus on getting that back arm up and over the front arm strut. And that will keep you in place as you get that front arm in too. See how much easier this is compared to rolling up your awning Well, we still need to roll up a little bit of fabric, just to get this all compact so that you can buckle everything down. But still, compared to these Sunseeker not freestanding awning of the same size, 2m, this is a much more simple process. (zipper zipping) After zipping it all up and then making sure that hook and loop sides are secure, that's gonna be it. This is what your awning will look like when you have it on your vehicle. Lots of people just leave this on there because the cover is weather resistant. It does protect your awning and it's fine for full-time storage on the vehicle. Now, if you are putting other things on top of your car, you also have to consider how your awning is installed. So if you stuck around for that, let's get into the nitty gritty. What you need to make sure so that you can install the awning is that you have crossbars with a channel and that your crossbars are far apart enough. So the brackets you see here install on top of the crossbars. They have a nut inside them, cinching them through the channel of the bars. Obviously, this will work with your Rhino-Rack crossbars, like your Vortex, Sportz, and even your Pioneer Platform racks. If you have another brand, as long as they have regular-style channels, then you will be good to go. But where it gets a little trickier is how far apart are those crossbars. Now, I have it in the front and the back bar, and this is about 48 inches apart, which is our crossbar spread. So this is a long awning. You need to have those crossbars far enough apart where you don't have too much overhang or too much awning sitting off to the side. So the maximum recommended by Rhino-Rack is no more than 27 inches of overhang. So in our case here, on our truck, evenly distributed, good support, we can carry this awning. If this was on my car where my crossbars are super close together, this might not be the best fit. But what would work for my car is the Rhino-Rack Sunseeker 2m, which is the lighter but not freestanding version. But hopefully this video was helpful for you for just getting an idea of how this awning works, what makes it special, and if it will be a fit for you and your vehicle and your adventures. What you saw was the Rhino-Rack Freestanding Sunseeker at etrailer.com. My name is Evangeline. I hope you enjoyed this journey.
Do you have a question about this Car Awning?
Info for this part was:
At etrailer we provide the best information available about the products we sell. We take the quality of our information seriously so that you can get the right part the first time. Let us know if anything is missing or if you have any questions.


Thank you! Your comment has been submitted successfully. You should be able to view your question/comment here within a few days.
Error submitting comment. Please try again momentarily.