
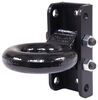
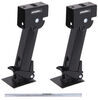
Snap-in mounting point for angle-iron trailer rails let's you add CargoAnchor tie-downs exactly where cargo shifts most. No drilling, no permanent hardware, just fast placement and confident load control.
California residents: click here
Videos are provided as a guide only. Refer to manufacturer installation instructions and specs for complete information.
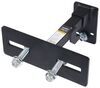
Hi, everybody, Andy here with etrailer. Let's take a quick look at this CargoAnchor angle mount for trailers with angle iron rails. Now this is basically going to give you a fast and flexible way to add secure tie-down points to your trailer, especially if you have angle iron rails to the sides of your trailer. On your screen, I'm popping up a picture there showing you one of these in action just to give you an idea of what this is going to look like when this is in use. And one of the biggest advantages is that you're not gonna have to drill anything. This is simply going to slide into place on your trailer's angle iron rail, and it's gonna lock in with a safety snap pin.
So no permanent hardware, no special tools, and no modifying your trailer. What makes this real useful is that the anchor point is going to be adjustable. You can slide it along the rail and position it exactly where you need it. So if your load shifts or if you're hauling something different next time, you can move your tie down point to get the best balance and hold. Now, if you're concerned about security, you can even swap out the pin for a padlock, which is not included with this, and that's going to help with increased theft deterrence when you're not by your trailer.
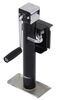
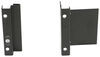
This is also designed to work seamlessly with CargoBuckle ratchet systems. You can bolt a cargo buckle unit directly onto it, which is going to make securing everything from heavy equipment to more delicate cargo quick and efficient. But even though this is adjustable, this is built to stay solid under the load, and it's constructed of steel with this black powder coat finish that's going to keep it protected from rust and corrosion. Let me see if I can try to give you some measurements just so you have a good idea of the size. So these are just some rough measurements here.
Looking at the overall height, we're sitting right at about, pretty close to 8 1/2 inches tall. The overall width, hmm, let me trying to figure out a way to show this to where it's gonna make sense to you here. Let me try it this way. Just measuring here at the widest point, hopefully you can see all that. My hoodie isn't making it real easy.
Let's try that. Width, we're gonna say right at about 8 1/2 inches wide. And then looking at the depth about three inches. Let me check that height one more time. So that height, I'm not sure what I said before, but I'm gonna say 7 1/4. Looks like that's 7 1/4. I think I was off there on the height originally. This is obviously gonna be hard to measure, so I just wanna make sure that you had a good idea of the size. The measurements aren't as precise as they should be here on my tabletop. But if you do have any other questions, don't hesitate to reach out. We do wanna make sure that you're getting exactly what you need. Well, again, my name's Andy thank you for joining me.
Info for this part was:
At etrailer we provide the best information available about the products we sell. We take the quality of our information seriously so that you can get the right part the first time. Let us know if anything is missing or if you have any questions.


Thank you! Your comment has been submitted successfully. You should be able to view your question/comment here within a few days.
Error submitting comment. Please try again momentarily.