
# 1
Furrion Vision S Wireless RV Backup Camera System w/ 3 Cameras - 5" Screen
Easy to install and pair. Theres a delay between camera and monitor !!!! The screen is way too small to have the 3 camera displayed. Not really easy to switch cameras while backing up. Would I recommend ti's product, for sure not !
Great customer satisfaction
# 2
Furrion Vision S Wireless RV Backup Camera System w/ Night Vision - Rear Mount - 5" Screen
The field of view is huge!! Install was quick and easy..definitely 5 stars. I haven’t pulled the camper yet to see if their is a video lag time. I always expect a little..but so far very happy.
While the advertising for a promotion of two extra cameras were on the site, When I applied, it said it wasn't eligible. WARNING, do not buy if you are expecting to get two sidelight cameras. Camera came with packing only on top. USPS can be rough so normal procedure is packing on bottom and top. camera itself works. It is a hassle in the F-150 to run the power all the way back to the rear seat area to get a cigarette lighter power. I'm sure the USB's are just not enough power.
# 3
Drive Wireless RV Backup Camera System w/ Night Vision - Rear Mount - 7" Screen
I had forgotten my account info and called customer service. They were fantastic. Was able to retrieve my business account and complete the order with no other issues. Thank You customer service for being very polite and patient with me.
Very clear image.
# 4
Voyager WiSight 2.0 Wireless RV Backup Camera System w/ Night Vision - Rear Mount - 4.3" Screen
I installed this on my Airstream Bambi just above the license plate. Removed license plate light to expose light power wires. Drilled a large hole to fit the rubber grommet using a step drill, then drilled two small mounting screw holes using bracket as hole drill template. Fed the assembled camera connector through the large hole and pulled the camera connector wires out the license plate light wire hole. Solder camera connector wires to license plate light wires (confirm polarity) and stuffed all wires back into hole. Installed grommet and camera bracket sandwiching the grommet between the back of the camera bracket and trailer siding for a water proof seal. Camera paired first try. Be sure to power only the monitor on first, wait for screen prompt, then turn on camera using trailer lights. Camera image is crystal clear and I've not noticed any image lag. It's been great so far.

Purchased this a year ago to mount on the rear of a camper trailer (after I backed over a mailbox that I could not see). I’m very happy with the purchase. It has been extremely useful when backing the camper by myself. The camera was not too hard to mount, the view is decent, and it has proven to be reliable. Overall, I’m very pleased with the purchase and performance of this camera. I recommend it!
Furrion Vision S Wireless RV Backup Camera Installation - 2021 Grand Design Transcend Xplor Travel T
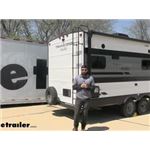
Hey everybody, how's it going Today we're gonna be going over and showing you how to install the Furion Vision S Wireless Camera System here on a 2021 Grand Design Transcend Xplor. So the Furion backup camera system is gonna be an awesome addition here to your trailer because it's gonna allow you to remain safe when you're driving out on the road or backing up. So this camera system here is actually powered by the running light circuit, meaning it's gonna have power and you're gonna get a picture in the vehicle whenever we have our running lights on. So we're traveling down the highway, whether we wanna see behind us, maybe we need to get over in a lane, or we just wanna see what's going on at the back of our trailer. This is gonna be an excellent option for this. It does a lot more than just serve to help us back up.


What our customers are saying:
"I like the easy of navigation through the site. It only took me a couple of minutes to place my order. Thank You I will shop this sight again in the future."