

 Arrives before Christmas
 To see if this custom-fit item will work for you please tell us what vehicle you'll use it with.
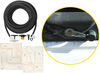
Ever put your truck or van in reverse only to realize that your backup camera is too dirty to see behind you? We love how this cleaning system conveniently lets you rinse off even the most stubborn road salt with your existing factory wiper button.
Features:
Specs:
Keeps Your Rear Backup Camera Clean
We fully understand the frustration of throwing your truck into reverse only to realize that your backup camera is so grimed over that you can't even see behind you. This cleaning system lets you rinse off your backup camera from the driver's seat using your factory wiper controls. It'll get rid of stubborn road salt on a wintery day or mud after an off-road adventure, and unlike specialized cleaners, you don't have to wait until the camera is dry or until the temperature is above freezing to use it.
Uses Your Factory Wiper Fluid System
Run the tubing along the frame and tap it into your factory wiper fluid reservoir, making sure you're avoiding any moving parts like the A-arms or any hot components such as the exhaust. You won't need to do any wiring for installation - only minimal drilling is required. To mount the spray nozzle, drill a 5/16" hole on the tailgate latch using the included template and mounting hardware. Depending on your setup, you may need a center punch, a sharp razor blade, and some side cutters.
Videos are provided as a guide only. Refer to manufacturer installation instructions and specs for complete information.
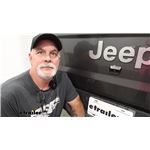
Hey guys, it's Jake here with etrailer. Today we have a 2020 Ford F-150, and we're gonna be taking a look at and showing you how to install the ClearVU Camera Cleaning System. This system is designed to clean your camera so that you don't have to get out of your vehicle in order to do it. We all know the frustrating fact of that when you're driving around on the road, whether it's during the winter, during the summer even, if you're driving down a gravel road that's dusty, this rear view camera, what'll happen is all the dirt and the debris from the roads is all swarming behind your vehicle, and it just starts to cake up that lens. Well what this is designed to do is when you go to back up into a spot, and you see that you can't see very clearly out of your rear view camera, this is going to clean it off. You just hit your windshield wipers, it's gonna tie right in with that line, and it's gonna clean your camera off, and you'll be able to see just fine.
You can see here our camera is completely unusable. We'll hit the wiper blades, and you can see perfectly clear again. Now as far as the installation goes, it's really not too bad of an install. I'd say you could probably have it done in maybe an hour or so. You will have to take the plate off the inside of your tailgate.
You'll have to remove your tailgate handle itself. But all of those things are pretty easy to do. I'd say probably the hardest part about this if you're doing it from home is going to be running the hose from the tailgate up to the front of our vehicle 'cause we need to tap into the factory windshield wiper, the washer fluid. But with that said, let's go ahead and show you how to do it. To begin our installation, you'll want to take a T25 Torx bit, remove the eight screws that are holding our tailgate plate on the inside.
(screwdriver buzzing) In your kit, you're gonna get this drill template. You'll notice that it has this tiny little hole in it. That's the hole we're gonna end up drilling for our spray nozzle to actually get installed in. This is just a pilot hole. But you'll notice that it'll go around our rear view camera just like this, and it fits perfect.
Now it looks like you can put it both ways, but that's what taking this back panel of our tailgates off is gonna help us identify. So our hole, we've got it lined up on the passenger side. It's gotta be on that side 'cause there is a wiring harness on the other side of our camera. So we're gonna take our screwdriver here and just put a little mark. That'll give us the spot so we can drill right there. We'll take a pilot drill bit and just drill our hole straight in. (drill buzzing) Then we'll take a 21/64 drill bit and drill out our final size. (drill buzzing) Now we can just check for fitment. We see that it works perfect there. And we're just going to get this assembled on here. You'll want this piece in the tailgate like this. And then we're gonna put a nut on the backside. Now because of where our hole came out at, you can see that down in this hole, this opening, it's so difficult to get down in there with our nut and then get our hose assembled to it. So what I'm gonna do is I'm gonna just pop this latch assembly loose from here and try to get the handle pulled out the back side so that I can get all this assembled, and then just put the handle back up. Now that we've got our handle assembly out of here, we're just going to slide our nozzle through. And then this might be a little tight in here. If we just bend it at an angle, you should be able to spin this nut into place. When you're snugging this nut down, you wanna make sure that your nozzle is pointed at your camera 'cause once it's tight enough, you're not gonna be able to spin it. And we'll take our hose while we got our handle off. This is gonna make it much easier to slide this over. Just slide that over that. Now with this attached, I'm going to feed this tubing back into our tailgate, and then we can reconnect everything and get our handle back in place. Now we need to put our check valves in place. You'll see that they both have arrows on them. You want the arrows pointing towards that nozzle we just put in. So what I'm gonna do is I'm going to leave enough space here so this can be looped 'cause I'm eventually gonna zip tie it to this rod. I do know that the rod moves ever so slightly, about an inch. So I'm just gonna give myself enough space so that I can attach it to that so that these check valves aren't bouncing around. We'll pull back a little slack, cut that off. You just wanna use a sharp knife or some tubing cutters like that in order to do it. Fish this in. What you'll want to do is you'll take another section, we're gonna cut it there, we're gonna put the other check valve in. I did find that putting a little bit of soapy water on here does help just so long as you can still hold the tubing. And we'll just get the remainder of our tubing hooked up to the other side of our check valve, just like that. So you want it to look like this. We're gonna get this tied off. Probably put a zip tie right over top of each one of these check valves so that it doesn't move anywhere on this bar. Then we can start routing our hose up to the front of our vehicle. Now the way that you wanna route the tubing from the back of the vehicle to the front is you wanna go through the tailgate with the rest of your wires, just follow those in, and then you'll want to come over to the passenger side by the spare tire and get inside the frame as fast as you can, and then route this hose all the way through the frame, come out of the frame right below by your wheel well, and then we'll come up into our engine bay, which is where we're at now. What we need to do is we'll take our tubing cutters again. Right here, this is our hose coming up for our windshield wiper fluid. You can see it's going in here and over to our windshield wipers. We're just gonna cut it. You might have some fluid come out of here. If anything, it would come out of this one. But what we're gonna do is we're gonna take the tee fitting, put the tee fitting in. And you wanna point the tee fitting to where your hose is running. So this is gonna allow the system, our normal system, to operate as normal or to operate as designed. And then we're gonna need a little short piece, and we're gonna have to put in our shutoff valve. And then we can attach it to our hose. We'll take our little piece, it's about 2 1/2 inches long, we're gonna slide that over our tee fitting. Then take your shutoff valve, slide it over, and then we'll know exactly how much we need to cut off of our hose here. So I'm gonna give myself more than enough space of this here. Cut it off right here. Like that. And then tie this in. Now because this can weigh a little bit more, I'm just gonna drill a single hole or maybe two holes right here in this plastic housing, get this zip tied, and safely secured down to this plastic. Now that we've got the system totally installed, we're gonna go ahead and turn our vehicle in accessory mode and test it out. Now that we know our system's working properly, that's gonna do it for our look at and installation of the ClearVU System on our 2020 Ford F-150.

Good product that works as advertised. The instructional installation video glossed over the difficult parts. The price is exorbitant for the hardware, you're really paying for the engineering, which was good.
Info for this part was:
At etrailer.com we provide the best information available about the products we sell. We take the quality of our information seriously so that you can get the right part the first time. Let us know if anything is missing or if you have any questions.


Thank you! Your comment has been submitted successfully. You should be able to view your question/comment here within a few days.
Error submitting comment. Please try again momentarily.