


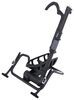
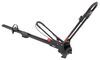
This bike rack is perfect for your overland adventure. It lets you quickly mount your bike on your Front Runner platform rack and, unlike fork-mount racks, you don't have to remove your front tire. Hoops fold down when not in use.
Features:
Specs:

California residents: click here
Videos are provided as a guide only. Refer to manufacturer installation instructions and specs for complete information.
Hey everyone, it's Evangeline right here at Etrailer. Today we have the Front Runner Pro bike rack. This is gonna be a wheel-on roof-mounted bike rack designed to fit onto your Front Runner roof rack. If you're looking for something that you don't have to remove the wheel of your bike and gives you a strong and stable fit as you drive and transport it around, this might be a good option for you. You're ready to go on all kinds of adventures with your Front Runner rack, and you wanna carry on some bikes. Now, for your Front Runner options, there's the Pro fork mount and the Pro wheel mount.
And people tend to go with the wheel mount if they're looking for something that might be more difficult to set up the first time, but after that, it's much easier to load the bike on and take it off, because you don't have to remove that front wheel every time you wanna go for a ride. And this fits nicely within your Front Runner or on your Front Runner rack as long as you follow certain tips and tricks with getting everything set up. So in this video, we're gonna review that process. I'll give you some of my tips and tricks, and we'll also do a quick overview of how to get it all set up. This will work with pretty much any bike, whether you have a fat bike, a road bike, a mountain bike, even some of your heavy electric bikes, since this has a weight capacity of 55 pounds.
Now, if you're wondering why would you ever lift 55 pounds onto your roof, that's most commonly seen when you use your Front Runner rack in a truck bed or something a little bit more accessible. Once you have everything set up, getting the bike up there is a pretty simple process. Now, that simplicity depends on the height of your vehicle and the height of yourself. So I have Matt here just to assist with that process. You just bring the bike up to the vehicle and focus on getting that front wheel into that basket.
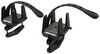
And then you set that rear tire onto your rear cradle. Then you secure the bike by pushing up on that bottom cradle and then tightening down that bottom cradle with the knob at the bottom. And then you secure that rear tire with the strap that tightens down. Now, you do have the option for your larger or wider tires to use a different bracket, but whichever you do use, you can ratchet it by lifting that lever up and down to get the most secure fit. Front Runner is cool in the way that they have different types of racks for it, different types of vehicles, and your adventure is a bit more customized that way.
So for your options for using this bike rack, this will work on racks that have at least seven slats, whether they're the slim line or slim sport series. With that too, this is the ideal way of loading your bike up where you want it as close to the edge as possible, front wheel facing the driver's side. But depending on what other cargo you have, there is a little bit of versatility there. You can load this further towards the inside or further towards the outside as needed. And this is what the rack looks like with the bike off. Now, a lot of people just leave it in the down position, ready to put the bike back on, but if you're not going for a ride just yet and you wanna make this a bit more compact, that's an option too. Now, there is a middle clamp here that doesn't come into play until you need to store your rack on the roof. This is actually two parts, and I store the top part on that middle section just because I like to use this eye nut as a way to run my own cable lock. But that's just gonna be an extra feature here. What we're gonna do is we're gonna take this eye nut out, we're gonna move that washer, and then lift this top bracket up and put it off to the side. And then we're going to completely loosen our bottom cradle with this knob until that cradle goes all the way down to that bottom bracket. And then you can bring your top cradle in. Now, this cradle tends to have a bit of resistance to it. That's totally fine. Just give it a good little force. And then once this sets nicely on top of that bottom cradle, go ahead, grab your top bracket. This is gonna fit up and over, and secure again with that washer and eye nut that you just removed. And just like that, in typical Front Runner fashion, yes, there are a little bit more things you have to fiddle around with, but once you get everything in place, you have a super solid bike rack. Compared to other roof-mounted bike racks that tend to move around even when they're folded down, this one, you really shouldn't expect to hear anything whatsoever when you drive other than typical wind noise. Quick overview of how to best get set up for your vehicle, as you will want it in a spot that's easy to load up your bike. In the case of our RAV4 here, we're kind of limited on space, so we just pushed as far forward as we could get. Now with that, you first install the front cradle system, and that's gonna have four bolts, and you're going to use a 13 nut millimeter wrench. So those four bolts will sit one slat apart. Once that's in place, you then line up your middle clamp. Now, you're just gonna mock up where this is gonna go. You're not gonna use it just yet, because you still need to load up the entire bike to get your measurements for your rear cradle. Since you want that rear cradle to sit underneath where your rear tire is, do keep in mind that there's the bracket on one side, and then it extends out. And you can rotate this to whichever orientation makes the most sense for your bike. It's gonna cover that gap between the slats. Now, what I do is I like to have the strap go out so I can buckle it to the side of the vehicle. That just makes the most sense. It's easier to pull down here and ratchet things down and get things lined up. Now, that is up to you, as long as you have your bike fully secured. It'll just make things easier that way. With your bike rack kit, you also get your bracket for fat tire bikes. Your maximum tire size you can carry is gonna be up to 5.2 fat tire bike tires. And you just switch out to the buckle bracket with this angled bracket and use a four millimeter Allen key to do that switch. So it will take a little bit of time, but it is doable, and you don't have to get anything extra to do so. With all my time working with roof-mounted bike racks, I've developed some favorites, like the Yakima High Road or the Inno Quick Base roof-mounted bike rack. But those are all designed for traditional crossbars. If you have a Front Runner platform rack, well, you're gonna wanna get the proper bike rack to match that rack. So at this point, really what you're comparing is gonna be the fork-mounted version or the wheel-mounted version. And I personally, even though it does require lifting a bit higher up to get your bike up onto that wheel-mounted version, I think it's worth it, because you then save the hassle of having to remove and then reinstall your front wheel every time you want to go for a ride. So with all that being said, as a bike rack, yes, it doesn't have those fancy features that some of those other traditional roof-mounted bike racks do have, like a ratcheting knob or things like that. But practically, this is solid, very little movement of the bike, very little movement of the rack when the bike is not on there, and it is a great fit and follows the Front Runner style of adventure very well. But today, this is a look at the Front Runner Pro roof-mounted wheel-on bike rack for your Front Runner racks at etrailer.com. My name's Evangelina and I hope you enjoyed this journey.
Info for this part was:
At etrailer we provide the best information available about the products we sell. We take the quality of our information seriously so that you can get the right part the first time. Let us know if anything is missing or if you have any questions.


Thank you! Your comment has been submitted successfully. You should be able to view your question/comment here within a few days.
Error submitting comment. Please try again momentarily.