
To see if this custom-fit item will work for you please tell us what vehicle you'll use it with.


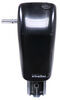
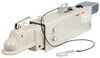
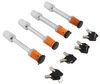
Roadmaster's crossbar-style brackets are virtually invisible, easy to mount and simple to remove. Brackets install on your vehicle's frame to provide attachment points for your tow bar.
Features:
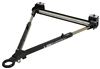
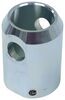
The drawbars, or front arms, on the crossbar-style series base plate kit are supremely easy to mount and remove. Just insert them into the brackets and twist to lock them in place. To remove, simply twist the arms back and pull them out. Once the drawbars have been removed, the remaining brackets are virtually invisible. On most automobiles, the brackets are mounted within the grille, where they remain not only unseen, but protected from scrapes and scuffs, as well.

California residents: click here
Videos are provided as a guide only. Refer to manufacturer installation instructions and specs for complete information.
Hi there Trailblazer runners, today on your 2021 Chevrolet Trailblazer, we're going to be taking a look at and showing you how to install Roadmasters crossbar style base plate. And this is what our base plate looks like when it's installed. You can see that the attachments are going to pass through the bottom here of our fascia. And this is a nice base plate cause it's given us places to mount our breakaway switch and our diode wiring. So you've just got everything you need right up here at front for you. It's a nice clean look.
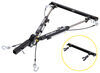
The black powder coat finish blends in with the exterior of the vehicle really well. And it really just all looks like it was kind of meant to be there. There's five main components you'll need when flat towing your vehicle behind your motor home. You'll need your tow bar, which is the connection between your motor home and your vehicle. You'll need your base plate, which is the connection point on your vehicle that your tow bar will attach to.
You'll need your safety cables, which is a supplemental connection, in addition to your tow bar. You'll also need your diode wiring, which will take the lighting signals from your motor home, and transfer them to the lights at the back of your vehicle, so people will know your intentions when going down the road. And lastly, you'll need your supplemental braking system, which will apply the brakes in your vehicle when you hit them in your motor home to help you come to a safe stop. Some additional components you'll want to consider is a high-low adapter. This is what we've got installed here, and this is only necessary if the height of your motor home and your base plate differ more than three inches.
We've you've got an eight inch drop installed here, in order to give us a difference of only one and a half inches between the two, giving us a nice level tow bar here. Because if the angle is too extreme, what will happen is every time that you take off, you will either pull up, or down on the suspension on your vehicle. And that can prematurely wear out those components. By having it be completely flat like this, we're just pulling it straight, and we're not going to be affecting our suspension in any way. You will need to, to make sure that you got the additional pins so you can get these all attached.
Another thing that you'll maybe want to consider is your safety cables. If they are coily cables, in most cases, your, usually will have the length that you'll need, but, adding a high-low adapter does often make your straight cables not quite long enough. And we've got extensions here at each trailer, if you we're to need those as well, to ensure your cables are long enough. We're going to hook up to our motor home now. So I've pulled up to it. And when you're ready to attach to your motor home, we're going to take our crossbar style arms here. This is going to insert in place. We can click that one in. We'll take our other one. And you can notice that that they are labeled on them, so it makes it nice and easy to know which one goes on which side. The tabs here are also going to be towards the top. Once those have been clicked in, we can grab the crossbar. This just slides down on top, and then we'll simply secure it into place with the included pins. At this point, this base plate is now ready to attach to any Roadmaster tow bar, but we've also got adapters available here at each trailer. So you can take another manufacturer's tow bar and swap those out and get those two attached directly to this base plate as well. We can now go ahead and get a tow bar attached to it. So we're just going to take our tow bar here, get it out of our storage position. We'll spread our arms to line up with our base plate. We'll then slide that arm in, so the hole and the tow bar lines up with the hole in our base plate here. We'll grab our pin. We're going to slide it from the outside in. And on the opposite side, we'll secure it with the clip here. We can then repeat that procedure over here on the other side. And now at this point, we are ready to take our, the rest of our flat tow components, such as our diode wiring. Our safety cables, and when attaching your safety cables, we do want to make sure that we are crossing those. So we're going to take the safety cable from the passenger side there on the motor home, and make sure that we connect it to the attachment on the driver's side on our vehicle. We'll do the opposite with the other one. And this will ensure in the event of a catastrophic disconnect, that we will have a, cradle here, underneath of our tow bar to keep those components up from dropping down onto the pavement. And lastly, we're going to take our breakaway switch cable, and make sure we attach that for our supplemental braking system. And then, at this point, we're ready to place our vehicle into flat tow, and we're ready to hit the road. We'll begin our installation here at the front of the vehicle with our hood open. We're going to need to remove some fasteners across the top of the vehicle. Here are several fasteners and some rubber bump stops. We'll start by removing the bump stops. To remove these, just grab 'em and give a little bit of upward pressure, and then, just turn counter-clockwise, and they'll unthread right out of there. So we'll remove the remaining three, just like that. Once those are removed, here's our fasteners that we now need to take out. They're Torx head bits, and there're going to be seven of them, you know, three on the passenger side, and four on the driver's side. We'll just take our T-15 bit, and we'll slide it down into those screws. And we'll just zip those outta there. We're now on the driver's side wheel well. I went ahead and turned the passenger wheel all the way to the right, and that kind of gets it out of the way so we can easily get these fasteners out in here. There are four more screws here along the inside edge, going down to the bottom. We'll use the same size bit to remove those. Once we get these four removed, there's also a pin located up at the top. If we then follow upwards, 'til it's pretty much just straight up and then go inward, we'll find our push pin fastener up in there. We'll use our trim panel tool to get behind the head and just pop it out of there. What happened there It came out pretty fast, but once you get the head popped out, that releases it, and then you can just pull it right out of there. Now that we've got those removed on this side, we'll be doing the same thing on the other side. When removing the ones on the other side, it's probably going to help take your, and turn your wheel the other way to give you a clearance over here as well. So now we're underneath the vehicle, we've got some fasteners we're going to be removing in the middle. And on each side. We're going to start with our Torx bit that we had on the side. And there's going to be several Torx screws that you see over here. There's about five of them over here. We only need to remove the ones that actually are connecting to our fender liner there, which is going to be this one here and this one here. And you can actually see like where the fender liner kind of would get attached to by those. So we'll get both of those out of there that same t-15 Torx. And then once we get these two out on this side, we'll be removing the exact same two on the other side. We'll take out the fasteners across the center where our under shields attached to here. So there are a total of six, three on each side, and we're going to use a seven millimeter socket to remove those. Now, after this first one here on the outside, you'll see that there's an opening hole here. You may or may not have a push pin fastener there. Uh, our customer doesn't have one there, but I do suspect that there is likely supposed to be one there. Same when you get to the other side, there's likely a push pin fastener right there between these two outer screws, but the one on this vehicle is not there. We're now going to come back to our fender here because we needed to get some of those loose on bottom. We're going to pull our fender liner back some. I'm just using a trim panel tool, to kind of pry this out of here. And we'll need to pull this trim piece off here. If we, it's hard to see, but, around the inside, if we kind of just feel in there, you, there are little white clips. We're looking for those white clips, and I'm just giving them a little bit of a pinch. And then we'll take our trim panel tool here on the outside. You can actually see if you look at the paneling here, how, when I'm pushing on that clip, it makes a little gap right there. And I'm squeezing the clip just a little bit. Here, you see the white clips that we we're talking about, that we passed that. You can see where I was squeezing to get it to pass through. And we're just going to follow that up. You can see here, I'm kind of giving it some pressure. It's not coming out, but with my other hand, I give it a little bit of a pinch, and it just pops right out of there. Now there is some along the way. So as we're going up, just kind of pay attention, you can kind of see there's one right here as well. So, just feel from the backside for each of those clips and squeeze a bit, take them out just like that. And we're going to get those released all the way back to we're behind this point here. Once we've got a release to this point here, it changes to a different style, that clip. So we're just going to use our trim panel tool with a little bit of pressure to get it released a little bit further. It also use plastic ones depending on the, uh, the area there. You can always pull that fender liner down to give assistance with these as well. We just need to get a little bit further back. That should be good there, cause we needed to reveal this bolt right here. We're, we're gonna remove this using a ratchet and a seven millimeter socket. Once we get that loose, most of the time they'll come out of there by hand afterwards. Or, what I like to do is you can take the socket off of your ratchet after you break it loose. And that makes a good little thumb wheel to get that out by hand. So once we get this guy out of here, what I'll do next is take some rags. And I like to kind of fold them up to make a spacer, and we can use that spacer then to hold this trim piece out. So that way, when we're removing our fascia, we don't have to worry about bumping into it. It kind of gives us a clearance that we need. So I'm just taking the rag here, just folding it up until it gets pretty thick. And then we can just peel back on this, and we're just going to slide it in just like that. And you can see the gap that it's made here for us. So that way we can easily get our fascia removed. We're going to go ahead and just put another one in towards the top as well. After we get these in place, we'll head over to the passenger side and we'll perform the exact same procedures over there to get that side removed as well. We can now start to get our fascia pealed off. We're going to start on one side. I'm just kind of pulling back on the fender liner so I can get a grip behind the fascia. And then, I'm just going to kind of pull outward, just like that, until we get it popped out towards the center of our taillight here. Once we get it popped out to that point, where it's released from the taillight, we're going to stop on this side, and we're going to go over to the passenger side there, and we're going to get it released to that point as well. So now we've got these released, we can pull out on it a little bit. These little black pegs that you see here and here, what that actually is, is that is the push pin for the wiring harness that's on the inside, and we need to get that taken off of there. So we're gonna take our trim panel tool. We're going to go behind this piece here to get behind our wiring harness. And, we're just going to pop it out of there. You can see here's that wiring harness that we just popped out with the trim tool. I just got, I just got the tool kind of behind it like this, and just popped it out. And we're going to get the next one released here, and then make sure we get the ones over on the other side, released as well. Now, I do recommend grabbing extra hands because all the electrical wiring and stuff, we are going to have some connectors back there. And this one is a little bit too difficult to do with one person. We're now going to rock out the center. And then we can kind of pull up on the top here to release it from the little tabs, and then we'll slowly walk it away and check for any electrical connectors. It looks like over on our passenger side, we're going to have one over here. We can remove this connector by pulling out on the lock tab here. So it's a little red, red tab, and then we can press the release right there. It can be pretty stiff. Sometimes if you actually push it together and then try to release it, it makes it a little bit easier. We'll then set this aside, where it won't get damaged. We'll need to remove our air dam. We'll use a pair of snips to make diagonal cuts here at the corners to separate it from the upper section. The upper section is going to stay on the vehicle. Once we've made those cuts, we can now release the tabs. Holding the air dam on, these tabs are located on the bottom. You'll pull the air dam directly towards you while pushing up on these tabs with a screwdriver to release them. Once we get the one side released over here, we'll then go over to the other side and release the other side at the same way. We can then set this aside, and we're not going to re-install it. We now need to make a small modification to the intercooler here at the bottom to have clearance for our base plate. On the passenger side, you'll notice that there is a small tab here that sticks out. We need to trim this off, so that way it's not in the way. We're just going to use a cutoff wheel to trim this somewhat flush. Uh. And if you've got it trimmed, if you want, you can take a file in here to just clean up these rough edges. It does kind of melt a little bit. And we're just trying to smooth it out and knock off at any of that melted part, really. Next, we're going to remove the bolts from our bumper beam here. You'll have four on each, the upper outer bolt, we're going to leave in place. The other three on each side, we'll be removing. We'll use a 15 millimeter socket to remove these. Next in your kit, we're going to have our spacers and put those in place, but I wanted to point out the two different spaces. If you look, they are very close to the same size, but one is slightly shorter than the other. You'll have two of these shorter ones and you'll have four of these longer ones. We're going to use the longer ones in these holes here. So we'll take four of them, and set those in place inside those holes, so that way they're ready for us. We're getting about ready to lift our base plate into position and start attaching it. But I find it easier if you prepare your hardware first. We're going to attach it with the longer bolts that come in our kit. Each of these is going to get a lock washer followed by a flat washer, and then all the hardware that attaches our base plate to the vehicle, we're going to be using red Loctite on. We'll have a total of three of these for each side. So I'm gonna go ahead and get these six prepared. And I suggest you do as well. We can now set our base plate into position. If you need so, you can grab yourself an extra set of hands. You want to carefully make sure we go around our intercooler. And then, we're going to line up our holes in our base plate with those spacers. And then get a bolt started on each side. Got one started there. We'll then head over to this side and get one started over here. When starting your bolts on the base plate, you may need a stick a small pry bar in this outer hole here like we are. And we're using it to pry it over to just so we can get everything lined up, cause it was very close on the way everything lined up on it. Now that we've got one of these started on each side, it will hold itself up, making it easier to install the rest of the hardware. We can go ahead and get those inner ones installed in there. And once you get those started, we're going to go back to those shorter spacers that we had mentioned earlier, and these are going to drop in from the side, but our hardware is still loose. You can kind of pull out to get that to slide in there. And then, we're going to use the same hardware, just with that different spacer, and get into those outer holes. We'll now take the smallest diameter hardware that comes in the kit, and we're going to prepare it with lock washers and flat washers like the other hardware. And of course, some Loctite. You'll have two for each side, and then we're going to take our lower brackets here. And these are side-specific. So we got the driver's side one here, the longer section here, it's going to be horizontal, and the holes are going to match up with those factory weld nuts. The other two vertical holes here, where it goes up, should line up with your base plate, and you can see the little gusset there and the open holes right there. So we want these to line up with our factory weld nuts there, and then we're going to take that hardware we prepared and just thread it right into it. Once we get these threaded in over here, we can get the other side kind of mocked up the same way. We can now take the slightly larger diameter, and they're also slightly shorter than the previous ones we used. And these ones are going to get just a flat washer. We're going to go from the outside in. On the other side, we'll follow it up with a flat washer, a lock washer, and a nut. So we'll just repeat that for the other hole on this side. And then the two holes over on the other side. We can now go back and tighten our hardware down. We're going to start with the bolts here, where it attaches to our bumper beam. We're gonna use a 17 millimeter socket on these. Then we can use a 13 millimeter socket for the side bolts that go into the factory weld nuts. And lastly, we'll use a 15 millimeter socket and a wrench to tighten down the bracket to the base plate. Need your socket on the outside, and your wrench in here on the inside. And here, you can get a good look of why we needed to trim off that piece. So we can clear for our bolt there. We can now go back and torque all of our hardware to the specifications outlined in our instructions. We'll do it in the order that we had tightened them down. So now that we've got our base plate fully torched down, the base plate installation is basically complete. At this point, we will be reinstalling our fascia in reverse order. We are going to have to make a few modifications to that fascia in order for it to clear our base plate here. But I highly recommend at this point, you hold off on reinstalling that fascia and complete the rest of your flat tow setup, which is usually going to include your diode wiring, and your supplemental braking system. A lot of those components, you'll have to route wires up here to the front of the vehicle and while we've got that fascia off, it's going to make your life a whole lot easier. We can see here right at the front of our base plate, they've offered wiring mounting locations, as well as breakaway switch mine locations for your braking system. So we can get all of our wires routed up to this point. I'm going to go ahead and do that now and complete the rest of those components installation. And then once I get those in place, I'll come back and meet up with you and we'll show you how to get that fascia re-installed. Before we reinstall our fascia, we do need to make some modifications here to the inside of it. The foam dampener here on the inside, we're going to completely remove. We can see there's kind of clips here, here, here, and here for those. Those are just plastic clips, you just simply push them away, and you can kind of just rock this out of there. I'll do that on this side as well. Take this whole piece off. And we're just going to set this aside. We're not going to be reinstalling it so we can have clearance for our base plate. We also need to make modifications to the ribbed area here towards the bottom of our fascia. On each side, we'll need to trim out this middle rib towards the outside here. That's going to allow for clearance for our base plate to pass through. We're just going to use a pair of snips to trim these right off of here. The directions also, want you to trim out this piece here, next to the sensor. But what I'm going to do is I'm going to actually leave this in place. I'm pretty sure that the fascia is going to be able to slide back on with this rib in place, if you haven't installed your diode wiring connector. That way we can trim it out with the smallest amount as possible so that when we put our connector together, it'll hide any trimming that we've made there. Now with an extra set of hands, we can reinstall our fascia. Don't forget to plug in your electrical connector over here on the passenger side, slide those guys back together. And make sure you reinstate that lock tab. And then we'll lift our fascia into position. If we can get the top hooked on the first, that'll make things a little bit easier, but we do also need to look down below and make sure that our components are passing through properly. Sometimes we have to angle it in a certain way in order to get everything to pass through. We can see here, we're catching on our electrical components, or the, it was the safety pin attachment there. So we just move it around 'til we're able to get it past that. It does look like here, where our breakaway switch is, you have to just kind of push up on that breakaway switch just a little bit to get it to clear as well. Now that we've got our fascia re-installed, if you're installing a six pole connector at the front here, this is the part we talked about, where we were, we we're going to trim, but we wanted to wait until we got it on the car because you can see here where our connector would go. The back of it's going to hit there and we can see the width of our, of our switch there. So we're just gonna come in right on the side of the switch. We're gonna give a little trim there. And then, we're just gonna come on this side of the switch, and give a little trim here. And then this way, we know that our switch is going to be able to go in place, and we're going to have the smallest trim possible so we can maintain that factory look. You might also notice if you're trimming that when you hold this up here, that the connectors hitting on the fascia here after we've got it re-installed, and it's really not going to line up with that bracket. That's no big deal due, to manufacturer variances, it may be slightly off. We can easily correct that. We're going to use an extension with an 11 millimeter socket on it. That's actually going to slide right over these really easily, which gives us a ton of leverage to just put a little pressure on that and just bend it down a little bit. We're going to do the same thing on this one, bend it down about the same distance. Just kind of double check, see where you're at there. And then we can hold it up there once again. It looks like we're still gonna have a little bit of contact, so we'll bend it just a little bit more, until we're completely clear. And it looks like we'll have plenty of clearance there. And we also want to just make sure we can flip it open, Looks like our lid will be able to open and everything there. So now that you've got that all adjusted, you are hooking up your six pole connector. You can go ahead and finish getting that installed and mount it up. You'll mount this up, just using the two self tapping screws that come provided with your kit and an eight millimeter socket. And that completes our look at Roadmasters crossbar style base plate..

deffinetly will use again!
Do you have a question about this Tow Bar Base Plate?
Info for this part was:
At etrailer we provide the best information available about the products we sell. We take the quality of our information seriously so that you can get the right part the first time. Let us know if anything is missing or if you have any questions.


Thank you! Your comment has been submitted successfully. You should be able to view your question/comment here within a few days.
Error submitting comment. Please try again momentarily.