
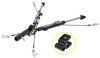
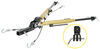
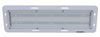
Roadmaster Crossbar-Style Base Plate Kit - Removable Arms


To see if this custom-fit item will work for you please tell us what vehicle you'll use it with.


The crossbar-style hidden brackets attach to your vehicle's frame to provide attachment points for your tow bar. The visible portions of the brackets can be removed when you are not towing.
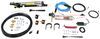
Features:
Note: Fishwire (C58400 - sold separately) is required for complete installation.
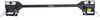
The square drawbars, or front arms, on the crossbar-style base plate kit are simple to mount and remove, easily securing with hitch pins. Once the drawbars have been removed, the remaining brackets are virtually invisible. On most automobiles, the brackets are mounted within the grille, where they remain not only unseen, but protected from scrapes and scuffs as well.

California residents: click here
Videos are provided as a guide only. Refer to manufacturer installation instructions and specs for complete information.
Today, in this 2008 Ford Taurus, we're going to install part number 4415-1 from Roadmaster. To start off our install, get under the hood. Let's remove two plastic fasteners and two bolts that are attaching the top of fascia to the core support. Next, we need to go to the fender liner by the wheels. Now, we'll get underneath the vehicle. There'll be three screws we got to remove. To make things easier, we'll go ahead and turn the wheels so they're out of the way so we can remove the fasteners. Now, we'll get underneath the vehicle.
We'll have to remove three plastic fasteners attaching the center splash shield to the core support on the bottom. On this particular car, on the passenger side, there's a little extra panel that we have to remove one more bolt for. We need to do this because above it is access to your fog lights. We want to disconnect those as well. There'll be one on each side. At this point, we can go ahead and start removing the front fascia.
It's a good idea to have an extra set of hands to help do this. Starting on the corner above the wheel, we'll go ahead and gently pull out. Now, this particular vehicles a tight fit. Then we'll pull it out far enough to see the tabs. Then we'll use a small screwdriver to push down the tabs to release it.
Once you have both sides free, we can go ahead and pull the fascia and set it out of the way for now. With the fascia out of the way, there are two air deflectors that we have to remove. Theres one on each side. These will not be reinstalled. There'll be one fastener on top. It's easy to see and then there'll be two underneath the bumper structure.
Now, on each side, just lower the bumper structure but remove one bolt attaching the hood latch support to the core support. Now, we can go ahead and start installing base plates. We're going to start on the driver side. Now, we're going to take the bolt we just removed and run it through the center of the base plate and use that to hold our base plate in place. Our base plate should line up the hole in the lower sub-frame. Now we need a fish wire, one and a half-inch-long carriage bolt at the backing plate. To help us pull the bolt through, we used part number 80101-1. Now, ours didnt particularly line up that well so what we did is we went ahead and ran a half-inch drill bit through it to clean it up. Now, we ran it through the base plate into the hole in sub-frame. We thread the block through and then thread it on the bold then carefully pulled it all the way back through. Now, this may take a couple of tries. The block may hang up on the inside. Once you have the bold through, we'll go ahead and let's install the lock washer and a nut. We'll take a 5 -inch long bolt with the 2-inch backing plate then we'll go ahead and run it through the bottom of the sub-frame near the base plate. Now, youll notice theres a space in between. We'll install a cup plate washer which is like a round washer with a flat space cut into it and then apply the spacer and then into the base plate. Then on top, we'll get a lock washer and nut. Once again, we'll snug down the hardware just to keep everything together. Now, there are two holes in the base plate that we have to use for drilling out two holes in the bumper structure. First off, we'll go ahead and mark the center of the holes with a half-inch drill bit. Then we'll follow up a series of pivot holes until we eventually get to go back up to our half-inch hole size. When the holes are drilled, we can go ahead and install the hardware. We'll install a weld nut and a 1 -inch bold. We'll go ahead and take the weld nut. The weld nut will slip inside the bumper structure. At this point, we'll go ahead and start applying some Loctite to the bolts and then well install the 1 long hex bolt in a half-inch lock washer. Once you have these two bolts installed, we'll go back to the original bolts that we previously installed and add some Loctite to those. Now, we know that everythings fit and all the hardwares in place, we have everything lift installed, we'll go ahead and tighten down the bolts. Then we'll torque the bolts down as specified in the instructions. We're all finished with our driver side. Now, we're going to repeat the same process over on our passenger side. We can go ahead and reinstall our fascia. Now, we do have to do some trimming underneath. There is an opening on the bottom of the bumper fascia. On each of far corners, we're to trim out some of the plastic thats underneath of it. We'll go ahead and make a mark with a yellow marker. Then we'll take a rotary tool and cut out the pieces that will be in the way. Now, we'll go ahead and reinstall our fascia onto our car. Now, you may have to do this a couple of times. Make sure that the fascia fits back into place. You may need to trim just a little bit more to make room for the base plate. Once you have the fascia fully installed by snapping the corners back in, then we can go ahead and reinstall the rest of the hardware and the panels underneath the car. This is also a good time to reconnect the wires for the fog lights as well. We can go ahead and install the removal front bracket arms into your receivers. Then we'll go ahead and secure them in place with the 5-inch pins and clips. Now, it looks like it's a good idea to go ahead and run the pins on the center of the vehicle outwards and then install the clip. Then we'll go ahead and install the 8-inch safety cables and the QuickLinks. We'll put the QuickLink and the cable together then attach it to the connection point on the base plate. Then we'll go ahead and simply tighten them down. At this point, our base plate is fully installed and ready to accept a tow bar. With that, that will finish it for our install of part number 4415-1 on our 2008 Ford Taurus.

deffinetly will use again!
Do you have a question about this Tow Bar Base Plate?
Info for this part was:
At etrailer we provide the best information available about the products we sell. We take the quality of our information seriously so that you can get the right part the first time. Let us know if anything is missing or if you have any questions.


Thank you! Your comment has been submitted successfully. You should be able to view your question/comment here within a few days.
Error submitting comment. Please try again momentarily.