
To see if this custom-fit item will work for you please tell us what vehicle you'll use it with.


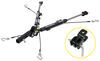
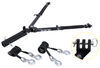
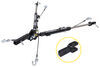
This custom-fit base plate kit lets you hook up your tow bar to your vehicle. The main body remains hidden for a clean, unobtrusive look when your vehicle is not being towed. Simple, bolt-on installation with included hardware.
Features:
Specs:

California residents: click here
Videos are provided as a guide only. Refer to manufacturer installation instructions and specs for complete information.
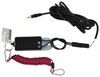
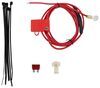
Hi, this is Scott with etrailer and today we're taking a look at and installing our Curt Base Plate Kit on our 2025 Ford F-250. To get started in flat towing, there's gonna be five main components that you're gonna need to get going. You're gonna need a base plate for your truck. You're also gonna need our tow bar, you're gonna need safety cables, you're gonna need tow bar wiring, some type of supplemental braking system. And then a couple other things that we always recommend, especially with the Ford trucks, is you're probably gonna need a brake light relay. And another thing to consider is a charge line kit.
That's gonna make sure that your battery's charged when you get to your destination. Here at the front of our F-250, we just wanted to give you an idea of what it's gonna look like when you're not flat towing and how it's gonna look if you're just living with it every day. With this one, I really like how it's kind of tucked in behind our main bumper here and it's just kind of in the air dam area. So anytime you're walking by it, you're not gonna have anything sticking out where you're gonna run into it with your legs or anything. And basically everything's tucked in really well.
Even our breakaway switch is tucked in nice and along with our plugin for our cord, and I think it turned out really good on this one. And one of the nice things about this one is it's pretty simple to get hooked up. You just go ahead and get all your stuff plugged in that you need and with your tow bar and getting your arm in place, it's really simple. With these, it's pretty close to the bumper, so I don't like to go in with it this way. So I like to make sure we have our pin side down.
Go ahead and push that in, give it a turn and that's gonna click in place. Then all we have to do is get our tow bar, get it all lined up. Then all we're gonna do is get our pin in place, get everything lined up, make sure that we have everything pinned and we're all set to go. Another thing I like about this base plate set up is where our safety cable tabs are and it's really pretty good access to it and it's really easy to get to. So we have everything hooked up.
I want to give you an idea what everything looks like with it all set up. Our neighbor today has a Blue Ox tow bar on theirs and it seems to work pretty good, hooks up really well. With this setup though, with the the end points being far apart, it's probably a good idea to take a look at a longer tow bar. That way you have that distance. No matter what type of RV you have. you're gonna want a little bit of distance in between there, but this will definitely work out. As you can see on our F-250, our base plate sits pretty low in the front of our truck, so one of the things that you're gonna want to consider is if you're gonna need a high-low adapter or not. On ours, it looks pretty good and almost perfect the way this one is set up because our receiver on our RV is pretty low, so it matches up really well with this setup. Now, depending on your RV, you're gonna want to check your RV and kind of get an idea of what your pin height is on there. Take a measurement to the ground and then you're gonna wanna find out where your tow bars are sitting from the center of the pin to the ground. And with that measurement, between both of those, you want to keep within three inches to make nice safe level towing. Now at the end of the day, I like the way this base plate turned out. It's kind of out of the way and it worked out really good on ours. Now, if you have any questions or comments about this base plate for your F-250, you could always leave a question or comment down below in the comment section, or you can get a hold of one of our experts here at etrailer. They'd be glad to help you out. Now, as far as installation goes for this one, it's pretty straightforward and kind of one of the easier ones we do here, but if it's something you don't have time to do yourself, you can always take a look at your dealer locator and get something done for you locally. If you feel like doing it yourself, stick around, watch our video and we'll help you get it installed. To start our installation, the first thing we want to do is get our air dam out of the way and underneath our air dam we're gonna have a bunch of eight millimeter screws that go all the way underneath across here. There's gonna be some above, down below, and on the sides, so we're just gonna go ahead to start removing all of those. (tool buzzes) (tool buzzes) (tool buzzes) (tool buzzes) (tool buzzes) Now, when you're getting down to your last bolt, you're gonna want to hold your air dam in place (tool rasps) and make sure you hold it up so it doesn't fall off when you get your bolt removed. (tool rasps) And once we get our last bolt out, we'll go ahead and grab our air dam and set that aside. With our air dam out of the way, behind our air dam we're gonna have this metal piece that hangs down. It's like a fascia bracket. We're gonna need to get this out of the way. On each side of our frame on this one, we're gonna have two nuts and bolts. Those are gonna be 18 millimeter. We're gonna have them on each side. And each side of our vehicle, we wanna remove those and get these out of the way. (tool buzzes) (tool buzzes) Make sure when you remove these, you're gonna have this bolt plate that goes from the inside of your frame. (plate clinks) I'll pop that out. (plate clinks) We pull that out of the frame and that's what that's gonna look like. Now we can remove our bracket. (tool buzzes) (bracket rattles) For our next step, we're gonna have our hardware we need to get installed and we're gonna end up having a bolt that comes out of the bottom of this hole into our frame. So in our kit, we're gonna have these carriage bolts, spacer blocks, and we're gonna have these fish wires. So what I want to do with this is I'm gonna take my fish wire with the coiled end, run that into the hole, and then I wanna pull that out of the front of the frame, which we'll use to get our hardware pulled through. So we're gonna put our spacer block up onto our fish wire. Then we're gonna take our carriage bolt and thread that onto the end of our fish wire. Just thread that up. Now that we've done that, we're just gonna push our spacer block up into the frame (hardware clicks) followed by our carriage bolt. Pull one end of our wire, pull our hardware through, (wire rattles) we get that through the hole, and we'll do that on both sides. Now, before we get our base plate put in place on our passenger side, I'm gonna have this wiring harness here. I just want to pop that off and get that out of the way so it doesn't interfere when we get our base plate started in. And I just wanna feel on the sides and make sure I don't have any dirt or anything like that. We wanted this to go in as smooth as we can. Now, in our particular model, I did do a test fit up, just to see how everything was gonna go in place. And on the front of our bumper right here, it was not letting our base plate go up high enough to reach our bolts up here in the front. So what I did, I just had to notch out a little spot right here, just clean that up so it'll fit, and then just cover that up with some black paint. Now, what we'll want to do is start getting our base plate put into position and make sure we have it orientated correctly. On ours, we wanna make sure we have our safety cable loop to the inside of the vehicle on both sides. What we're gonna do is take our fish wire, that we ran through on our carriage bolt, run that through, and then we're gonna start getting our base plate slid up over our frame. Now ours is pretty tight. Yours may be a little bit easier to put in place, but you may have to end up tapping it in place with a rubber mallet. It is pretty tight fit. Now, your situation may be different. You may not need to do this, (mallet taps) but our main goal for our first step is to just get our carriage bolt through this rear hole in our base plate. (mallet taps) (mallet taps) (mallet thuds) Once we get that started through, we want to pull off our fish wire (wire rattles) and you may need to tap that around, (mallet taps) get that to go in place. (mallet thuds) Now, we're gonna take our flange nut and just get that started and that's gonna hold everything in place. Now, we can start lining up our front holes. Now, we're gonna have these two holes here in the front. We're gonna have our long bolts, we just wanna get them lined up. May have to tap our base plate around a little bit. (mallet taps) There's some good sized bolts, so. (mallet taps) Now, we have those lined up, we'll just run our bolts through, (hardware rattles) both of those (hardware rattles) on both of our bolts that we have through our frame. We're gonna put on our supplied washers on both of those. Then we'll follow that up with our nyloc nuts and just get those on finger tight on both of those. (nut rasps) (nut rasps) Now, we'll come back through and snug down our hardware. I like to start with the bottom one here first. That's just gonna get everything snugged up. (tool buzzes) Now, all of our hardware here on these are gonna be 15/16, but you can always also use a 24 millimeter. And now, we'll just go ahead and snug down our side bolts. (tool buzzes) Now we're gonna repeat the same process on the other side of our truck and what we want to do now, we have everything snugged down, everything's in place where we want it, we'll come back through with our torque wrench and torque down all of our hardware to the specifications listed in an instruction manual. Now, if you don't have a torque wrench, you could always pick one up here at etrailer. We do have options available. Or you can take a look at your local auto parts store. You should be able to rent one there. (torque wrench beeps) With everything torqued down, now I like to come back through with my safety cables and what we do with these, they're just gonna go around our frame and I like to go off a solid part that it's also going around here. Just pull our cables up and over our main frame, pull that down and through. Now what I'll do is in your kit you're gonna have these quick connects. Get one of them in place, run our cable back through. Now, we'll just come back and tighten these down (quick connect taps) with a three quarter or a 19 millimeter wrench. Now, after you have these up there, if you don't like where these are hanging down or anything like that, you can come back through and wire tie these up out of the way if you want. That way you don't get your tire coming in and rubbing on 'em. That's usually what I'll do is just come through and tie 'em back. (tool clinks) Now, the best way to get our air dam trimmed out is just get it held up to it as close as you can. And then I like to get behind that and kind of mark out where we need to make our cuts. Now, after we make our cuts and we try and fit it in place, we can always come back through and then just trim a little more if we need to. So what I'm gonna do now, I'm just gonna use my multi-tool cutter and go ahead and start making my cuts. (cutter buzzes) (cutter buzzes) (cutter buzzes) (cutter buzzes) (cutter buzzes) (cutter hums) Now, we have our air dam all cut out and you may need to cut out wherever you have your wiring coming through as well. So I went ahead and did that. So keep in mind you'll wanna mark for that too and just take your time. After you make your cuts, you can come back through with the file and just kind of clean up your edges and make 'em look pretty good. So for now, what we'll do is we'll go ahead and we'll get our air dam put back in place. With all of our trimming done and our components put back in place, that'll do it for our look at and our installation of our Curt Base Plate Kit on our 2025 Ford F-250. I'm Scott with etrailer and thanks for watching.

Do you have a question about this Tow Bar Base Plate?
Info for this part was:
At etrailer we provide the best information available about the products we sell. We take the quality of our information seriously so that you can get the right part the first time. Let us know if anything is missing or if you have any questions.


Thank you! Your comment has been submitted successfully. You should be able to view your question/comment here within a few days.
Error submitting comment. Please try again momentarily.