

To see if this custom-fit item will work for you please tell us what vehicle you'll use it with.


Features:
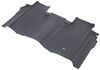
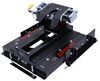
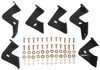
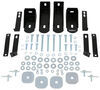
Westin's HDX Drop Nerf Step Bars provide the rugged look and function that truck owners need and want. They feature a solid 1-piece steel construction and heavy-duty punch plates creating high traction step areas. The HDX Drop Steps also feature Westin's notched bar design which allows for more than 2 inches of additional toe/heel placement over its competitors. Available in a textured black finish that complements Westin HDX Bumpers. The HDX Drop Steps have vehicle specific applications and include vehicle specific mount kit, installation hardware, and instructions.

California residents: click here
Videos are provided as a guide only. Refer to manufacturer installation instructions and specs for complete information.
Hello neighbors, it's Brad here at etrailer and today we are taking a look at installing the Westin HDX Nerf Bars with side steps on a 2025 Chevy Silverado 2500. And more and more people are using larger trucks for family hauling, most of them are crew cabs. And the cool thing about 3/4 tons is they're big and heavy duty. You can do a lot with them and you can haul people, but something that's kind of synonymous with those 3/4 tons is gonna be ground clearance. They're generally pretty high. For a normal adult like myself, it's generally not an issue for hopping in and out, but if this is your family hauler and you have kids or family members with mobility issues and they're struggling to hop in and outta your truck every time, this is such a great way to do it and look good in the process.
So let's take a closer look. First and foremost, these look really, really good. I like the clean look. There's a lot of Nerf bars out there that hang down really low and just really aren't ergonomic or what I'd want on my truck. Westin does a really good job here.
I like that the tube is underneath the sill of our door or the rocker panel, but the steps protrude out just enough to where you can still get a nice step on here. You have a punch plate with holes that's gonna add traction. So if you have muddy boots or snow or you know, wet from the rain, this is gonna bite into your shoe and it's nice and wide here you can get a nice sure footing. Now I will say the front, they are wider, which I guess makes sense because generally you're gonna have adult passengers and these are gonna be used the most. Your back ones are a little bit smaller, but I think overall works really well.
So you know, if the kids are hopping in they can easily step on and in. Now the cool thing is the steps protrude about a little over two inches out and I think that's great because you get that nice clean tucked up look of the one piece bar against the body. But still, again, all the usability without it looking just large and kind of bulbous on the truck, super clean with that textured black. So as I hop in, you know, it's right where I want it to be. So passengers, you can use your three points of contact here if you need to, but also it's just really easy for getting in and out.
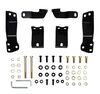
Like I said, being a full grown adult, for me it's not a problem. But you know, kids or even my parents, they're getting older and my mom would have to run and jump, well, try to run and jump to get in here. Super easy to get these installed and I think that's the big thing about these is this is something you can do super quick. I mean 30 minutes, you could have these installed in your driveway or garage and it's gonna change the look and I really like additions to vehicles that are functional that look good, but something that you're gonna use every time you hop in and out of the truck, it's gonna make a world of difference. With that being said, I'm gonna walk you through all the steps to make sure that you get your Nerf bars installed on your truck. And throughout the process if there's anything that I could have done better or was it helpful either way, leave us some feedback that really makes our videos as best as possible by taking that information and dialing it in for the next one. Now also if you watch the video and say, it looks pretty easy, but I don't have the time, the place, the tools or even the want to do that, you can find someone to get it installed for you as well as any other accessories. Maybe you're getting a brush guard like we have on our truck today installed. Use our dealer locator, you'll simply put in your zip code, you'll find a list of shops close to you that can get all of this installed for you so you can be out on the road enjoying the new look of your truck without having to worry about that installation. But speaking of that, let's take a look at it now. To get our side steps installed it's actually super easy. Really all you're gonna need is a 13 millimeter socket and a torque wrench to get these all torqued down and maybe a trim panel tool or a flathead screwdriver to pop out some plastic clips. But beyond that, the first thing you wanna do, unpack everything, get your side steps on the specific side they're supposed to go and to figure that out, you'll see that we have one step that's a little bit longer than the others and the HDX logo is on that short step side. So this'll go towards the back of the truck. So make sure that you have a long step by where the passenger door would be. Now with that, the brackets are a little bit unique as well, so laying these out will really help you. You'll find two of 'em. This one says PC, so passenger center. On the driver's side, believe it or not, it's gonna be DC, so driver center. So get those set up on each side in the center. And if you look at the orientation in the instructions, they kind of lay it out as far as gaps of where it needs to go, but it is gonna be specific to the back. You'll find these slots that have threaded spots in here. So there's three of 'em, three spots where we'll be mounting up our brackets. So it's imperative that we get those set up in the right spot because when we go underneath the truck there's gonna be caps that we pop out to put our brackets in, but there's multiple spots so we need to make sure that we get the proper ones. So beyond that, this installation's super easy. So first step, let's go underneath, let's point out where those plastic clips are, that way we can start getting our brackets in. So starting at the front on our passenger side, what we're looking for is the cap on the bottom side and then one that's directly above it. So here's our front fender, we're about a foot, a little over a foot behind here and we're gonna pop these out. These caps are nice 'cause they're protecting the factory weld nuts that are in there, the threaded sections and these capsules make sure that we don't get rust and corrosion built up in here. So it should make it pretty easy. They're kind of a pain to pry out, but trim panel tool here, just get one of the edges kind of peeled back and then as we go up we'll get this one as well. And our first bracket to get in place, the double sided of the bracket here where there's the two elongated holes, that's gonna be what bolts up to our side steps. So this should line up just like that. So now in the hardware you're gonna find that there's longer screws and shorter screws. So here's the longer one, here's the shorter one. So it's very easy to get them, you know, mixed up, but we wanna make sure we have the proper ones. You'll see I have the split washer and flat washer on both of 'em, so we'll save the shorter ones. Those will be bolting up to the sidestep through those two holes. So for here, we'll just thread these in by hand and no need to really tighten this down because we want a little bit of wiggle here so we can get the side step in place. So just kind of start those by hand and we're good on this bracket. So passenger side, you'll see the tabs they're facing towards the front and I've already taken care of our driver's side. It's actually reversed where those tabs are facing towards the rear. So just keep that in mind that that's the way that those brackets are gonna live. So our next one that we need to tackle, looking at this sidestep, you'll see the threaded sections, but you can see as we go back here you could see that this could be a spot and so could this. So determining which one we need that comes down to laying out that side step and measuring. And that should put us, if I look at mine here, it should be this rear one. Grab our long hardware, we'll get this mounted up. And then the rear bracket, that's gonna be the furthest back one. So as you can see, again, it's easy to get this messed up because we have multiple, but for this one we're gonna go to the furthest back. So now that I've pointed out where those threaded sections are. So that's where these brackets all align. So for here you'll see that there is a lower tab kind of here on our brackets. So we're gonna slide it under and then raise it up over. Just be careful not to hit your truck in the process. They should all slot into those sections and you might wanna hold this in place or have someone hold it in place while we grab our short screws or our bolts, I should say, same hardware combo as I mentioned before. And we're just gonna kind of reach in there. It's a little tight, but try to get at least one of 'em started on each of 'em that way it's gonna hold this up, make it a lot easier for us to get the rest of the hardware in. Now with those three started, I'm just gonna finish getting the rest of them threaded in. So now we're gonna go through, we got everything loosely in place and there's a little bit of side to side movement as far as getting it adjusted, but for the most part it's pretty well fixed. So I would just make sure that the brackets look nice and perpendicular and they're not swayed one way or the other because we're gonna start snugging them down. 13 millimeter socket. I recommend always starting at the bottom because the top hole's slotted and if we draw that bottom up, then we can kind of set that top one. If we tighten the top one first and then try to draw it it's gonna kind of bind up that bracket. Now I'm using an electric ratchet and we're gonna come back with a torque wrench pretty low. So hand tools are totally fine here. In fact, I would recommend kind of erring on the side of caution of less is more here. (drill grinding) And then we can swap that socket over to our torque wrench and you can get away with a three. It's torque wrench here. Like I said, it's pretty low torque setting. If you don't have a torque wrench, I would recommend renting one from an auto parts store, borrowing one from a friend because it's such a low torque setting, it's important that we have it tight enough obviously so it's not gonna loosen up over time, but over tightening it can really damage those threads. So torque wrench really dials it in perfectly and those settings are found in the instruction manual. So I'll just go through each of these, all of the hardware and get 'em all torqued down. With everything torqued down, you've officially got our running board installed. Now all you have to do is repeat on the other side. So super easy, as you can tell. I mean you can do this in your driveway or garage. There's plenty of clearance on this truck, half an hour. I mean, laying out the stuff is half the battle. But as far as the installation, super easy to do and it's gonna completely change every time you hop in and out of the truck. It's gonna change the way it looks. All of your passengers, if you have kids or people that have mobility issues, if they've struggled to have to hop up in your truck, this is an awesome way to make sure that they can get in safely. So again, it's one of those products, the installation's easy, but it's gonna completely change every time you hop in and outta your truck. And I think you're gonna be really happy with the look and functionality long term. So with that being said, thank you for a look and installation of the Westin HDX Running Boards on a 2025 Chevy Silverado 2500.


Easy to install! Look great!!
Easy to install , looks great, fast del ivery.
Easy to install. Looks great!
Great Product.
Info for this part was:
At etrailer we provide the best information available about the products we sell. We take the quality of our information seriously so that you can get the right part the first time. Let us know if anything is missing or if you have any questions.


Thank you! Your comment has been submitted successfully. You should be able to view your question/comment here within a few days.
Error submitting comment. Please try again momentarily.