


Stream your favorite shows and movies while camping off-grid with this smart TV. 3 HDMI and 2 USB inputs let you add a DVD player, gaming console, and other devices. Runs off DC power from your RV's battery so an inverter isn't required.
Features:
Specs:
California residents: click here
Videos are provided as a guide only. Refer to manufacturer installation instructions and specs for complete information.
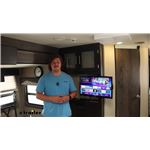
Hi, everyone. Aiden here with etrailer. Today we're gonna be taking a look at and later we'll be showing you how to install Jensen's line of 12 volt RV TVs. These are gonna be an excellent option for you if you find yourself camping in spots that don't have shore power so you need to run the TV off of the batteries. And I think this will be an excellent option too if you have solar panels because you'll have a way to keep them fed. But regardless, if you find yourself in those situations and you just wanna have a movie night or you wanna be able to check local weather in the event of bad weather so you can stay updated, then these could be a great choice for you.
So let's check 'em out. Now for this style, there's gonna be a number of different sizes to choose from. We have the 24 inch one installed right now. There's gonna be a 32 inch and there's going to be a 40 inch. Functionally they're gonna be very much the same, slightly different power draws on most of them, and for that big 40 inch one, it will have a slightly better resolution than the other two.
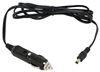
But if you're looking to replace the TV that's currently in your rig, I'd recommend just measuring it and find the one that sizes up the most appropriately just because then you're going to have a direct replacement only now it'll be powered through the battery. Now for the kit you're gonna get, obviously the TV. It's gonna give you the remote with the batteries to get it running. You're gonna have these RCA cables if you wanted to hook up to say something like a DVD player. And it's going to give you your power wire, which is going to be fused.
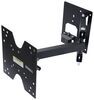
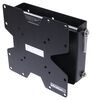
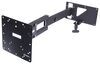
That's just gonna plug directly into the TV and give you two wire leads, positive and negative to plug into your 12 volt power source. We'll cover that a little bit more in the install section later. But some things that don't come with it are gonna be things like your TV mount. It's gonna use a standard 100 millimeter by 100 millimeter VESA amount. So if you already have a TV mount, just check that it's compatible.
Most are going to be, it's a pretty universally standard measurement that TV mount's use, but it's always good to check. And if you're adding this new to your camper, you're not necessarily replacing one that's already there. You'll just wanna go ahead and pick one up. You can find a number of them available on our site, both on the swinging swiveling arms like we have here, or fixed mounts if that works better for your application. And because these are all pretty small, weight capacity shouldn't be an issue there. But if you're getting the big 40 inch, then just maybe check to make sure that you're getting something that can support the extra weight. Now if your remote dies, you do have controls on top of the TV so you can control power, volume, your channels, go to your menu settings and even the source, which brings me to the different options on the side here to plug in. So at the very top we've got a headphone jack. So if you're in a more close quarter situation, say like a camper van where this is mounted above your bed, you might wanna just plug in and use your headphones instead of the built in speakers. That's an option. You've got two USB ports and two HDMI ports. At the bottom we've got a spot where we could hook up our cable. We've got our RCA cables, we've got an RJ45 LAN input. So if we did wanna plug directly into Wi-Fi to have ethernet, then we could. And then of course we've got our power connector on the far side there. For resolution on those smaller two TV sizes, it's gonna be 1366 x 768. So just a little bit over your typical 720p resolution. Not full HD, but technically HD. And then the 40 inch TV is going to give you 1080p. That's your typical full HD that you're probably used to seeing at home. Now it's not gonna be 4K or anything by any means, but it's better than nothing. You know, in a camping situation, especially when you're not sitting super close to it, it's gonna be fine. You know, like the display here looks good, it's smooth and responsive whenever I go to browse the menu here and if I go to stream anything, it's gonna really be more dependent on your signal. So if you've got good Wi-Fi signal or you're looking to watch some local news stations, how good a signal your antenna is getting, I think really that's going to be the major decider of how everything looks on the TV. But honestly for us, everything is passable. We'll play a YouTube video here if it loads. Now this is one of two colors of the Motion 3 in this particular size we have with us today. And I'll just keep it muted right now. But it's giving us a pretty good picture. You know, if I get really up close to the TV, then yeah, it's not gonna look that great, but sitting back the distance I probably would be if this camper we inchesre all set up ready to go, it'd be fine. And it's like I said, better than nothing. If you're looking to do a movie night or you're just rained in and you really can't do much outside during your camping trip, then you can do that and it's going to give you a better, bigger picture than you'd get just on your phone or something like that. As far as sound quality goes, any built-in TV speakers are gonna be pretty average in my opinion. And that's all the more reason maybe if you're in a close quarters situation to utilize that headphone jack. But I'll let this video play for a little bit and we can see just how that sounds for a bit. Today we're gonna be taking a look at the Thule Motion 3 21 cubic foot roof box and we're gonna see how it fits on the top of our 2020. Now for power draw, the biggest TV, that 40 inch model is going to draw 6.65 amps and the smallest one, the 24 inch here is going to draw 2.93 amps. Overall, not too bad. And when you're considering how you're gonna be running this off of your batteries, you probably wanna pick up a solar panel if you don't already have one. If your camper is prepped with the plug on the side for a portable solar panel, that's gonna be the quickest and easiest solution. And in good weather conditions, you'll likely be able to run your TV all day long with that solar panel plugged in. We have an etrailer portable solar panel kit that's gonna give you all the pieces you need to plug into that factory prep and get rolling. So it's gonna be a really quick and easy way to get set up. Or we do have some permanent rigid panels that would mount to the top of your rig and allow you to get a more permanent setup. Those are going to allow you to get more panels if you wanted to or some higher capacity panels if you just wanna stick with a single panel. If you're not comfortable getting those installed, you can always use our dealer locator tool to find an installer near you and help you get those set up. But I think permanent solar on the top of your roof can go a really long way at enhancing the camping experience and it's gonna allow you to run these TVs and really not have to worry about power. Now Jensen also has a line of these TVs that are powered through a 110 volt outlet, just a typical household plug. And that's actually the style of TV that we had on here before, and those are gonna be fine. They're gonna be at a somewhat lower price point and still offer very similar specs, somewhat better in some cases because they're just plugged in. And if you're running off of shore power, you're not as concerned with the power draw probably. But by switching to a 12 volt system like this, while it is more premium, you're gonna get more freedom with it because you can run off the batteries and you don't have to be bound to shore power to get it to work. And that's precisely why our neighbor today chose to switch. He had a TV that was run off the household outlet that's tucked away in this cubby here, but he chose to switch to this one because he often finds himself camping at spots that don't have shore power. So if he wants to be able to watch the weather, he wants to be able to check the news or just be able to stream something if the weather's bad or they just want to stay in for a night, then they can, they have that option and they don't have to be bound to a certain area when they're choosing their campsite. Not to mention they have solar panels on the roof and with that setup, they really don't have to worry about the power draw on their battery, so long as they're not running things like coffee makers, hair dryers, things that will draw a ton of power and drain those batteries, they can charge up during the day, use a little bit of juice at night for your lights and the TV and then repeat that cycle the next day and it'll be all fine. So if that's something you're looking for, then I think this could be a really good option and it would be worth the premium price point for me then. Now compared to a typical household TV, all of Jensen's offerings will be at a more premium price point and there is good reason for that. These TVs are to withstand the extra shock and vibration they're gonna be experiencing when living in your camper, whereas your typical household TV, while it will be a cheaper price point, isn't built to withstand that, it's not tested that way. And if you put it in this environment, it's likely going to break. Something just will fail because you're gonna have a lot of shock and vibration when driving your camper down the road. So while it might seem a little bit strange at first to see a higher price point for a smaller TV, it is worth it because it is designed to be used in this application. But with all that being said, if you've decided this is the route you want to go, you probably want to know how it installs. It's gonna be a pretty simple process and it will vary depending on your camper. But if you wanna see how we got it done, follow along and we'll show you how we did it. Now the install will look a little bit different depending on your camper and just how everything's set up. But walk me through the general process for us today looked like dismounting our old AC powered TV. Just getting it out of the way since we're not gonna be reusing that and finding a place to draw 12 volt power from. For us, that happened to be this radio mounted directly below the TV cubby here. I just removed this decorative cover plate and underneath that there were four mounting screws that allow me to pull the unit out and access all the wiring behind it. So I'm just gonna draw all of this out as much as I can and we can see what we're working with and test some wires to figure out where we're gonna be getting that power from. With the multimedia here, we're going to test some of the wires. I did look at these earlier and in our setup here, we've got some pretty large black wires and some pretty large white wires that lead in here and that black is going to be our positive and the white will be our negative. And when we look at our multimeter, we can see that when testing, we're getting a little over 13 volts there. So that is our power supply. And we did also test this with the camper unplugged, so we know that when it's unplugged, it's drawing power from the battery and that's going to be our 12 volt supply that the TV can use. Now I want to get our wiring passed up from our power source up to where our TV can actually use it. This again, will look different for every camper, but for us we've got a small grommet on this inside wall and I'm hoping that feeding something like an airline tube down through, it's gonna poke out down in the opening that we just pulled that radio out of. I'll try to keep my hands out of the way so you can see where that's feeding and it's getting caught on something, but this I think will be the correct path for us. Of your wiring lead I'm gonna be leaving the plug out because that's the end that needs to plug into your TV and I'm just gonna be sending the bare wire leads down. We'll just pull this through, just being careful to not pull it loose until it pops out the bottom right there. And that gives us plenty of slack with this end of the cord right here because these bare wire leads will be tucked up a bit further. So if you needed to, you may consider with your application getting some wires to extend it. It's really just gonna depend on how far you have to go. For us, luckily we're sitting pretty close. To splice these in it's gonna be pretty straightforward. We'll walk through one of the wires together and just repeat it on the second one. We'll start with our 12 volt power. That's gonna be your solid red wire and the ground will be the black with a red stripe. So on this end they already come stripped back. On our camper side, we already tested that this black wire here with the white stripe is our power, so we're just gonna snip right there in the middle, leaving ourself enough length on either end if we ever needed to change these connections and we will strip back each end of that wire lead. Once you have both ends stripped back, I always like to give those wire ends just a good twist to keep them together. And you can grab one of our butt connectors. These are not included in the kit, so you will need to pick up some of your own. And I'm just gonna crimp those on to the one end over here and just pull on that to make sure that we have a good solid connection. Then on the other end we're going to have my two wires, one for the TV and the other from our power source here, just kind of twist it together. And if I need to strip back more, I could. We'll see if that fits down in. And it does. And same thing where we'll just crimp that end down. Once we've verified that connection is good, we can repeat that process with our ground wire and then we can go through and since we used heat shrink butt connectors, I'll shrink those ends down and it's gonna protect from any potential moisture intrusion. Inside that really shouldn't be an issue, but it will make that connection a bit more secure. And we'll just go back through with that heat gun to shrink those connections down. Again, you don't have to use heat shrink, you likely might not even have those. We just keep each shrink down the shop since so much of what we do is outside the vehicle. So that's just what we had available. With those connections made though, I can tuck everything back up inside this cavity we pulled it from. And I'll reattach the radio the same way we took it off. Depending on how hard all of that was to access for your camper, you may consider testing the TV now real quick, but for us it's easy enough to take back apart if we need to. Now it doesn't come with a mount for the TV but you likely have your own if you're replacing one or you went to go install one new. For us, we're just gonna reuse our old one and flip the TV over to the backside where our 100 x 100 millimeter VESA mounting spots are. I'll line up our mounting plate with the holes and use the screws that come with the TV to mount this up . And we'll get all of that hardware started loosely by hand before coming back through with our screwdriver and tightening all of those screws down to the TV. No need to overtighten these, but we just want them to get nice and snug like that. It's a good idea to just look at the layout of the ports before you mount up the TV. Our power is right in the middle there so I know where I'm supposed to be looking. I'm just gonna slot in the bracket for our TV mount here, and then I can take my power wire and plug in the TV at the back. And just like that, it's on. We know it's working right away and we can go through, take the protective plastic off and do any further tests we want to ensure it's working the way we want it to. The kit does include a remote with batteries, so I strongly recommend during your initial setup just making sure that works and it does. And from there you can just go through and do your initial setup, connect it to the internet since it is a smart TV and go through all the different setup steps that are required to get it going. But as far as the install goes, that's really it. It's a pretty simple process and if you're looking to switch from an AC power TV to a 12 volt TV in your camper so that you can camp off grid and still be able to watch your shows and be able to stream, maybe in the evenings whenever you're just sitting in the camper and chilling, you can. It's a pretty easy swap and it's gonna perform just like you would expect your old TV to. But today that was just our look at the line of Jensen 12 volt RV TVs here at etrailer. My name's Aiden and thank you for watching.

Great service, wrong html plug in, that’s on me.

Lite weight easy to install works very well high price
It was delivered as promised at works g reat!
Works better than expected.
Great tv
Excellent probably should have bought a bigger one but didn’t know if it would fit
Very nice television.
Received exactly what we ordered. Instructions were detailed and specific, but still easy to follow. Installed, plugged it in and it worked exactly as it was supposed to. Very pleased.
Order showed up, unwrapped see photos. Don't even know if the TV will work. Never had such a bad experience with etrailer.com
Do you have a question about this RV TV?
Info for this part was:
At etrailer we provide the best information available about the products we sell. We take the quality of our information seriously so that you can get the right part the first time. Let us know if anything is missing or if you have any questions.


Thank you! Your comment has been submitted successfully. You should be able to view your question/comment here within a few days.
Error submitting comment. Please try again momentarily.