Curt Discovery NEXT Trailer Brake Controller - 1 to 4 Axles - Time Delayed
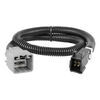
Curt Custom Wiring Adapter for Trailer Brake Controllers - Dual Plug In
Part Numbers: C84VV,C51459

Thank you! Your comment has been submitted successfully. You should be able to view your question/comment here within a few days.
Error submitting comment. Please try again momentarily.
Curt Discovery NEXT Trailer Brake Controller - 1 to 4 Axles - Time Delayed
part number: C84VV
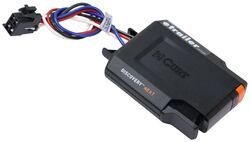
An easy-to-read digital number display, 10 power levels, and a pinch-trigger manual override make this time-delayed brake controller easy to use. Installation is simple with no mounting restrictions. Activates brakes with a preset intensity.
Features:
- Brake controller activates trailer brakes with preset intensity
- Adjustable power output control lets you select the amount of braking force
- Rocker switches located on left front of module for easy access
- 10 Gain settings and 9 load settings allow you to adapt to various driving conditions
- Select a higher setting for harder braking and lower for more gradual braking
- Pinch-trigger manual override is within easy reach for controlling trailer sway or stopping in emergencies
- Simple LED display shows the amount of power output
- Self-diagnostics monitor trailer connection and check for shorts
- LCD display shows power adjustments in 0.5 increments
- Brightness is adjustable for optimal visibility
- Auto-sleep mode prevents battery drain after 5 minutes of idle time
- Quick and easy installation with no mounting restrictions
- No need to mount level - install anywhere at any angle
- Included mounting bracket and hardware designed to hold the brake controller flush against the dash
- Plug-in, vehicle-specific brake control adapter (sold separately) available for select vehicles to reduce installation time
Specs:
- Application: trailers with up to 4 axles (8 brake assemblies)
- Compatible with low-volt, PWM, ABS, cruise control, and electric-over-hydraulic trailer brakes
- Dimensions: 4" long x 3-1/8" wide x 1" tall
- Limited lifetime warranty
Gain Adjustment
Gain control lets you set the maximum amount of power that will be applied to your trailer's brakes, adjusting in increments of 0.5. How much braking output you need is determined by the weight of your trailer; a heavier trailer will need more power to bring it to a stop. You want to go as high as you can without the trailer brakes locking up. Typically, the gain is only readjusted when you experience changing road conditions or if the weight of your trailer changes. To get more power to your brakes, press the upper orange rocker switch. To decrease the gain, press the lower switch. When you make your adjustment, the gain setting will show on the LED screen for 10 seconds as a series of bars and then go into sleep mode.
Load Control
Once you have the gain set, you can fine-tune your braking by adjusting the load control on a scale of 1 to 9. This controls the aggressiveness of your trailer's braking, meaning how quickly the brakes reach the maximum braking level. Load control can get the braking power to your trailer faster and with more intensity so that it doesn't push your tow vehicle forward. If your vehicle takes too long to come to a stop, increase the setting by pressing the upper black rocker switch. If it stops too abruptly, decrease the setting by pressing the lower switch. You can alter the setting to suit your driving preferences or to improve handling based on changing road conditions or varied trailer loads.
Pinch-Trigger Manual Override
The Discovery comes with a easy-to-reach, pinch-trigger manual override, great for stopping sway or controlling your trailer's momentum in emergencies. To engage the manual override, just push in the trigger. This will activate the trailer's brakes and brake lights without you having to apply the brakes on your tow vehicle, perfect for limiting trailer movement while you're cruising.
LED Display
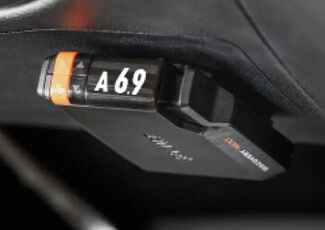
The LED display on the Discovery is large and easy to read at a glance. It will show you what setting the brake controller is on as well as give you information for troubleshooting. You can adjust the screen brightness or trigger night mode so it won't glare obnoxiously on your dash. Press the control button to cycle through the different modes.
Quick Installation
Because inertia plays no role in the functioning of this controller, you do not have to mount the unit at any particular angle. Your mounting options are limitless, so long as you can still easily access the controller and the manual override. The included bracket is designed to mount the brake controller flush to the dash so it takes up almost no space at all.
If your vehicle already has a plug-in brake controller wiring harness, just connect the unit to it. Otherwise, you will need to purchase a vehicle-specific wiring harness (sold separately) to plug into. If a harness is unavailable for your vehicle, hardwiring will be necessary.
Note: If a custom brake control wiring adapter is not available for your vehicle, one of the following will be required:
20-Amp circuit breaker (9506P - sold separately) for 2- to 4-brake applications
30-Amp circuit breaker (38630 - sold separately) for 6- to 8-brake applications
See also etrailer.com's exclusive 7- and 4-way brake control installation kit (ETBC7 - sold separately) if you don't already have a 7-way plug at the back of your vehicle.
Time-Delayed Braking
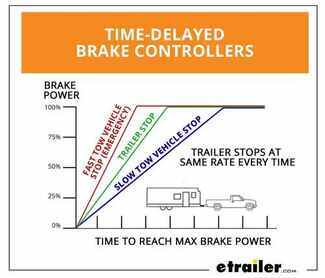
The Curt Discovery comes equipped with time-delayed braking. Every time you apply the brakes in your vehicle, a signal is sent - via the brake switch - to the Discovery. The controller then sends power out to your trailer brakes to activate them with an intensity set by you, at a rate determined by you. Both the amount of braking power (gain) and rate of application (load) can be adjusted to suit your preference, the road conditions, the type of trailer, and the weight of your load. To determine which levels are best for your application, test your towing setup and choose what feels right.
51126 Curt Discovery NEXT Time Delay Trailer Brake Control - 1 to 4 Axles
Replaces Curt 51120
Curt Custom Wiring Adapter for Trailer Brake Controllers - Dual Plug In
part number: C51459

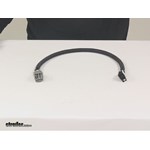
Install your Curt electric trailer brake controller quickly and easily with this custom wiring adapter. Simply plug one end of the adapter into your brake controller and then plug the other end into the built-in port behind your vehicle's dash.
Features:
- Plug-in wiring adapter allows for quick, simple installation of your electric trailer brake controller
- No cutting or splicing required
- Custom connectors plug into the built-in port underneath the dash of your vehicle
- Other end plugs into the back of your electric brake controller
- Compatible with time-delayed and proportional brake controllers from Curt
- Brake controller must have built-in plug for adapter to connect - will not work on controllers with pigtail wiring harnesses
- 2' Long, 12-gauge wires have protective covering to deter damage
- Limited 1-year warranty
Installation of Curt Brake Controller Adapter
To install your Curt electric brake controller, you need to connect the wiring of the controller to your vehicle. Certain auto manufacturers offer pre-wired options, typically known as tow packages, wherein wiring is run for you from the dash to the trailer connector on the back of your vehicle. When this is done, a port is installed at your dash so that you can easily plug in a brake controller.
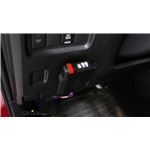
This adapter plugs into the connector underneath your vehicle's dashboard, located to the right of your steering wheel.
No hardwiring is required to install this adapter. After you plug it into your vehicle's connector, you simply plug the other end of the adapter directly into your electric trailer brake controller. Because there are no wires to connect, installation is not permanent. You can unplug and remove your brake controller at any time to transfer it to another vehicle or securely stow it away.
51459 Curt Quick Plug Brake Control Adaptor Harness
California residents: click here
Customer Satisfaction Score:
97% were satisfied with this product
3% of customers were not satisfied
- Defective
- Product did not meet expectations
- Alternate product found
Customer Reviews
Curt Discovery NEXT Trailer Brake Controller - 1 to 4 Axles - Time Delayed - C84VV
Curt Custom Wiring Adapter for Trailer Brake Controllers - Dual Plug In - C51459
Average Customer Rating: 4.7 out of 5 stars (29 Customer Reviews)
An easy-to-read digital number display, 10 power levels, and a pinch-trigger manual override make this time-delayed brake controller easy to use. Installation is simple with no mounting restrictions. Activates brakes with a preset intensity. Install your Curt electric trailer brake controller quickly and easily with this custom wiring adapter. Simply plug one end of the adapter into your brake controller and then plug the other end into the built-in port behind your vehicle's dash.Took about 10 minutes to install. Have not made all the adjustments yet, but is easy to understand.
Tested . Work fine and advertised
excellent service and delivery.
Like its compact size and simple operat ion.
Very helpful, knowledgeable and friendl y!
The trailer break came on time and was a good price.
I was very pleased with my purchase of the wiring adapter. Plugged right in,and works great! I was also pleased with the follow ups after I placed my order. Tracking was provided and even contact information, if I had a question. Arrived in time and no surprises. Thank you!
Product was as expected. Easy install, plug and play. If your buying a curt brake controller it’s a no brainer to buy this.
The controller came and I installed it and it seems to work fine. The installation instructions were minimal but found a totorial on you tube and followed it and the installation appears successful
Super easy plug and play install on 2020 Jeep Gladiator
This made the installation can breeze. Wish it was a little longer but that's just a minor complaint.
My brother in law installed this for me and he was thrilled. He said it was easy and went in very quick. It is working great.
Great Service with informative product descriptions
Fast shipping, easy to install, works g reat
So far so good

Ask the Experts about this Trailer Brake Controller
Do you have a question about this Trailer Brake Controller?
- Parts Needed to Install an Electric Trailer Brake Controller on a 2012 Nissan Frontier
- The Curt brake controller # C84VV by itself does not plug directly into the factory location on the 2012 Nissan Frontier. You require another harness, # C51382. Once end plugs into the brake controller the other to the factory harness on the vehicle. The factory harness will be located underneath and left of the steering column, taped to another harness near the emergency brake pedal.
If your 2012 Nissan Frontier did not come with a factory installed 7-Way trailer connector you will
view full answer... - How to Access Vehicle Brake Light Signal for Trailer Brake Controller Installation
- If your 2005 Toyota Sequoia has a factory-installed 7-way trailer connector you can install the Curt Discovery trailer brake controller # C84VV using only the mating wiring adapter part # C51362.
If it does not then the installation will be hardwired. You can gain access to the vehicle brake light signal, which is what triggers the Discovery controller to generate output voltage for the trailer brakes, either by tapping into brake light wiring or by installing a fuse tap in the brake
view full answer... - Replacement Brake Controller that is More Reliable Than Curt Discovery
- You have successfully diagnosed your Curt Discover brake controller part # C84VV as having an internal issue. It really is a bummer if this is the second one you recieved with an internal issue but I can't say I am too shocked since we've seen the Curt brake controllers be pretty problematic. The Draw Tite Activator part # TK90160 is a similar controller that is MUCH more reliable.
view full answer... - Issues with Brakes Not Activating with Curt Discovery Brake Controller on 2015 Ram 1500
- I spoke with my contact at Curt about the issues you and other customers have experienced with their Curt Discovery Brake Controllers # C84VV and newer model Ram trucks.
The problem stems from a low voltage output on the stoplight wire on the truck. The Discovery requires 12 volts from the stop light wire in order to recognize the signal and activate the trailer brakes. Curt has found that the newer Ram trucks often have less than 12 volts at the stop light wire when the brake pedal
view full answer... - Parts Needed and Method to Install Curt Trailer Brake Controller on 2007 Chevy Silverado
- You may or may not need an additional wiring harness to install the # C84VV. If your 2007 Chevy Silverado is the new body style you will not necessarily need the harness, but if it is a Classic you will need harness # C51352 because there is a port under the dash on the floor, on the far left. One end plugs into the controller, the other end plugs into the port.
The port is located in a junction box. There is a black cover on the box. Remove the cover and plug in the harness in the
view full answer... - Compatibility of Curt Discovery Brake Controller With 2010 Chevy Silverado
- Brake controllers are not vehicle specific. The # C84VV Curt Discovery brake controller is compatible with your 2010 Silverado. You'll also need the Universal Curt Brake Controller Pigtail, part # C51515. The pigtail wire will connect directly to the tow package wiring located under the dash between the steering column and the emergency brake pedal. Look for a bundle of wires with a white tag hanging from it. The wires of the pigtail will connect to the tow package wiring as follows:
Red
view full answer... - Turn Signals Work But Brake Lights Do Not Light Up
- You came from a brake controller page when you asked the question. Is this issue related to the installation of the brake controller? Or are we just talking about brake lights on a trailer or vehicle?
If it is on the trailer then usually there is a bad ground connection since the brake lights draw more constant power than the turn signals. Make sure that the vehicle side and trailer side connectors are clean and free of corrosion inside and out. The main connector grounds should be attached
view full answer... - How to Find and Access the Brake Light Switch Wire on a 2015 Toyota Highlander for Brake Controller
- If you check out the video I attached you will see how we installed a brake controller in a very similar 2014 Toyota Highlander as your 2015 model. We had to remove the lower dash panel (13:00 mark of the video), to make accessing the green wire possible.
The kit used for the install in the video is the part # ETBC7.
view full answer... - Troubleshooting Flashing Display of the Curt Discovery Brake Controller part # C84VV
- The flashing O.L. message with the Curt Discovery Brake Controller part # C84VV when there is no trailer connected indicates that there is a short somewhere on the brake output circuit. I would check all the connections you made on the blue wire from the controller and then also check the trailer connector at the rear of the vehicle looking for any exposed wire or corrosion and fix as necessary.
If it only flashes O.L. when the trailer is connected the problem is the same as above but
view full answer... - Parts Needed To Install Curt Brake Controller On a 2018 Ford E-Series Cutaway
- In order to install the Curt Discovery Trailer Brake Controller part # C84VV on a 2018 Ford E-Series Cutaway you should be using the Curt Custom Wiring Adapter for Trailer Brake Controllers part # C51432.
The Tekonsha Plug-In Wiring Adapter 3034-P won't work.
view full answer... - Does Dealer Need to Turn on Aftermarket Brake Controller in a 2015 Ford F-150?
- There will be no need for you to go to take your 2015 Ford F-150 to the dealer to have them turn on an aftermarket brake controller. The brake controller I recommend that you need only an adapter for is the Curt Discovery # C84VV.
Since you already have the factory tow package, just use the Plug-In Wiring Adapter # C51436.
Plug one side into the brake controller and the other side into the wiring on your F-150 and you are done.
view full answer... - Brake Controller Installation 2004 Chevy Avalanche
- Your Avalanche should be prewired for a brake controller. Check the fuse panel in the engine compartment. Remove the outer and the inner fuse box cover, and on the inboard side of the fuse box, you'll see two threaded studs. The stud closest to the rear of the vehicle powers the brake controller, there should be a 30A fuse installed next to it. The stud closest to the front of the vehicle powers the 12V feed to the trailer connector. There should be a 40A fuse installed next to it. If the
view full answer... - How to Properly Set Up Curt Discovery Time Delayed Brake Controller
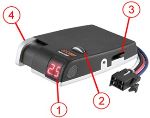
- To properly set up the Curt Discovery brake controller part # C84VV you first need to set the max output setting with the thumbwheel (number 2 in picture) on top of the controller. You want to adjust this to a setting that when you slide the manual override lever (number 4) all the way grabs the brakes as hard as possible right before locking up.
Once that's set the next setting is the sync setting (lever on side number 3) which controls how fast the brake pressure ramps up to full
view full answer... - How to Wire in a Curt Trailer Brake Controller to a 1999 Ford F-150
- Actually you have a couple of options. First, you could use harness # C51322 in place of the harness for your 1999 Ford F-150. It will plug into the Curt brake controller and the truck. This is the easiest option.
The other option is to cut off the plug on the Curt brake controller # C84VV and hardwire it to the Ford harness. You would have to know the functions of the wires on the Ford harness. It may be labeled or printed on the harness.
If your Ford harness has Red, Light Green,
view full answer... - Which is Better a Time Delayed or Proportional Brake Controller
- Between the two controller I would go with the proportional Curt Triflex part # C51140 over the time delayed Curt Discovery part # C84VV.
A time delay controller is so named because there is a delay between the time that you initially apply the brakes in your tow vehicle and the time that the controller reaches maximum power output. Unlike a proportional brake controller, which activates your trailer's brakes based on the deceleration of your tow vehicle, a time-delayed controller sends
view full answer... - Comparing Curt TriFlex Trailer Brake Controller To Curt Discovery Trailer Brake Controller.
- The main difference is the Curt TriFlex Trailer Brake Controller # C24VV is a proportional brake controller while the Curt Discovery Trailer Brake Controller # C84VV is a time delay controller. The proportional controller will automatically adjust power sent to your trailer brakes based on how hard you are braking, while the time delay always sends the same force no matter how soft or hard you are braking.
Those with time delay controllers will often have to reach down to crank up the
view full answer... - Installing a Brake Controller in a 2009 Chevy Suburban
- The 2009 Chevy Suburban does not have a port to plug in a brake controller which is the same as the trucks of the same year. But it does have the tow package wire bundle up under the dash, to the left of the steering column, held together with a white tag.
Pull the wire bundle out to wire in a brake controller. With Curt brake controller # C84VV you will also need pigtail # C51515. Then you can make the following connections:
Vehicle red/black wire to controller black wire for 12
view full answer... - Recommended Brake Controller Wiring Harness For 2013 Toyota Tundra
- If your 2013 Toyota Tundra has the factory 7-way installed, the Curt Custom Wiring Adapter, part # C51362 will be what you need to connect the Curt Discovery Trailer Brake Controller, part # C84VV.
If you have a 4-way connector installed on your Tundra, part # C51515 is what you need. This harness is used on a vehicle that does not have a factory tow package or on one that has a brake control harness but is not equipped with a plug-in port. If your vehicle doesn't have a factory tow
view full answer... - Brake Controller Installation on 2011 Toyota Tundra
- If your 2011 Tundra has the factory tow package, which includes the factory installed 7-way trailer connector on the rear bumper, it will be equipped with the tow package plug under the dash, as shown in the photo I've edited for you. Some models with the factory 4-pole (or 4-pin) trailer connector will also have the plug under the dash, you'll need to look for a white plug located above and to the left of the emergency brake pedal, above the toe kick. Occasionally, the plug will be located
view full answer... - Gauge Wire Recommendation for Installing Curt Discovery Brake Controller
- Curt does recommend that you use 10 gauge wire like part # 10-1-1 sold by the foot to install the Curt Discovery # C84VV, but the common recommendation for installing brake controllers is to use 12 gauge or larger wire. If you use 12 gauge wire you should be just fine, especially since you will only be activating 4 brake assemblies.
view full answer...
Info for these parts were:


At etrailer.com we provide the best information available about the products we sell. We take the quality of our information seriously so that you can get the right part the first time. Let us know if anything is missing or if you have any questions.






Rick
3/12/2018
yes