
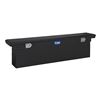
Westin Grate Step Nerf Bars with Custom Install Kit - 6-1/4" Wide - Black Powder Coated Steel


To see if this custom-fit item will work for you please tell us what vehicle you'll use it with.
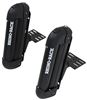
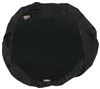
Grated steel running boards have an extra-wide stepping surface with raised treads to prevent slipping when entering your truck. Serrated treads provide a rugged look and help keep mud and snow from getting in your cab. Custom mounting kit included.
Features:
Specs:

California residents: click here
Videos are provided as a guide only. Refer to manufacturer installation instructions and specs for complete information.
Hello, neighbor. This is Curt at etrailer, and today, we're gonna be taking a look at the Westin Grate Step nerf bars on our 2024 Toyota Tacoma. Now if you have any experience with the Westin Grate Step, please leave it in the comments below. We'd love to share your experience with other neighbors in order to help them make the best decision for themselves possible. Now the Grate Step is made completely of steel, so it is a very heavy-duty step. It's gonna be 6 and 1/4 inches wide and it's got these really aggressive serrations across the top that stick about a quarter inch high up.
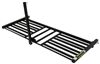
And it's gonna do a really good job of getting the excess mud and snow off of your shoes or boots before getting into the cab of your truck. Now the length of the nerf bars are really gonna be dependent on which vehicle you have and how far they need to reach across either one or both doors on your vehicle. The bracket kit is also going to be custom depending on which vehicle you have. Now, let's take a look at this on the truck and see how they look. So that 6 and 1/4 inch wide width is gonna be plenty for really just about any shoe or boot size.
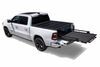
You get a really good grip across the bottom with those serrations and again, they're gonna do a great job of scraping any excess mud off of your boots. The length that we have for the vehicle, and this was the recommended length for this particular truck, is definitely enough to cover both doors plus a little bit extra so you have a little extra room to scrape off some excess before you get in. There's not gonna be any liquid building up on this at all either because the serrations are open, so any kinda liquid can fall through that. And it's a really good look on this truck. I really like the rugged type of look.
It gives it more of a work truck or out outdoor off-road type of feel, which if that's the look that you're going for, this is a great recommendation. Now one of the things you may notice about these aesthetically is that you got a bit of a gap here between the vehicle and the top of the step. It doesn't create a very factory or OEM look, but frankly on nerf bars like this, I think having that extra add-on kind of aftermarket look is really appealing. It really just kind of makes it look like you're accessorizing this truck to handle those tough workplaces or those outdoor adventures that you might go on. Now let's go ahead and take a look at exactly how we got these installed.
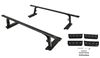
So the first thing we're going to do is take our passenger front bracket, which is easily identifiable because it's at this angle plus it has the stamping on it we discussed before. And each bracket is gonna require two of those hex bolt assemblies that we showed you. And I've got my 13 millimeter socket wrench. Now the first thing I'm gonna need to do is remove the existing bolts that are under here, which are located at an angle here and here. On our passenger side is gonna go with this next set of bolts here. There's no angle to this as far as the bracket goes, so they're just gonna go on pretty directly. Now what you're also gonna find is that the next set and the next set after is really gonna be dependent on the type of vehicle and the type of running boards you get as far as which of these sets to use for your third passenger side bracket. If you have a shorter cab, this is likely the set you're gonna need to use. If you have the double cab, this set is the set that you're gonna likely use. It could also be dependent on the type of running boards you get. But these are gonna go on the same way regardless of which one of these you end up going with. And we're simply gonna need to repeat this same process over on the driver's side. Now we've got our first rear mount installed on the passenger side, but something that we noticed as we we inchesre taking the Toyota bolts out is that the Westin install guide is gonna let you know that you need a 13 millimeter wrench for the bolt heads, which is true of the bolts that come with the bracket kit. However, the Toyota bolts that we're removing, we found out are actually 12 millimeter. So 12 millimeter, like, well, this is the 13 millimeter. You could see how loose that is. That really gave us a fight as far as getting these out. So get yourself a 12 millimeter wrench as well for the removal of the Toyota bolts. You will need the 13 millimeter, however, when we install the bolts from the install kit. Now that we've got our brackets installed, let's go ahead and see how the nerf bar itself is gonna mount onto those brackets. So the first thing we'll wanna do is go ahead and turn it over. And what we'll notice under here is that it's gonna come with three different sets of these bolts here that are actually gonna be what fits into our brackets. Now out of the box, you may notice that these are very stiff. You really can't move them. That's because our four millimeter hex wrench here is gonna be inserted into the end of that. When these are tightened down, it actually tightens the bracket in so it doesn't slide back and forth. That's what's gonna keep your running board from sliding forward and back while you're traveling. So the first thing we'll need to do is get them loosened up and it doesn't take a whole lot of turns on this to get 'em loose. Loose enough to move anyways. And once we have that loosened up, we should be able to slide the bracket pretty easily. (metal scraping) Now we can move it into position to exactly where our brackets are located before we thread the bolts through and get them attached. Now we got that loosened up and we could position it freely, the next step we're gonna take before setting it actually on the brackets is going to be to put this plate on. Once we have that in place, it will mount on your bracket as such. At which point, so you can see with those ovular holes, we'll be able to position it closer and further away from the vehicle this way. And once we have it on there and in a spot that we like it, we can go ahead and do our bolt assembly as such and then tighten it down using our 13 millimeter socket wrench. Now we don't want to tighten it down completely because we wanna leave some maneuverability just to tweak it and make sure it's perfect. The last step in this installation will be torquing the bolts to 15 to 18 pounds. Now it mentioned that the vehicle that we have today only requires three brackets for installation, but if you have a running board that requires four brackets, they do give you the parts to assemble that into your nerf bars here, and we'll do that as such. We'll take this plate here. Insert it in. Next will be this L-shaped plate here, which we can insert in right there. What we'll then do is take these two bolts. Now make sure that when you're doing this, you're putting the closed end down. Remember, this is how we tighten and loosen these brackets So we wanna make sure that the end that's gonna accept the hex key is up on the top. We're gonna go ahead and thread those in as such. And we'll be able to tighten those down once they get into the correct position and putting that third plate on. Now, the reason that we showed you how the brackets went on up on the table is that, as you can imagine, it's very difficult to get under here and show you exactly what we're doing. So being able to see that up on the table, that's precisely how we put it on. We simply turned it over with the bolts facing downward. We left them sliding and loose so that we could position them into the mounting bracket holes. At which point, once we had the length adjusted to where we wanted it, and from here, we're basically going from door seam to door seam. This one actually fit this truck very, very well. Once we had the forward and back adjusted the way we wanted, we went ahead and took our four millimeter hex key and tightened down those bolts that we inchesre in there to keep it from sliding back and forth. After that, those ovular holes that could move the nerf bars toward or away from the vehicle, we actually have them on this vehicle positioned all the way as close as we can. We think that that really, with the profile of this vehicle, didn't have it sticking out too far, but also had plenty of room to get your foot on. Now that we have all that on and tightened down and to the way we want to, the final step we have in other installation is going to be getting that 15 to 18 foot pounds of torque on each bolt. Now there are 12 bolts on each side of the vehicle, and we had mentioned earlier that this is the last step. So now we're gonna just go through and tighten each one of those down to that 15 pounds. And once that's done, we should be ready to roll. So with the installation complete, you could see that it might be a little bit tough for one person to do. I was able to manage doing it on my own, but getting an extra set of hands is always helpful. So overall, this is a really great high functional step. It's gonna be fantastic for you in those really kind of messier conditions outdoors. So if you do a lot of off-roading or camping, or if you work job sites where you gotta deal with a lot of dirt, mud, snow, things like that, these are really nice, rugged, durable nerf bars that should last you a very, very long time. Once again, this is Curt at etrailer. Thanks for stopping by.

Good finish. All parts included.

Vicki was amazing, Help us after We ordered the wrong parts, Got us on the right track. Thanks again!
Love them directions could’ve been a little more clear as far as the assembly goes over all great product
As advertised… Great fit form and funct ion…
Love them! Easy to install and after a year they are still performing as they should and look great!
These things look great and they feel like they will hold up forever. The install is a breeze, and I had all the hardware that I needed.
No problems ordering or delivery can't ask for better. Great service . Thanks etrailer
CAMMY WAS A FRIENDLY, COURTEOUS SALESPERSON. PRODUCT WAS SHIPPED SOONER THAN EXPECTED. HIGHLY RECOMMENDED AS A SUPPLIER.
GENE
Great product
Easy install, not a single cuss word.
No issues with etrailer.com whatsoever. Good price, prompt delivery, and item very well packaged. Product itself is very nice and looks great installed (did installation myself). Only complaint is with Westin. Instructions are a bit confusing, and pictures only show some of the rocker panel brackets (which are very similar to one another). Didn't notice until doing the final torque down of the hardware that the brackets had the part letter stamped on them. That detail was omitted from the instructions and would definitely have sped up installation.
As others have mentioned, the instructions were a bit lacking.Total install time probably took an hour longer than necessary.However, the final product was very satisfactory. Quality product and good looking.
Fits great! Used an impact gun to install the bolts because the holes in the truck frame were a tight fit but everything lined up well. Lots of adjustment on these but very solid! Very happy with how they turned out!
Good quick service
Info for this part was:
At etrailer we provide the best information available about the products we sell. We take the quality of our information seriously so that you can get the right part the first time. Let us know if anything is missing or if you have any questions.


7_2_tn.jpg )


Thank you! Your comment has been submitted successfully. You should be able to view your question/comment here within a few days.
Error submitting comment. Please try again momentarily.