

To see if this custom-fit item will work for you please tell us what vehicle you'll use it with.

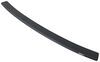
Make it easier to climb into your vehicle with running boards. The added step helps family and friends get into your vehicle independently, and can also assist you with accessing your roof. Sporty, streamlined boards are custom fit for your vehicle.
Features:
Specs:
California residents: click here
Videos are provided as a guide only. Refer to manufacturer installation instructions and specs for complete information.
Hi Matt with etrailer. Today we're gonna talk about the Romik running boards. Now this will be a great option if you have a 2025 Lincoln Aviator if you're just looking for something to be a little bit easier to get inside your vehicle. So let's check it out. Now if you do decide to go with this, let us know how this looks on your vehicle in either a photo or review. Now today I'm mainly gonna be focusing on the main things that stand out about it and how it's gonna interact with our Aviator.
After that, I'll give you my final thoughts and then I'll show you how to install it on your vehicle. Now the two things that really stand out to me about these is, one, it's gonna have a fairly simple design so it's not gonna stand out too much and it's gonna look more natural on our vehicle. The second thing that stands out to me though is it's still gonna give you that traction that you need when you're getting inside your vehicle. So if it's rainy, snowy, muddy, whatever it is, you'll be less likely of slipping. And the reason to that is 'cause we're gonna have these little squares that are gonna be rubberized.
And what I like about these is they're a simple design and they're less likely of hurting anyone. So if you have any kids, they're getting inside your vehicle, the grated steps that I see a lot are nice, but if someone we inchesre to slip on those, you're more likely of getting cut and hurting yourself. These, you really don't have to worry about that. There's no hard edges on it. It's all very smooth and rounded.
Now, let's focus on how it's gonna interact with our Aviator today. And if you look at this, this is gonna be one continuous piece, which is nice. You don't have to worry about not having enough room to really step onto this. That should brings me into my next thing is getting a few measurements. So when we look at this, it doesn't look like it's that high off the ground, and especially when you compare that to the step right here.
This step that we're originally making is around 21 inches. So when I'm trying to get inside my vehicle, that's a fairly high step even for an adult. Now if you're a kid or someone a little bit older, that might be a step you don't want to make. It's gonna be the same on the front side too. Now when we compare that to these running boards, this is gonna be a little bit less than 10 inches. And the distance we're traveling from that running board to the very top of this is gonna be a little bit under 11 inches. So we're pretty much just cut that travel in half. So this is gonna be much easier from stepping like this, now we're just making a step like this. But are you gonna have enough room to really get your feet on here So if I get the distance from the sidewall of the vehicle to the very end of that, we're gonna have a little bit under 5.5 inches. And for me, I think this is plenty. If I put my foot here, it's gonna be the same on the front or backside, and that's probably about a third of my foot. And that gives me plenty of stability to stand here. For your kids, that's gonna be more than enough. Now when I have my door closed, we are gonna lose a little bit of space there. Really not much. Now if you have some boots on, it might be a little bit harder to get your shoe in here. But the reason why I bring this one up is if you have any other accessories, let's say, on your roof. You're trying to get up here, will you have enough room I think so. I don't really have an issue standing here, and it's gonna be great having this running board too, 'cause like I said, if you need to access anything up here, it's gonna be a lot more easy than how to do it from here. Now in my opinion, I think this is gonna be one of my top choices if you're someone who's just basically doing some more daily driving and you have a family with you too. It's gonna be something that's just gonna have a simple shape to it, no hard edges, and we're gonna have that extra traction so our feet aren't gonna slip. Now when it comes to installing it, this one is actually gonna be one of the easier ones that've installed just 'cause we don't have to install this into any open threads on your vehicle. If you have any of those built-in nuts on the vehicle, sometimes you're gonna have to go through a lot of grime. This they give you all the hardware to do it with. So if you're curious to see this, just stay tuned. We'll walk you through the process. To begin the installation, I recommend having your vehicle slightly elevated, whether you're using some ramps or jack, just make sure it's chalked. Now today, I'm using a lift and I actually did the driver's side mainly from the ground. The reason why it had to lifted up is when I was torquing down those bolts, this torque device is a little bit large and I just didn't have the space to work. Another reason why we have it lifted up is just so we can kind of better show you what we're doing today. Now your driver's side is gonna be the exact same process as your passenger side. So whatever we do over here, same thing for the other side. Now let's go over the parts we're gonna have in this kit. So besides the running board itself, we're gonna have plenty of bolts. So we're gonna have our M10 hardware and our M8 hardware. The M10 hardware is just gonna be larger and each one of those are gonna have a corresponding nut that comes along with them. Now for your M8 hardware, it's gonna be a little bit different. Most of them will have a nut that corresponds with them. Now you're gonna have three extra ones and with these ones, you're gonna have a U-nut that you'll use with it. I'll go over that a little bit more in detail later on. And we're gonna have three sets of brackets. Now these brackets, each one of them are gonna be exactly the same. There will be a difference between your driver and your passenger side. So just make sure you check your instructions and you can really compare the difference and what they look like. You're gonna have the one that attaches directly to your vehicle and then one that directly attaches to the running board itself. Now with all of that said, let's get underneath our vehicle and start this up. Underneath your vehicle, you're going to have a couple places where we're gonna insert our bolts. So you can find all these locations right over here. So the one on the front side, you'll be able to tell where it is 'cause we're gonna have this square opening and this circle right here. We're not gonna be putting our bolt through that. Instead, we're gonna have these three holes right here in the frame. Now sometimes you might have to pry some paneling away from it. In our case today, we don't have any paneling on it. So these are gonna go right through here and we're gonna have a hole in the center that we're not gonna be using. You'll also notice that the hardware that I'm using today has some blue Loctite on it. This is something that I added to it. It's not gonna come this way. It is recommended though. Now for the second location where we're gonna be working at, it's gonna be in the center of our vehicle right here. Again, you're gonna have a square opening above it, a circle there. But we're mainly just gonna be putting these bolts here to the side. And same thing for the one on the back end of your vehicle, it's gonna be exposed, putting that hardware through here. I am gonna grab my U-nut now 'cause we we inchesre just talking about that and that opening I was telling you about with the square, we're gonna put this through there with the longer section here or the nut actually going inside. Just like this. We're gonna try to line this up with the opening of that hole as much as possible. It doesn't have to be perfect quite yet, but we're gonna repeat that process on the other spots behind us. We can take our bracket now that's gonna attach to your vehicle itself. And this one, you'll be able to tell that we're gonna have two holes on one side. This is gonna go through those bolts that we already installed. And this one at the very top, it's gonna line up with that U-nut we installed. So show you what I'm talking about. Put it right through here, push through those two bolts, just like that. Now before I do anything else, I'm gonna have two nuts on hand because you can tell this might want to move on you a little bit. I'm just gonna put this nut right over the top of both of them. I'm doing this now just so it doesn't fall off on me. There we go. And I am not gonna fully install this quite yet. I'm gonna keep this pretty loose for the moment. And for this one at the very top, this one can be pretty tricky, especially when you're doing it from the ground. You can tell my clip got pushed to the side, so I'm gonna reinstall that. There you go. Just like that. Push it it through. Again, we're just gonna loosely install this. All right, and with that done, you're just gonna repeat that process on the other spots behind us for the middle and the rear. And when you are working with the middle bracket, you might get some paneling in your way. This should be able to just be applied to the very top of it and pushed down, get outta your way. Or you could simply just cut it out of your way too. Now we're gonna move to our second bracket. And the way we're gonna put this one on is, if you look over here, we're gonna have the outside of this bracket, it's gonna go on the outside of it and we're gonna opt to go with these two lower holes. So from there, we're just gonna push our M10 bolt through here. That's gonna be your larger one. You can tell I already got the blue Loctite on here too. And I'm gonna put a nut on there. I'm not gonna tighten this all the way. Again, I still want this pretty loose just in case I have to make any adjustments later on. And once this is complete, we can do this for the middle and the rear. So now from here, we're gonna actually put our running board on here. As you can tell, everything's pretty loose here and we want it that way just so it can be a little bit easier to put in place. Now if I flip this over, you can kinda see what's happening underneath here. I've adjusted these nuts to be in lined or in the bolts to be in line with those brackets. Now it's not gonna be perfect at this point and I've already put some blue Loctite on them so I know I'm good to go. And I'm just gonna start here in the center. I push 'em into place. Yep, one started there. I have another one started here. Lemme get that last one in this very edge. There we go. We're gonna do the same thing for the ones at the very end. And if you don't wanna do it this way, you could just simply take off these nuts and drop it down into place. Whichever way's a little bit easier for you. All right, so with this roughly in place, we want to adjust where it's sitting. So right here for me, I think, is a good point. It's gonna be kinda aligned with the end of the frame here. We don't want it too close here. I can even push it to show you what I'm talking about. We don't want it close to your tire 'cause it could damage something. So let's say right around here is gonna give you enough room to actually step on it and not really damage anything over here. Once it's in a good spot, make sure you have this pushed all the way to one side. And then we're just gonna go underneath here and then tighten down these bolts for a good amount. And once these are hand tightened, you're gonna do the same for these ones right next to it and the ones at the very top. Once that's done, I actually recommend starting to tighten down with the sock and wrench, a 13-millimeter, socket one side, wrench on the other side, these ones at the very top because sometimes you're gonna get a little bit of a gap here if it's not perfectly lined up. So if we tighten this down, that should alleviate that. Then we'll go down to the ones here. You'll need a 15 socket and wrench for these ones here. And then the ones connecting to the running board itself, you'll go back to a 13 and then you repeat that for the rest of them. Now that everything is feeling pretty good, what we have to do is torque this down the rest of the way. Now you are gonna have three different torque settings on this. So any point that's making contact with the running board itself, it's gonna have its own torque setting, then any steel and steel contact, and then your M8 and your M10 bolts are gonna have different torque settings. So you can actually find those exact settings in your instructions. But with all that said, I'm gonna torque this down real quick and that should pretty much do it. And the last thing I like to do is just to kinda step on it to make sure it feels good. And if it does, that'll complete the installation. And of course, if you guys have any other questions, please let us know here at etrailer. And again, I'm Matt and thanks for watching.


Very nice , had them professionally installed at Ziebart and they look and feel great
Product arrived in a timely manner and was well packaged. Install was a bit of a challenge but they are installed and look great. The instructions could be a bit more clear but that seems to be a common issue with most products these days. Overall I am satisfied and would purchase them again.
Running boards look great and the hardware is really nice.
Please note…. The 2026 Aviator has (apparently new) threaded fasteners that interfere with the bracket mounting. Unable to line up the brackets easily. I was able to modify them to get the correct fit. Probably took three extra hours to install. They look great and I’m very happy with them. Very nice product!
Info for this part was:
At etrailer we provide the best information available about the products we sell. We take the quality of our information seriously so that you can get the right part the first time. Let us know if anything is missing or if you have any questions.


Thank you! Your comment has been submitted successfully. You should be able to view your question/comment here within a few days.
Error submitting comment. Please try again momentarily.