
Custom Fit Roof Rack Kit With Y06185 | Y43TR | Y63TR
Item # Y32RD
Our Price: $733.80
Confirmed to Fit
2003 Nissan Altima
Will this fit?
To see if this custom-fit item will work for you please tell us what vehicle you'll use it with.
This item qualifies for Free Shipping


- All Info
- Reviews (15)
- Q & A (0)
- Videos (3)
- Photos
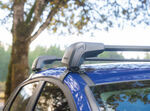
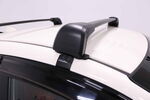
Yakima Roof Rack - Y32RD
- Aero Bars
- Crossbars
- 40 Inch Bar Space
- Yakima
- Black
- Flush
- 2 Bars
Replace a damaged crossbar or add another bar to your BaseLine FX roof rack with this half kit. Durable, aluminum crossbar has a built-in top channel. Installs on your vehicle's naked roof.
Features:
Yakima BaseLine FX LG:- Half kit lets you replace a damaged crossbar or add another bar to your existing BaseLine FX rack
- Pair with fit kit to create a complete roof rack
- Flush design provides a streamlined, factory look - no crossbar overhang
- JetStream crossbar with top channel accommodates channel-mount and clamp-on accessories
- Push-down rubber strip in top channel allows for easy attachment of channel-mount accessories
- Sleek towers with matte finish are weather resistant
- Custom installation to your vehicle's naked roof with Yakima BaseClips (sold separately)
- Aerodynamic, lightweight aluminum crossbar resists corrosion and reduces wind noise
- Yakima Same Key System (SKS) lock cores (sold separately) deter theft
Yakima BaseClip 185:
- Custom-fit mounting clips and pads allow you to mount BaseLine towers on your vehicle with a naked roof
- Padded, stainless steel clips provide secure grip on your door jambs
- Snap onto DropHooks inside towers
- Protect door jambs from scratches and abrasions
- Powder coated for durability and rust resistance
- Molded rubber pads fit the contours of your roof
- Clip onto bottoms of towers
- Protect roof from scratches and abrasions
Yakima BaseLine FX MD:
- Half kit lets you replace a damaged crossbar or add another bar to your existing BaseLine FX rack
- Pair with fit kit to create a complete roof rack
- Flush design provides a streamlined, factory look - no crossbar overhang
- JetStream crossbar with top channel accommodates channel-mount and clamp-on accessories
- Push-down rubber strip in top channel allows for easy attachment of channel-mount accessories
- Sleek towers with matte finish are weather resistant
- Custom installation to your vehicle's naked roof with Yakima BaseClips (sold separately)
- Aerodynamic, lightweight aluminum crossbar resists corrosion and reduces wind noise
- Yakima Same Key System (SKS) lock cores (sold separately) deter theft
8006185 Custom Base Clips and Pads for Yakima Base Line Towers
8000166 Yakima Base Line FX MD - Roof Rack Cross Bar for Naked Roofs
8000167 Yakima Base Line FX LG - Roof Rack Cross Bar for Naked Roofs
Video of Custom Fit Roof Rack Kit With Y06185 | Y43TR | Y63TR

Videos are provided as a guide only. Refer to manufacturer installation instructions and specs for complete information.


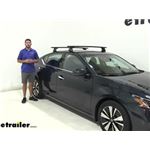
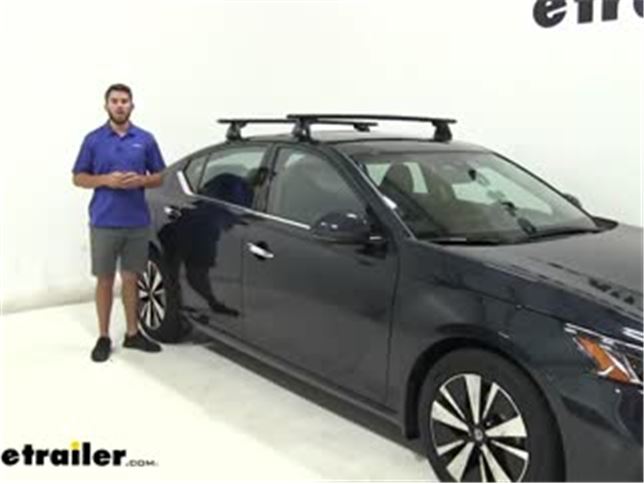
Video Transcript for Yakima JetStream Roof Rack Installation - 2019 Nissan Altima
Colin: Hey, everyone. It's Colin here at etrailer. Today, we have a 2019 Nissan Altima. Now, we're going to be test fitting the Yakima JetStream Roof Rack System.This roof rack system mounts to the naked roof of your Altima. It allows you to get all of your favorite accessories on top of your roof, whether you've got a bike rack, a kayak carrier, or even a cargo box.Now we have a couple of different components in our roof rack. Up top, we're going to have our 50" long JetStream crossbars.
Now these are in black, but they're also available in silver, just see etrailer. They're going to have a nice aerodynamic shape to them. It's going to help cut down on wind noise and drag, especially when compared to your standard square or round bar roof rack system.We have a rubber strip up top letting us know we can utilize the T track accessories. How we access that track, we have to pull the end cap off and instead of having to pull the rubber strip out and then cut it to length, all we have to do is push down on it, insert our accessory and then slide it to wherever is most convenient for us on our roof rack.Now in the middle is going to be our baseline towers. These are what's connecting our roof rack to our crossbars, excuse me, to our fit kit.
When I pull it off you can see the components on the inside. We're going to have our tightening bolt right here, which is securing our fit kitted hook and our rubber pad from our fit kit onto the roof.The fit kit is going to include a rubber pad right here, which is going to help prevent any type of scratches or abrasions occurring on your roof. It's also going to have rubber padding on the inside of the hook to do the same thing. It is going to be custom fit for your Altima, so it is going to match the contours making sure it gives it a nice sleek look.On our towers, we are going to have these pop locks right here, which we can replace with Yakima lock cores. That'll give you more security for your roof rack.Now I want to go over a few measurements for you guys.
First I'm going to go from the top of our roof to the bottom of our JetStream bar. It's going to be about three and a quarter inches, so that's plenty of space to be able to get any clamp on accessories under our crossbar without risking damaging the roof of our Altima.Now I'm going to go from the top of the roof to the top of the crossbar. That's going to be 4 1/2", so that's just something to keep in mind that you have added that height to your roof. With an Altima, you probably don't have to worry about any low clearance situations, but it is something to be mindful of.We're also going to have a weight capacity of 165 pounds for our JetStream system, which is more than enough weight to get your favorite accessories on top, but be sure to double check with your vehicle's Owner's Manual to make sure your roof can handle that weight.Now that we've gone over the features, let's show you guys how to get it installed. We'll show you how to get the rear crossbar assembled and installed.
It's going to be the exact same process as our front one. The only difference being how you position it. And how we got the front bar position, we measured from the center of the door jam to the center of our crossbar.Now the back is going to assemble the same way. We're just going to flip it over. Remove the end cap on the other side. These push up on the cap right there and just pull. It's supposed to be pretty tight like that, so don't get worried if it takes a little bit to get it off.Now we're going to come down to our baseline towers. First thing we're gonna do is grab it. We're going to grab the pad from our kit. You're going to see that there is an arrow right above the number. You want to make sure that, that arrow is facing to the outside of the vehicle, so because the tower is going to sit like this, you want to make sure the arrow is facing that way, so we'll do it like that. It just clips right in there like so.Now we're going to come up here and take our black plastic piece, it's going to clip in right here. You want to make sure you pull this gray tab right there. That's going to make sure that this bolt inside is visible. You need that bolt to be visible because it's actually that one right there. We're going to take our silver piece right here. Make sure the flat side is up, and try to thread it on there instead of right on top, and hold it. With my finger, I'm going to flipped it over, and take my roof rack tool that's included in my kit and just begin to tighten it down. Now if I come from the angle, you'll see it start to go down towards the baseline tower. Just make sure it's tight.From there, we're going to come over to this side of our crossbar. We need to feed it into the channel right here, so using the tabs that's right there, we're just going to go like so. Let's get it in the channel. There we go.Now on our cross bar, we are going to have engravings of numbers. There is a measurement in your instructions to let you know where to position it. Wherever the instruction says to mount it, you want to make sure you get the edge of the tower right here right up against there, so we'll adjust it to where our instructions tell us to. There we go.Now the next thing we need to do is adjust our pitch and our tow. Our pitch is going to be which way the towers angle. You can see I move it back and forth like that. Once we tighten it down at a certain formation that's going to be our pitch. How we tighten that down, we adjust it to the pitch that we need, so I need to tilt it back like that per the instructions. Tighten down that bolt that we used for the silver piece. Just keep pulling it back. Now with the tool, it's going to let you know when it's tight enough by giving you those clicks right there.We've adjusted our pitch, now we're going to adjust our tow, which is going to be the way that our pad is. You can see I've shifted it around right there. You adjust it, which is right there. You can see that knob moving back and forth. It's going to be numbered by one, two, and three from the front to the back. Two is just right in the middle. That's where we need to go. Tighten down this bolt. Now we'll just throw our end cap back on and now we're ready to get it on our roof.Now with both doors open, we'll go ahead and set this on top of our roof. It doesn't have to be in an exact spot. We'll go ahead and measure our crossbar spread. That's going to be center on center from our crossbars. You can find this measurement in your instructions. Just make sure it's the same on both sides.Now when getting the hooks installed, we're going to loosen up this bolt right here. That's going to adjust the angle of the hook. We're going to flip that cap back. Take our the hook. We might need to loosen that a little bit more to get our hook installed, just like that.Now we'll need to loosen it a little bit, so the hook can reach the doorframe. There we go. Now what we're going to do is tighten this down. That's going to bring the angle down to where it's exactly the angle we need for the hook to be at. There we go. We don't need to over tighten. It just needs to be like that. Now we'll go to the other side and repeat this.Now the next thing you need to do is make your way back and forth tightening down the hook, which is going to pull up on the door frame. I've already gone back and forth a couple of times. We're on the finishing touches. All I'm gonna do is tighten it up until I hear those clicks right there. Now I can close that cap, and put on my end cap to my tower, shut my door, and now I'm ready to load up my favorite Yakima Roof Rack accessories and then hit the road.Thank you all for watching. That's going to do it for our test fit of the Yakima JetStream Roof Rack System on our 2019 Nissan Altima.
Customer Reviews
Custom Fit Roof Rack Kit With Y06185 | Y43TR | Y63TR - Y32RD
Average Customer Rating: 4.7 out of 5 stars (15 Customer Reviews)
Replace a damaged crossbar or add another bar to your BaseLine FX roof rack with this half kit. Durable, aluminum crossbar has a built-in top channel. Installs on your vehicle's naked roof.by: Dave02/11/2024
Love my Yakima roof rack!! It exceeds my expectations.great product. Also thank etrailer for the tec support! great staff always there to help thanks again!!
by: Todd 06/24/2023
Look great & perform outstanding. Would recommend this product to anyone where applicable.
by: Jason04/10/2023
They do the job but have loosened up and needed readjusting a couple times over the almost 20,000 miles we’ve put on them since installing. Overall, good, just check periodically for loosening.
by: Shelli06/24/2020
So far this has been a great product except for the cover on one of the legs flew off and got all scuffed up on the road -- luckily my husband saw it and stopped but other than that it seems to work as it should, unfortunately, we have only been able to use it a few times. But so far so good. We will be looking for accessories to add to it.


by: Frederick08/22/2019
excellent design with easy to follow in structions
by: Mike09/15/2020
Good quality rack system.
by: Jason05/18/2022
Everything fit as expected. Nice to have a second person to help on the install. Well made piece of equipment.
by: Michael06/21/2022
Exceptional service highly recommended
by: Dave F.06/12/2017
Liked there fit. Appear beer that the old qtip style.
by: Rob 06/09/2021
Haven't installed the rack yet but this base clip is robust and etrailer has been great in getting me what I needed.
by: Steve09/05/2022
by: Vince 12/20/2020
by: Patrick 02/07/2021
by: William 05/26/2023
by: Eric04/26/2024
I purchased clips that were stated as being compatible with our 2010 Chevrolet Impala. The front clips fit well, however the rear clips do not.


by: Howard11/09/2023
From start to finish, the folks at etrailer -- and I spoke to several people there, so it was a consistent corporate vibe -- were fantastic to deal with.
There were delays in getting my product that were on the supplier side and out of eTrailer's control, yet etrailer folks kept me up to date and also worked on a customized solution.
My goal was to be able to carry my surfboard on the roof of our 2019 Hyundai Santa Fe to the beach more than 3 hours away. But the particular model we had had no existing racks, no recessed areas, nothing to fix racks to. Not even the dealer had a solution. I was sh*t out of luck.
But etrailer hooked me up. The racks did take me a while to put on, but most of that time was fine tuning to reduce “hum” while driving. I’m very happy with them.
Thanks to etrailer, I have gone surfing and can go surfing whenever I'd like to.


by: Eric04/26/2024
I purchased clips that were stated as being compatible with our 2010 Chevrolet Impala. The front clips fit well, however the rear clips do not.


by: Anthony11/29/2020
I have a 10th gen Civic sedan and I was dying to get the perfect roof rack set for my car. At the time of my purchase there was not many visuals of what the rack system looked like on this car.
I purchased the:
•Yakima 50in Jetstream crossbars
•Yakima baseline towers
•bc182 & bc183 clips
•Yakima 46in fairing
Overall I love how it looks on my car! During This COVID pandemic I have been camping more, and this is the perfect foundation! First off, the 46in fairing is the perfect fit for the 10th gen civic! Wind noise is low also with the help of the aerodynamic crossbars. My main concern was the fuel efficiency. On long road trips I still average 38-40 mpg with the rack on. My daily commutes I average 34 mpg without Econ on.


by: JD03/07/2018
Hyundai Sonata - glass pano roof. These items have been on for about 1-year. So happy with the set up. I’ve take a road bike and a mountain bike on 500+ mile trips. The mounts do an excellent job.

by: TimN03/19/2024
Works perfectly on my 2023 Chevy Silverado. The rubber pads are soft enough to prevent scratches, yet firm enough to support the force of being cranked down on the roof. They fit perfectly in the ridge near the edges of the rough.
by: Dave G.06/20/2019
I ordered the Yakima "aero" bars , baseline towers, and BaseClip kits for my 2019 Honda Civic 5 door. While expensive the quality is excellent and it was a pleasure to assemble such a high quality and precision engineered product. It fits perfectly on my new car and the "aero" bars are quiet even at freeway speeds. Highly recommended.


by: Kevin04/06/2022
Overall these are a great product and much needed. I had a Tiguan with the side rails but needed cross rails for my gear. When I got my Jetta I wanted to keep my Yakima cross rails so I needed the Towers. They work great and fit my car well. I took them off recently after having them on for a year for re-fitment.
by: Juan04/07/2023
Exactly what I need, and good Track information. Thank you!
by: Andrew07/17/2020
The installation was super easy, and despite a long time stuck in shipping the delivery itself was extremely fast, and the package arrived in spotless condition. The manuals were very easy to follow, and the end result is absolutely amazing. They provided a nice, flush finish and hold the racks down tight.


25
506
Show More Reviews
See what our Experts say about this Yakima Roof Rack
- Recommended Roof Rack for a 2022 Nissan Sentra w/ No Roof Rails I would be happy to help you! To add a roof rack that stops at the mounting legs to the naked roof of your 2022 Nissan Sentra, I recommend the roof rack by Yakima which includes the following parts: Yakima BaseLine FX Roof Rack for Naked Roofs - Aero Crossbars - Aluminum - Black - Qty 2 item # Y89UV BaseClip Fit Kit for Yakima BaseLine Roof Rack Towers - Qty 2 item # Y06161 BaseClip Fit Kit for Yakima BaseLine Roof Rack Towers - Qty 2 item # Y06179
view full answer... - Recommended Roof Rack for a 2022 Toyota C-HR w/out Roof Rails Yes, it is possible. To add a roof rack to your 2022 Toyota C-HR, without rails that does not overhang, I recommend the roof rack by Yakima which includes the following parts: Yakima BaseLine FX Roof Rack for Naked Roofs - Aero Crossbars - Aluminum - Black - Qty 2 item # Y89UV BaseClip Fit Kit for Yakima BaseLine Roof Rack Towers - Qty 2 item # Y06117 BaseClip Fit Kit for Yakima BaseLine Roof Rack Towers - Qty 2 item # Y06176 I have attached a couple of pictures below that will give...
view full answer...
- Recommended Roof Rack For A 2024 Chevy Trailblazer For a 2024 Chevy Trailblazer with factory rails that run front to back you'll need the following components: Yakima BaseLine FX Roof Rack for Naked Roofs - JetStream Aero Crossbars - Aluminum - Black - Qty 2 # Y89UV BaseClip Fit Kit for Yakima BaseLine Roof Rack Towers - Qty 2 # Y06183 BaseClip Fit Kit for Yakima BaseLine Roof Rack Towers - Qty 2 # Y06187 If you have a naked roof then you'll need the following components instead: BaseLine Towers for Yakima Crossbars - Naked Roofs -...
view full answer... - Recommended Roof Rack for a 2024 Chevrolet Trailblazer w/ a Naked Roof To add a set of crossbars, that don't extend past the legs, to your 2024 Chevy Trailerblazer, I recommend the roof rack by Yakima which includes the following parts: Yakima BaseLine FX Roof Rack for Naked Roofs - JetStream Aero Crossbars - Black - Qty 2 item # Y89UV BaseClip Fit Kit for Yakima BaseLine Roof Rack Towers - Qty 2 item # Y06183 BaseClip Fit Kit for Yakima BaseLine Roof Rack Towers - Qty 2 item # Y06187 This aero bar roof rack system has a 165 lbs capacity. I recommend adding...
view full answer... - Recommended Roof Rack for a 2024 Lexus ES 350 w/out Rails and No Glass Roof Yes, there is! Since your 2024 Lexus ES 350 does not have rails or the glass roof top you can use the roof rack by Yakima which includes the following parts: Yakima BaseLine FX Roof Rack for Naked Roofs - Aero Crossbars - Aluminum - Black - Qty 2 item # Y89UV BaseClip Fit Kit for Yakima BaseLine Roof Rack Towers - Qty 2 item # Y06143 BaseClip Fit Kit for Yakima BaseLine Roof Rack Towers - Qty 2 item # Y06170 This aero bar roof rack system has a 165 lbs capacity. I have attached a couple...
view full answer...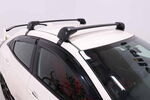
- Recommended Roof Rack for a 2024 Lexus ES 300h w/out Roof Rails Congrats on the new car! Yes, we do have a roof rack set up that will work with your 2024 Lexus ES 300h even though you don't have the side rails. This mounts directly to your roof with custom fit clips and the crossbars will not overhang the side. I recommend the roof rack by Yakima and it includes the following parts: Yakima BaseLine FX Roof Rack for Naked Roofs - Aero Crossbars - Aluminum - Black - Qty 2 item # Y89UV BaseClip Fit Kit for Yakima BaseLine Roof Rack Towers - Qty 2 item...
view full answer... - Recommended Roof Rack for a 2024 Chevrolet Trailblazer w/out Roof RailsTo add a roof rack to the naked roof of your 2024 Chevrolet Trailblazer, I recommend the roof rack by Yakima which includes the following parts: Yakima BaseLine FX Roof Rack for Naked Roofs - Aero Crossbars - Aluminum - Black - Qty 2 item # Y89UV BaseClip Fit Kit for Yakima BaseLine Roof Rack Towers - Qty 2 item # Y06183 BaseClip Fit Kit for Yakima BaseLine Roof Rack Towers - Qty 2 item # Y06187 This aero bar roof rack system has a 165 lbs capacity. The crossbars do not extend past...
view full answer... - Recommended Roof Rack for a 2024 Toyota Corolla Sedan w/out Roof Rails To add a set of crossbars to your 2024 Toyota Corolla with no roof rails, I recommend the roof rack by Yakima which includes the following parts: Yakima BaseLine FX Roof Rack for Naked Roofs - Aero Crossbars - Aluminum - Black - Qty 2 item # Y89UV BaseClip Fit Kit for Yakima BaseLine Roof Rack Towers - Qty 2 item # Y06135 BaseClip Fit Kit for Yakima BaseLine Roof Rack Towers - Qty 2 item # Y06151 This aero bar roof rack system has a 165 lbs capacity. I recommend adding the Yakima Same...
view full answer... - Recommended Roof Rack for a 2024 Nissan Leaf w/ a Naked Roof To add a roof rack to your 2024 Nissan Leaf you will need the following parts: Yakima BaseLine FX Roof Rack for Naked Roofs - Aero Crossbars - Aluminum - Black - Qty 2 item # Y89UV BaseClip Fit Kit for Yakima BaseLine Roof Rack Towers - Qty 2 item # Y06159 BaseClip Fit Kit for Yakima BaseLine Roof Rack Towers - Qty 2 item # Y06176 This roof rack has a 165 lbs capacity and includes custom fit clips that mount inside your Leaf's door frames. The crossbars do not extend over the sides...
view full answer... - Is It Possible To Add One Crossbar To The Roof Of A 2019 Ford F-350 Super DutyAbsolutely! As long as your 2019 Ford F-350 Super Duty is a Crew Cab or Super Cab you can use the following parts to add just one crossbar to your truck: 60" Yakima JetStream Crossbar # 8880649 2 of the Replacement BaseLine Tower for Yakima Crossbars # 8880618 BaseClip Fit Kit # Y06185 I also recommend adding the Yakima Same Key System (SKS) Lock Cores # Y07202 which will lock the roof rack to your roof to deter theft. At this time there is not a roof rack system to fit the regular...
view full answer... - Recommended Yakima Roof Rack for a 2024 Ford F-250 Crew Cab To add a Yakima roof rack to your 2024 Ford F-250 Crew Cab you will need the following parts: Yakima JetStream Crossbars - Aluminum - Black - 60" Long - Qty 2 item # Y00426 BaseLine Towers for Yakima Crossbars - Naked Roofs - Qty 4 item # Y28TR BaseClip Fit Kit for Yakima BaseLine Roof Rack Towers - Qty 4 item # Y06185
view full answer... - Roof Rack for 2020 Ford F-350 Super Duty to Carry Bike RacksFor a roof rack for your 2020 Ford F-350 Super Duty that would allow you to carry a lot of bikes you'd want to go with a rack that has a longer crossbar like our Yakima Jetstream Rack # Y00426, # Y28TR, and # Y06185 which is 60 inches long. Then you could use a roof bike rack like the Yakima HighRoad part # Y02114 which allows you to keep the front wheel installed on the bike. Space-wise you wouldn't be limited on how many bikes you could carry as most likely you'd run out of roof capacity...
view full answer... - What Roof Rack do You Recommend for a 2017 Lexus LS 460?I have an answer about your Rhino-Rack crossbar system. Unfortunately, I confirmed that Rhino-Rack does not make a crossbar system that is compatible to fit your 2017 Lexus LS 460. Since they do not have any roof racks for your vehicle, they do not manufacture compatible fit kits for the crossbars. Fit kits from other manufacturers do not work with Rhino-Rack crossbars because each company produces specific fitments for their feet/towers. Here at etrailer, we have never seen anyone custom...
view full answer... - Parts Needed to Install Roundbar Yakima Roof Rack on 2021 Ford F-250I have a way you can reuse your Yakima round crossbars on your 2021 Ford F-250 supercab but Yakima discontinued the q towers a while ago so there aren't any q clips around or ones made to fit your truck. What you'd need is the and BaseLine Towers # Y00146, fit kit part # Y06185 with the round bar adapter # Y03536 and you'd be set.
view full answer... - Buying a Single Yakima HD Crossbar for a 2020 Ford F-250While we do not have a full kit for just one crossbar for your 2020 Ford F-250, I have compiled a list of the individual part numbers that make up the Yakima HD crossbars that are compatible with the SuperCab and CrewCab. For the crossbar itself, use part # Y95FR. It's the single bar, 60" long like the full kit. For the BaseLine Towers, use part # Y62TR. There are 2 in this kit. For the HD Bar SL Adapter, use part # Y03541. This, unfortunately, does not come in a quantity of 2, so you'll...
view full answer... - Solution for Carrying Multiple Bikes on Roof of 2021 Ford F250We absolutely have roof rack options for your 2021 Ford F250. Beginning with the roof rack, I'd recommend the Yakima CoreBar roof rack which would be assembled using these parts: • Yakima 70 inch CoreBar crossbars, part # Y00423 • Yakima BaseLine Towers, part # Y28TR • Yakima Vehicle-Specific fit kit, part # Y06185 With a 70 inch long crossbar, you'll be able to fit up to 5 bikes on the roof, but keep in mind that the roof rack has a 165 lb weight capacity, so unless your bikes are really...
view full answer... - Correct Yakima Roof Rack For 2018 Ford F-250 Crew CabOkay, we can get your 2018 Ford F-250 Crew Cab set up with the right Yakima roof rack, and let's start with your first question about the correct length bars. That is determined by the manufacturer when they test fit roof racks, which is how we know the correct length of crossbar for your truck are the 70 inch long bars. In regards to a disadvantage with the clips/clamp-on versus drilled on racks, there is no disadvantage at all. Really, the only reason someone might use a rack that that...
view full answer... - Yakima BaseClips Y06185 NeededYou need the BaseClip Fit Kit for Yakima BaseLine Roof Rack Towers - Qty 2, part # Y06185.
view full answer... - Parts Needed To Install Single Roof Rack Crossbar With Aero Fairing On a 2019 Ford F-250 As long as you have a crew cab or super cab the following parts will allow you to mount a AirScreen XT # TH22WV on the roof of your 2019 Ford F-250. Yakima JetStream Crossbar # 8880650 Qty 1 BaseLine Tower # 8880618 Qty 2 Fit Kit # Y06185 Qty 1
view full answer... - Is There a Solution for a Roof Rack on My 2021 Ford F-250 that Doesnt Require Drilling?I have a great no-drilling solution for you. While the Rhino-Rack Heavy-Duty Bar Roof Rack for Camper Shells - Track Mount - Black - 59" Long # Y01-130B requires drilling, there are options for your 2021 Ford F-250 Super Duty crew cab that do not require any drilling. To go this route, you will need the following parts: - Round 66" CrossBars for Yakima Roof Rack System (QTY 2) # Y00410 - BaseLine Towers for Yakima Crossbars - Naked Roofs - Qty 4 # Y28TR - RoundBar SL Adapter for Yakima...
view full answer... - Correct BaseClip Fit Kit for Yakima JetStream Crossbars on a 2024 Ford F-350 Crew CabFor your 2024 Ford F-350 Crew Cab using the Yakima JetStream Crossbars # Y00426 you're going to need the BaseClip Fit Kit for Yakima BaseLine Roof Rack Towers # Y06185 with the towers # Y28TR.
view full answer... - Are Yakima Jetstream Roof Rack Instructions for 2023 Ford F-350 Same as 2024 ModelsThe Yakima JetStream roof rack part numbers # Y00426, # Y28TR, # Y06185 that fits the 2024 Ford F-350 crew cab is the same as the 2023 models so the instructions are the exact same. So Jack, what that means is that the instructions were printed when the 23' model was the newest but it's definitely the same as the 24' models.
view full answer... - Recommended Set Up for 2017 Ford F-250 to Haul 4 White Water Kayaks.I have a set up that will work great for your 2017 Ford F-250 to haul 4 white water kayaks. For a roof rack for your truck I recommend the following components: -Yakima HD Crossbars # Y01158 -BaseLine Towers for Yakima Crossbars # Y28TR -HD Bar SL Adapter for Yakima BaseLine, SkyLine, TimberLine, and RidgeLine Towers # Y03541 -BaseClip Fit Kit for Yakima BaseLine Roof Rack # Y06185 To get your 4 kayaks strapped down safe and sound, I recommend the Rhino-Rack Nautic Stack Kayak Carrier...
view full answer... - Recommended Roof Rack for a 2018 Ford F-350 Super Duty With a Naked RoofFor your 2018 Ford F-350 super duty with a naked roof, I recommend going with the Yakima BaseLine FX Roof Rack for Naked Roofs - JetStream Aero Crossbars # Y56UV with the fit kit # Y06185. This roof rack system will work great with your naked roof, has a maximum weight capacity of 165-lbs, and has integrated t-slots so you can use roof mounted accessories as well.
view full answer... - Can I Purchase a Half System of the 66 Yakima Round Crossbars?Yes, we do carry a option for a single Yakima Round Crossbar - 66" # Y8810025 for your 2020 Ford F-250 Super Duty (Super Cab). In addition to the crossbar, you will need two of the Replacement BaseLine Tower for Yakima Crossbars # 8880618, the BaseClip Fit Kit for Yakima BaseLine Roof Rack Towers - Qty 2 # Y06185, and two of the Replacement RoundBar SL Adapter for Yakima StreamLine Towers - Qty 1 # 8880641. With that being said, in order to transport a kayak or a canoe on the top of your...
view full answer... - Does Same Yakima CoreBar Roof Rack Fit 2017 and 2020 Ford F-350Yes the Yakima CoreBar Roof Rack part numbers # Y00422, # Y28TR, and # Y06185 is a confirmed fit for both a 2017 and a 2020 Ford F-350 crew cab.
view full answer... - Parts Needed to Install Yakima JetStream Crossbars on 2021 Ford F-250To install 60 inch Yakima JetStream # Y00427 aero-style crossbars on your Ford F-250, you'll need the # Y28TR BaseLine towers and the # Y06185 vehicle-specific fit kit.
view full answer... - Recommended Roof Rack and Kayak Carrier for a 2003 Toyota RAV4Lucky for you, Yakima does make a set of crossbars that are designed to work with vehicle's that have a bare roof like your RAV4. Check out the Yakima BaseLine FX Roof Rack for Naked Roofs # Y59UV with the BaseClip Fit Kit for Yakima BaseLine Roof Rack Towers # Y06185. These crossbars measure 44 3/4" long, has a 165 lb dynamic weight capacity, and has an integrated top channel for roof mounted accessories. Since you also are looking for a way to transport some kayaks, I'd recommend checking...
view full answer... - Roof Rack Fit for 2016 Hyundai Elantra GT With Panoramic SunroofI checked for you and there is a fit for a roof rack for your 2016 Hyundai Elantra GT with the panoramic glass roof (moonroof), which is from Yakima. I verified the fit with the manufacturer and roof rack consists of the following parts: - Yakima JetStream Crossbars # Y00425 Black - BaseLine Towers for Yakima Crossbars # Y28TR - BaseClip Fit Kit # Y06151 - BaseClip Fit Kit # Y06185 - Same Key System Lock Cores (Optional) # Y07204 This is going to give your '16 Elantra GT an easy to use,...
view full answer... - Can I Reuse Yakima Q Towers for 2021 Ford F-250In 2016, Yakima phased out their Q-Towers and upgraded to their new BaseLine system. That means for vehicles that are model year 2016 or newer, there are no confirmed Q-clip fits for them so we need to get you a new roof rack for your 2021 Ford F-250. If you want to reuse your round bars to make a roof rack on your F-250 Crew Cab, you can do so with a new BaseLine system. That consists of BaseLine Towers # Y28TR, a RoundBar Adapter # Y03536, and BaseClip Fit Kit # Y06185.
view full answer... - Half Roof Rack and Ladder Rack that Fits 2023 Ford F-350To do a half roof rack for the roof of your 2023 Ford F-350 you'd need the following: Yakima JetStream Crossbar part # 8880650 BaseLine Towers for Yakima Crossbars part # Y62TR BaseClip Fit Kit for Yakima BaseLine Roof Rack Towers part # Y06185 There isn't a way to do a half ladder rack so best option would be an adjustable height rack like the Yakima Overhaul # Y01151-5855 so that you can have it match the height of your roof rack and if needed you could leave off the rear (or front)...
view full answer... - Roof Rack for Roof Tent on a 2019 Ford F-450 Super Duty Crew CabWhile there are no roof racks that have a weight capacity of 400 lbs, I still believe we have a solution for your 2019 Ford F-450 Super Duty Crew Cab with the Yakima HD roof rack. This consists of the HD Crossbars # Y01157, BaseLine Towers # Y28TR, HD Bar SL Adapter # Y03541, and Fit Kit # Y06185. If you are looking to use a tent that has a 400 lb weight capacity like the Yakima SkyRise HD # Y07436 then you actually just need to make sure that the roof rack is rated for 165 lbs like the...
view full answer... - Adding A Roof Rack To A 2020 Ford F-350 Crew Cab For Additional Cargo Carrying CapacityYakima OverHaul HD Adjustable Truck Bed Ladder Rack - Aluminum - 500lbs - 68" Crossbars # Y01151-58 has an on-road capacity of 500lbs, off-road capacity of 300lbs, and static capacity of 800lbs. The correct roof rack for your 2020 Ford F-350 Super Duty Roof Rack by Yakima would be the following parts: Yakima HD Crossbars - Aluminum - Black - 60" Long - Qty 2 # Y01157. BaseLine Towers for Yakima Crossbars - Naked Roofs - Qty 4 # Y28TR. HD Bar SL Adapter for Yakima BaseLine, SkyLine, TimberLine,...
view full answer...
Do you have a question about this Roof Rack?
Info for this part was:

Edited by:
Daron K

Written by:
Alex H
At etrailer.com we provide the best information available about the products we sell. We take the quality of our information seriously so that you can get the right part the first time. Let us know if anything is missing or if you have any questions.
Thank you! Your comment has been submitted successfully. You should be able to view your question/comment here within a few days.
Error submitting comment. Please try again momentarily.