


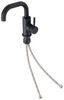
Sleek, black stainless steel faucet modernizes the bathroom in your RV or camper. Maintenance-free ceramic disc cartridge helps prevent the faucet from dripping and wasting water. Includes deck plate and mounting hardware.
Features:
Specs:
To install, use the inlet shank and drop the new faucet in place of your existing faucet. Then thread the mounting hardware onto the shank and connect the braided hot and cold water lines. You'll need to keep some tub and tile caulk (not included) on hand to help prevent any leaking.
California residents: click here
Videos are provided as a guide only. Refer to manufacturer installation instructions and specs for complete information.
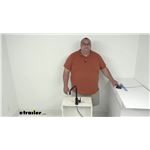
Hello neighbors and friends. Today, we're looking at the Utopia RV Kitchen's Faucet with a Single Lever Handle in Matte Black. I'm Steven and let's get into it. So folks, this faucet here will let you replace or upgrade your kitchen faucet in your RV or camper. It is a single lever style handle as you see here. So you can go hot/cold, on/off, and it has inside of it a maintenance-free ceramic disc that's inside this whole housing here.
Now what that disc cartridge is gonna do, it's ceramic, it creates a watertight seal when the faucet is turned off, and it's gonna prevent dripping and leaking. Now everything here is a durable rustproof stainless steel construction with that matte black finish so you don't have to worry about rust, corrosion, those kind of things. It's what we call a one hole installation. So most kitchen falls, this used to have couple holes, and a centerpiece that you're used to. This way you just have to do one center hole.
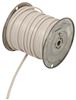
Now you will need what's called a tile and tub caulk that's sold separately. You can get that here at etrailer.com or get it from your local hardware store or your local store. Now this is CUPC and MSF 61-9 compliant. As far as some quick dimensions, overall it is nine and a half inches wide, and approximately 15 inches tall from the deck or the top of your sink up to the top of the faucet. Now as you can see down here you have two hoses.
These are braided steel construction. You have lines on 'em. Red for hot, blue for cold. I'm gonna go ahead and pop this off real quick, and then we're gonna give you a closer look. So if you've never done an installation like this, you might wanna get a local plumber or handyman to do it for you.
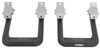
But honestly, I think if you take your time, read the instructions, you won't have any problems doing it yourself, if you wanna try it out. So what we got going on here is you've got a couple of washers, and you've got a nut here. The nut has a slit in it. That way you can get it on or off. And again, I'm gonna give you a closeup look here in one second. And then you got again, your braided lines here. Now these are all standard connections, so they should match right up to your hot and cold connections that are underneath your faucet, and underneath your sink house. All right, so I'm gonna bring this up close for you real quick. So again, you've got hot and cold with the threaded ends. These are a steel braided line, that's a lot more durable than the plastic ones that are out there on the market. As you can see, again, this one has red lines. That's your hot water. And this one has the blue lines. That's your cold. You got the threaded part here. This is what's called your deck plate. What you're gonna do is, you'll put this on top of the sink. You'll put a little bit of that tile and tub caulk on this. That way when you put it down on the sink surface, and then it tightens down and makes a watertight seal in here. Then you got two washers, you got a rubber one, and a metal. Rubber always goes closest to the the faucet. So the rubber goes on first basically. And what you'll do is, you'll kind of pull one down shorter to fit 'em both through. And then you'll have those up in place under the sink. And then this guy here is your set nut, and it's got set screws as well, and it's got a slit. That way you can just come right over the cords here and put it on. Now what you would do is, you would tighten this up all the way, and then once you get it hands tight, you would then just kind of finish the tightness with these two set screws once you got it up in place. So again, very nice, elegant. You can see the black finish here over the stainless steel. There's a view of the aeration cap here. And again, the single handle lever on/off, hot/cold, depending on which way you turn it. And this guy could turn all the way around. As you can see when I spin this, it's not spinning the cords. That's actually something that a lot of faucets don't do. So that's just a little feature. So basically, if you wanna mount it with the handle on this side, or if you want to spin it, and have the handle mounted this way, you could technically do that. Just keep in mind your hot and cold, maybe backwards, depending on one side or the other. All right, folks. Well I think that's gonna wrap it up for our quick look today. Again, my name is Steven. Thanks for joining me.

The connection hoses were several inches too short to connect to my RV plumbing

Installed myself. Only problem was that the attached lines were not as long as original. Had to purchase parts to make them long enough. Faucet works as it should.
Received in a very timely manner, we replaced it this weekend and it seems to be working nicely!
The faucet is just what we needed at works fine good pressure easy to install and the water lines fit the RV perfect
The faucet was exactly what i replaced.
And arrived safely and on time Thanks
Works great with pump. Beautifies house boat kitchen
Info for this part was:
At etrailer we provide the best information available about the products we sell. We take the quality of our information seriously so that you can get the right part the first time. Let us know if anything is missing or if you have any questions.


Thank you! Your comment has been submitted successfully. You should be able to view your question/comment here within a few days.
Error submitting comment. Please try again momentarily.