


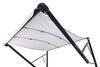
Manual RV awnings can be a pain to set up, especially after a long day behind the wheel. When you finally park, you don't want another job. This electric awning runs off a wall switch. Just stand and press while the awning does all the work.
With a manual awning, you are the motor. You have to step outside, pull it down, guide the arms, and try to keep it tracking straight so it doesn't bind. If it starts to go crooked, you have to straighten it out before it makes things worse. At the end of a long day, paying attention to every detail isn't the job you want. This powered awning takes you out of that role. The momentary wall switch sends power to the motor inside the roller tube, which rotates the tube and moves the awning. You just hold the switch and watch it do the work.
This isn't just your basic on and off switch. It works only while you're pressing it. That means you decide how far the canopy extends. Need just enough projection to block late afternoon glare through one window? Stop there. Want full coverage over the patio side? Hold it longer. You press, it moves. You let go, it stops. It only moves on your timing.
Both. This awning works just as well for a new install as it does as a replacement for an older unit. It runs on 12-volt DC power, so it connects to your RV's existing 12-volt system. Once it's connected make sure to properly ground it. You might ask, "Is there a single standard way to wire it?" Not really, because RVs are anything but standard. Battery locations, fuse panels, and wall cavities change from unit to unit. How you route and protect that wiring depends on your RV's layout.
It isn't surprising when an awning tears. It's not even surprising that it tears in the exact same places every time. Tears start near the arms and along the seams because that's where the fabric and hardware rub against ea8h other every time you extend and retract it. Repeat that enough and wear turns into a tear. This awning reinforces those high-stress tear zones near the arms with heat-welded seams rather than stitched ones. The fabric isn't punched full of needle holes. The panels are fused together instead, so you aren't giving water and wear an obvious weak point to work from.
Any time you bolt something to an RV wall, you create a hole. And holes are where water goes. If those holes aren't sealed correctly, water will eventually get inside. To prevent that, this awning includes butyl tape on the brackets and arms. As the bolts are tightened, the tape compresses and spreads into the small gaps between the bracket and the wall, forming a continuous seal instead of relying on surface contact alone.
Long awnings are awkward to move and even easier to damage in transit. Rather than shipping in one oversized carton on a freight truck, this awning ships in protective packaging built to move through standard carriers. That means fewer bent tubes, fewer crushed corners, and less chance you're dealing with shipping damage before you even get it installed. It also keeps shipping costs more reasonable.
To get the right size awning for your RV, measure from the outside of the flange on the left side to the outside of the flange on the right side. That's the fitment width. The fabric is narrower, typically about 6" less (3" on each side), since it fits inside the assembly.


Info for this part was:
At etrailer we provide the best information available about the products we sell. We take the quality of our information seriously so that you can get the right part the first time. Let us know if anything is missing or if you have any questions.


Thank you! Your comment has been submitted successfully. You should be able to view your question/comment here within a few days.
Error submitting comment. Please try again momentarily.