


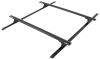
Stop hauling a separate ladder just to reach your trailer roof. This bolt-on ladder gives you permanent access so you can climb up anytime to check straps, secure cargo, or handle maintenance. Two-piece design assembles into a full-height ladder.
This ladder mounts to your trailer so you always have a fixed way to reach the roof. Use it to check cargo, adjust straps, or handle routine maintenance without hauling a separate ladder.
The grooved steps provide better contact for your boots, helping you maintain footing when the ladder is wet or dirty.
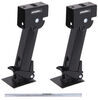
The ladder ships in two sections that bolt together to form the full height, then mounts to your trailer's rear wall using the included hardware. Installation requires drilling into the trailer structure. Strength depends on how and where it's mounted; securing it into reinforced areas of the trailer will provide the best support. Some setups use backing plates inside the wall to help distribute the load. Instead of wasting time setting up a ladder, or skipping roof checks altogether, you've got instant access whenever you need it.
Videos are provided as a guide only. Refer to manufacturer installation instructions and specs for complete information.
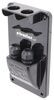
Hello neighbors, it's Brad here from Etrailer and today we are taking a look at the P and F access ladders for enclosed trailers. Now these are gonna be available in a few different configurations, anywhere from six foot to seven foot to eight foot, and also in raw aluminum or a black powder coat finish. All of these are gonna be a great option for any enclosed trailer to gain access to the roof, whether it's for maintenance, whether you have a rack up there for storage. Either way, this is gonna be a great way to be able to get up there without having to bring a ladder along with you and it's gonna be nice and secure in the process. All of the ladders, no matter the size, they're gonna be a two piece design and they just bolt together here. It's all milled aluminum with welded on brackets.
Now these don't have holes, you have to create your own template, but that allows you to custom dial it in to the studs on your trailer to get it nice and secure. So there's a total of four brackets and they give you the hardware, the self-tapping screws to get these mounted up. So two screws per mounting position was enough to make this really, really solid. It's also lightweight, so when you're trying to get this all up, it's not super hard to deal with with mounting it up. Cool thing about aluminum too is it's gonna be rust proof.
You know it's going to maybe get corrosion long term after being outside, but it's not gonna rust up. Now with a powder coat finish, that's gonna help protect that exterior, but aluminum you really can't go wrong because, well, like I said, it might corrode. The black does look really good. And on the black ones there are gonna be holes on the brackets that are already pre-drilled. Those are just for the powder coat process, but you can utilize those for mounting purposes.
As far as the dimensions go, we have 20 inches wide from outside to outside. From bracket wall to the exterior of the ladder, it's gonna be right at six inches and in between each rung is right at one foot. So the only difference would be, you know that extra foot that you add on. So depending on what kind of enclosed trailer you have and the height, you can get that seven foot or eight foot. In fact, the seven foot would work on here.
I could have put this slightly lower to where it's almost flushed with the trailer and it would've stuck up just a little bit. But we went with the six foot, we're gonna be putting a rack from P and F very similar to this up top so that way we can store ladders up there. And this is why it's great for landscaping, contractor work. Really anything where you need long, you know, ladders, maybe conduit, PVC, lumber, whatever it may be, if you get that rack combo and this ladder, again, that's a whole lot of real estate that you can store things up there. Installation on this is super easy. Essentially you're just gonna be drilling in those self tappers, making sure that it's all nice and level. But beyond that you can do this in about 20 minutes. So with that being said, let's take a look at the installation. The first step that we need to do to get our ladder installed is determine where we want it and ideally we find a spot where we don't have to put a backing board on here. So following where we have our exterior screws, generally these are gonna go into a metal stud or potentially a wood stud depending on your trailer. But as we measure it out, let's see if it follows house rules of 16 inches and it's pretty close. So what we'll need to do is drill out holes that are 16 inches apart. That way we can use the included screws that come with this in order to mount it up. So knowing that I am gonna be 16 inches apart, I'm just gonna mark those lines on each side and drill these out a little bit larger than the diameter of the screw. So pretty easy from the outside of each bracket is 18 inches. So if we just go one inch in, now we get a total of eight screws and we have four platforms. So if we do two holes per that should be perfect and make it nice and secure. So at the one inch mark I'm gonna make a mark. And then at the 17 here. I'll move this up and do the same thing. I'll be using a quarter inch drill bit and just to make sure that this goes exactly where I want it, I'm gonna use a punch. You don't necessarily need to, but it'll help get everything started pretty well. And I have my hardware here, I think the quarter inch is a perfect size for drilling that out. When we go to drill this into the frame of the trailer, we are gonna go with a smaller drill bit. So we have some biting on, but this will allow us to pass our hardware through perfectly. So we'll get our remaining holes all drilled out. So with your holes drilled out, the next thing you need to do is determine height wise where you want it. So being a six foot ladder, I mean I could go, I wouldn't go any lower than the bottom of the trailer, so we get ground clearance issues, but also you don't want it too big of a step to come back down. What I found is going in between the screws is gonna be best, so it sits nice and flush against the wall. And I'm gonna grab a paint marker, I'm gonna hold it up and at least get two of the top ones first and we'll pre-drill those holes. And then if we can get that to where it's nice and level, we can go through and mark the others and pre-drill 'em. We're not gonna completely mount this up because I'm going to be putting some butyl behind here. We generally put those on on RVs when we mount things on the outside and it's just gonna create a nice seal for where we drill in. That way water long term doesn't seep in here and make its way into the trailer. Not completely necessary, but I have the butyl here and I think it's a little bit added peace of mind knowing that water's not gonna trickle in there. So I'm gonna grab my paint marker, I'm gonna hold this up, double check, make sure everything's nice and level how I want it. And then we can start drilling. And to get this perfectly dialed in, I would recommend using a bubble level. So I made my marks. These are pretty close to level, so using those as a reference you can measure down. So I am gonna drill this out, just pre-drill and see what we got behind here. Make sure it's nice and secure. This drill bit that I use is a 13 60 fourths and those are self-tapping screws. So yes, you could send it through, but I like to pre-drill it to where it goes in nice and square. It's not gonna go crooked on you and shift the ladder. So I'll get this one. You know this is cleaned out to where it's already passed through. I'm gonna get this one so we can mock this up and that's gonna become a template for the rest of the holes. So we'll get this one drilled all the way through as well. So with those drilled out, I'll get these zipped in. With your self tappers, don't go crazy here because you don't want to ruin the threads that you're making. So I'm going pretty light here 'cause all we want to do is support this to where we can use it as a template. So now we have it held up, we'll double check, make sure that it's nice and square, it looks good. And at this point I can mark all of these out. So with all those drilled out, double check on the backside, if you had any that went through without looking like there's something to bite onto, you might want to cut some wood as a backing plate for it to drill into because as you climb this, you're gonna be putting a decent amount of, you know, stress against it. So if it's not really into a strong stud, it's very possible it can rip or bow. So main thing is make sure it's nice and sturdy. I'm very happy with how ours went. Had nice bite as I drilled through. So I'm gonna pull these off. I'm gonna grab my butyl and put those on the back. Now as I mentioned, you don't have to do that. You could get away using some RTV silicone as well, whatever you have handy. But I would recommend maybe sealing around, again, just 'cause as water goes in here, it very well can leach inside. So we'll pull this off and then I'll get my butyl tape on and then we can send this thing in. We'll be ready to go. The butyl is just kinda like a tacky putty for instance, and it does stick to it really well. But as we draw those screws in, it's gonna kind of press out and again, create a nice seal. So I'm just running it the layer or the length of this. And then once you peel this off, it will be tacky, so just be careful. But what I like to do is take the screws and run it through and then guide 'em in. But it'll poke through this with no issue. If there's butyl around the threads, that's actually not a bad thing 'cause that'll just add a little bit of extra bite as we go in. I'm just gonna do the top one for now, but as I mentioned, this stuff's really tacky, so make sure that when you press it on, you got it pressed where you want it because to take it off would be not so fun. (drill grinding) I haven't completely tightened these down. I wanna get these loosely started on the bottom as well. And then all we have to do is get these all snug down. Okay, got all those mounted up. We'll give it a test step. And super solid. Very happy with it overall. So with this installed, we also have a rack that we're putting up here, and that's really why you'd want one of these on your enclosed trailer. This is a lot of real estate up there that is previously not used or even doing maintenance on there. To get up, you know, you're gonna need a ladder, you're gonna have to store that. So the cool part about this is I can climb up there, store a ladder if this is a contractor trailer, and it's gonna be all new real estate you've never had before. So overall, really happy, super easy, and nice and secure. Well hopefully this installation and a look at the P and F access ladders for enclosed trailers, help you decide if this is gonna be the proper product for your enclosed trailer so you can really utilize it as best as possible. My name's Brad and thanks for watching.
Info for this part was:
At etrailer we provide the best information available about the products we sell. We take the quality of our information seriously so that you can get the right part the first time. Let us know if anything is missing or if you have any questions.


Thank you! Your comment has been submitted successfully. You should be able to view your question/comment here within a few days.
Error submitting comment. Please try again momentarily.