


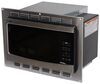
With 20,000 Btu of heat, we recommend this built-in furnace for RVs about 20' long. It will get your RV nice and toasty far quicker than a space heater, and it includes a door so the unit can be serviced from the outside.
Features:
Specs:
Bigger isn't always better. Getting a furnace that's bigger than you need can cause problems. A major one is that it will burn even more propane than you need.
You really only need about 1,000 Btus for every foot of RV length. For example, a 20,000 Btu furnace would be good for a 20' trailer or motorhome.
If you're installing a new furnace, the decision between door or doorless furnace will depend on where its installed and how you can get to it for maintenance or repair. With a doorless version, only the vent plate will be visible on the outside of your RV. This gives you a cleaner look, but it also means that you must be able to access the furnace from the inside of your RV.
The doored version isn't really a door, but more of an access panel that is screwed in place. You shouldn't need to access your furnace regularly, but when you do, you will need that access panel if the furnace is mounted in a place that you can't easily get to inside your RV.

California residents: click here
Videos are provided as a guide only. Refer to manufacturer installation instructions and specs for complete information.
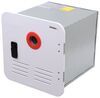
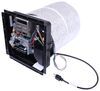
Hello, neighbor, Steve here with etrailer.com. Let's take a look at our Dometic RV Furnace, running on LP gas, with an automatic pilot light that runs on 12 volts of DC current, rated at 20,000 BTU, with a nice white access door included. Now, folks, I'm gonna go ahead and remove this access door here, one, before it falls off the table, and two, I wanna be able to show you the correct measurements here. So, dimensional-wise, this is 12 inches wide, 20 inches deep or long, and seven inches tall overall. Now, keep in mind this plastic retainer would go in first, and then the white access panel with the metal finish on it and everything, or it's made of metal, over that, and then follow it up by this piece here, giving you that complete finished look once it's all installed and then screwed into place and everything. So, I'm gonna set all that over here to the side, and while I've got you zoomed in, so, why a furnace Well, it's gonna quickly and efficiently heat the interior of your RV, camper, motor home, travel trailer, fifth-wheel camper, those kind of things.
Maybe you need to replace one or just upgrade. You've got some access panels all over the sides here. They're gonna give you two included duct adapters, so that's where those ducting would go. But this is a propane-powered system. You got your four wires here, two blue for thermostat, black for ground, and red for power, that's the 12 volt power.
And when you're using this with the gas, the gas will be hooked up under this tab here. They got that sealed off for shipping. I'm gonna leave it there. And the propane-powered system's gonna let you boondock a lot easier, because you don't have to worry about being connected to shore power. You just need that 12 volt igniter from your battery on the motor home, camper or whatnot.
Now, it does use an automatic DSI gas pilot and that's direct-spark ignition, and it's gonna reduce the risk of gas leaks and also increase the fuel efficiency. Now, it does relight automatically until the heater is switched off. The blower here uses what's called a low-air turbulence. That's gonna provide quiet operation whenever it's blowing out the air. As you can see up here in the panel, you have an LED light down there on the bottom.
That could light up and give you some flashes. What that would be meaning is that it's flashing diagnostic codes, or faults, if you will, if there's any fault presence. So, let's say for whatever reason, it's outta gas, it may flash you a fault light, and you didn't know you we inchesre outta gas, so then you read your Instruction Manual on the Troubleshooting, and that flashing sequence will tell you, oh, it just needs propane refilled. So, stuff like that is what it's gonna give you. Now, it also will require a thermostat control unit, that's sold separately. I'll put that item number on the screen. Keep in mind, that's just a mechanical thermostat, meaning it's not LED, it's not Wi-Fi-activated or anything like that, it's just a simple control thermostat. You could also need butyl tape or RTV sealant if you're sealing up anything that gets put on the outside of this, if it's going on the outside of the RV fascia or camper, so things such as that muffler looking guy there, that heat shield, stuff like that. You also could possibly need, according to the instructions that came with it, some number six or number eight by 1/2 inch long, panhead or self-tapping AB-style screws as they call 'em. And again, that just depends on your specific installation needs. They do give you two mounting brackets and screws for that. And that little baggie of four screws, I found that that's for the outside connection on that panel as far as just putting that panel on. So, again, folks, 20,000 BTUs, white access door. This is the Dometic RV Furnace. I'm Steven, thanks so much for your time, thanks for watching, and have a great day.

Installed and working hours after delivery! Worked great in 1999 Dutchman .
It was easy to get all the info I needed to select the correct heater for my 5th wheel.
etrailer was extremely helpful in navigating the myriad of choices available and determining the correct unit to purchase. We provided the BTU output and dimensions with the ductwork configuration that allowed the salesman to accurately sell the unit that (1) fit in the space provided without modifications (2) matched the BTU output (3) provided auto ignition and worked from the existing thermostat and (4) required minimum modifications for the ductwork.
The old furnace suffered from a cracked heat exchanger which set off the carbon monoxide alarm inside the camper. Carbon monoxide is deadly and could cause a fatality. We took the furnace apart and sent the heat exchanger to a welding shop for repair. The crack was repaired, but other holes were found during pressure testing. The heat exchanger was a
discontinued item for manufacturing and therefore lead to the decision to replace.
The unit cabinet required modification to accommodate a horizontal installation with a floor duct inlet that was different than the configuration provided by the factory. A new duct outlet was cut using a template from the old furnace and using sheet metal shears. The gas line required a slight modification to reroute from a side entrance to the top. The plastic connector and wiring harness were removed from the old furnace and installed on the new furnace with heat shrink connectors. The modifications took a couple of hours to complete, however the unit is installed and working as expected.
The furnace after installation is performing very well. The unit operates from the original thermostat. We have stayed in the camper for a week with temperatures dipping down to 25 degrees Fahrenheit with extremely good comfort. etrailer is highly recommended for anyone shopping for a new RV furnace.
Do you have a question about this RV Furnace?
Info for this part was:
At etrailer.com we provide the best information available about the products we sell. We take the quality of our information seriously so that you can get the right part the first time. Let us know if anything is missing or if you have any questions.


Thank you! Your comment has been submitted successfully. You should be able to view your question/comment here within a few days.
Error submitting comment. Please try again momentarily.