
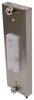
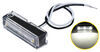
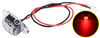
Brighten up the darkened interior of your enclosed trailer or add stylish, accented light around the furniture in your RV or camper. Included incandescent bulb provides warm white light, and the shade softens into a warm glow.
Features:
Specs:
Need to brighten up your hallway for those late night bathroom breaks or snack times? Or perhaps you need to upgrade the dim, old lights in your enclosed trailer? This incandescent wall light gives you warm white light in your RV's walkway or bedroom or next to the entrance door of your enclosed trailer. The included rectangular shade softens that light so it's not too harsh.
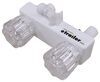
Surface-Mount, Bolt-On Installation is Easy
This sidewall light is incredibly easy to install either as an upgrade or a replacement of your existing light. To access the bolt holes, pop the shade off the housing. Then, using hardware (not included), bolt the light down onto an interior wall of your RV, camper, or enclosed trailer before re-installing the light shade. The light can be turned on and off with the built-in toggle switch, or it can be wired to a light switch. The 2-wire design hooks up to ground (white wire) and power (red wire). 1 Incandescent light bulb is included.
California residents: click here
Videos are provided as a guide only. Refer to manufacturer installation instructions and specs for complete information.
What's going on, everybody Adam here with etrailer. Today, we're going to be taking a look at the Optronics RV light. This light is going to be for our 12 volt DC system. So if you have a 24 volt system, this isn't going to be for you. This is going to draw about 0.97 amps, which is a little bit more, about double than what you see on some LED lights. So this is an incandescent bulb.
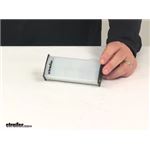
So once I take this acrylic lens off, you can see the aluminum housing, but then you see the incandescent bulb. I'm not a fan of these bulbs. One, they put off some heat. That's why we have aluminum here. Two, they don't really have as long of a life as LEDs.
And three, it really doesn't put off a whole lot of light compared to the amount of amps that it's drawing. That's just me. And these will break over time. But if they do and you want to go this route, it's bulb type 211, and we do have replacements here at etrailer. This is definitely going to be an interior light.
It's not really going to seal well with the water. So let me put this lens back. You just put it on one side and then squeeze it and it's good to go. We do have a switch, which I like that just because a lot of the lights in our trailer are hardwired. So they just turn on whenever I turn on the switch, but sometimes they just need a little bit of extra light, and other times I don't need all the light, I just need one to light up the interior.
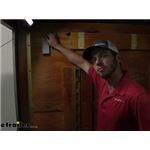
So I definitely like having a mixture in my trailer, but that's just me. If you want my opinion about this light, I mean, it gets the job done. If you're really wanting something skinny and narrow like this, there is an LED option, which is what I would use just because it's smarter, in my opinion. You can put twice as many LED lights and you're going to get twice as much light, but just draw half as much amps. So that is something I would definitely recommend for you, whether it's in your trailer, your RV or your camper. One other thing that we haven't really gone over is how to install it. It didn't take a whole lot of time. It's just like any other type of light that we sell here at etrailer. So if you stick around, we're going to show you how we did it. First things first, let's figure out exactly where we want our light. I'm just going to replace the light that was here before. So if you have wires ran, great, we don't have to run wires. If you don't, you got to run wires. So we need a positive and a negative wire. So go ahead and run those. Luckily I didn't have to, someone already did it for me. So now what you want to do is prepare the wires. I like using these heat shrink butt connectors. We have some here at etrailer if you don't, so just add them to your cart, so you get all the stuff so you're ready to go whenever it all comes in. Always take your wires and twist them together. Just makes it a lot easier to put these in. And I usually kind of push and twist in the same direction and it's nice and secure. So now you want to crimp these down. You want to make sure these are super, super crimped down. You don't have to redo this, because these wires will eventually go in the wall. And if they come undone, we're going to lose them and we'll have to go fishing. It's not fun. I've done it before. So we'll do the same exact thing for our other wire. And one thing, I have already gone ahead and tested these wires to figure out what's which one is power and which one is ground. A lot of the times the colors will not match up, so always match by function and not by color. So be sure to test all that stuff. Once that's done, then we can go ahead and grab our actual light and just give it a good tug, make sure it's nice and secure before we move on. So positive and negative, go ahead and hook those up accordingly. Just like that. It's just the same deal as before. And before we really heat these up and put it all back, we want to make sure that it's going to light up. And it does, so we are good to go. Go ahead and flip this off. And now we can proceed with the install. So crimp these down. And what I'm going to do is use a heat gun, but not everybody has a heat gun. So what you can do is you can use maybe a hairdryer or something. It's not going to be as fast as this, but it'll get the job done. What I like about these is they're a lot better than the twist nuts, just because those tend to fall off and they just don't really make the best connection. But this is going to be water tight, and it's also going to hug around the wires. So if for some reason you don't crimp it down enough, you don't have to worry about it slipping out. So that's always a plus. And within a couple of seconds with this heat gun, we'll be ready to roll with the rest of the install. I'm going to go ahead and put our wires back in now that they're kind of cooled off and we can start to position it to see where exactly we want to mount it. As you can see, we've installed a lot of lights today, so we're going to try to utilize one of those holes. And what you want to do to take this lens off, just pop it off like that, kind of squeeze in on it. And you can see our little bulb and our two little mounts. So I want to align. I'm basically just going to place it right here. I'm going to put the switch up top. So the hardware is not included, so you will have to provide that yourself, but you can really use anything. I'm just using these self tappers just because I'm going into wall And you can use a power tool like me, it makes it a little bit easier, but just be careful. You just don't want to damage the housing, bend it, crack it, yada, yada, yada. Just a little bit of looseness so I can get it nice and even. Now we can do the last one, and we are almost done. Perfect. So now all we gotta do is put our lens back in just like that, and we're done. And that'll do it for a look at the Optronics RV Light..
Ratings & Reviews


Easy to install work great
Very Useful in my Trailer, and the light is bright.
Arrived timely. Matched perfectly to the one we were replacing. Installed easy.
Seems like a well built light. Kind of confusing on the wiring, Red is set up as to look as its the ground (because of what looks to be a grounding tab on base), but really is the power wire and the White wire (that is going into the light itself) is the ground wire. I point this out, because this light will NOT find its own priority, it must be hooked up correctly... With that said, not sure how I feel about the Red power wire not being internally protected (and I will have to do more testing to make sure the "base" is not powered, that would mean a possible short if the base/stud screw is grounded). Also, we will see how the trim ring holds up, the tabs that hold it on are not the best. With the things I pointed out, I don't feel giving it more then a 3 would be appropriate.
These lights were exactly what I needed. Delivery was as described and the product arrived undamaged and in perfect working order. Upon installation for mood light, they didn't disappoint. They worked great. I would definitely order again.
Info for this part was:
At etrailer we provide the best information available about the products we sell. We take the quality of our information seriously so that you can get the right part the first time.


Thank you! Your comment has been submitted successfully. You should be able to view your question/comment here within a few days.
Error submitting comment. Please try again momentarily.