
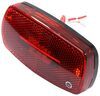
6-5/16" x 3-5/16" Oval. LED light functions as an RV porch light or utility light with 16 diodes producing bright light at a downward angle. Durable SMD LEDs better withstand shock and vibration. Surface mount installation. 2-Wire pigtail.
Features:
Specs:
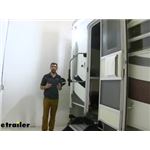
Surface-mount RV lights install using a flange or bracket with mounting holes. These lights lay flat against the RV surface and only require a small, often pre-existing hole, for wiring. Mounting hardware is used to secure the light to the trailer.
California residents: click here
Videos are provided as a guide only. Refer to manufacturer installation instructions and specs for complete information.
Zach: Hey guys, Zach here at etrailer.com and today we're going to be taking a look at an RV porch light from Optronics. This is going to be an LED light that does a really good job of lighting up the entrance to our camper. We also like to put these on different parts around the camper, like basement doors or any other area we want to provide some light, and we also like to put them on enclosed trailers, so let's just take a closer look at it. With this being a porch light, I have it tied into a switch on the inside of my trailer so I can turn it on and off from right here in the kitchen. But if you had this as a utility light somewhere else, you can also run it to the same system and have switches. But if you want it to just be more isolated, as long as you have power, there are options where there's a switch underneath it and you can just turn it on and off in that very specific location.When it comes to adding a light on or especially replacing one, I like that this is LED.
The LED has a lot of benefits to it. One, it's brighter. If you're looking for something that's going to light up the campsite and especially the entrance to your camper, this is definitely the way to go. Incandescent definitely does its job of lighting it up, but this does a little bit better job in my opinion. It's pretty bright and I think it has a much more modern look.
The one downside is you may have a bunch of incandescent lights going down your trailer, so if you wanted them to match, you'd either have to swap them all out or you'd have to just get one incandescent to replace it. But I think that if you're upgrading, LED's a really good way to go.These also won't draw as much power compared to the incandescent lights, so if you're doing some off-grid camping, this is a really good option just because they won't draw as much from your 12 volt system or your batteries. So this is a really good way to go if you're looking for something that's brighter, doesn't draw as much power, and these won't burn as hot. And when it comes down to being at the campsite, you burn out an incandescent bulb, you've got to find the ball and you've got to replace it. These, I don't have to worry about them.
Once they're on, you're going to get a lot of years out of them, so I think it's a really good way to go if you're looking for something with low maintenance.If you're replacing an old light, you can still see the outline of an old rectangle style that we had on there. We still need to clean up that a little bit, but this one's going to fit a little bit different. But the overall length is going to be six and five 16ths of an inch, it's going to be three and five 16ths of an inches tall, and the depth of it will be an inch and seven 16ths. So it's a little bit different in the shape. It's a little longer, but you can see it doesn't have as much space that it's taken up there on the corners.
I think this is going to provide a really nice updated look to your camper.With the lights down in the shop, you can kind of get a good idea as to how bright this is. I've got some light coming in from the windows next door, but overall, this does a really good job of lighting up a pretty good area. I think that some people prefer incandescent lights because it's not as harsh as maybe the LED. It definitely stands out maybe as a little overbearing for some people, but the incandescent light in my opinion is a little bit more dull and kind of dingy, but if that's what you're going for, I think it's still a good option. But if you want something that's bright and efficient, LED is the way to go. But it's pretty easy to install, there's not a whole lot to it, especially if you've got a light that you're replacing. So let's just walk you through how we got this one put in place.Before we get our light installed, we need to take our old existing light off, and we just had an old amber, rectangular kind of a larger style light there, and we're going to replace it with this one. And I've got my wires stripped out that we're running from the inside of my trailer and I've confirmed that my black wire is my power, my white's my ground, so it'll match up perfectly with this, and I'm going to connect them with some butt connectors. Now these don't come in the kit, but you can pick these up here at etrailer. And you can go with heat shrink if you'd like, but I think these are going to be just fine since we're tucking it back inside the trailer.Now some lights that we offer come with a mounting kit that will include wire nuts like you'd install at your house, and those are okay, they do a good job, but I think since we're putting this on a trailer, we'll just connect it with these butt connectors. It's the ideal choice for us just because they hold a little bit better whenever we're going down the road. Let's get these connected in there and get them clamped down, make sure we get that in there. Get a good connection. I like to give it a little tug, make sure that it's holding in place good. Then we can just tuck those back in there, and then I'm going to mock this up because I don't think my mounting locations are going to match up to that old rectangular one, but I do think that the housing will cover up our old holes, so We'll confirm that. And you'll see there's this larger side right here, and a slimmer side. The larger side should go on top, and we'll rest those wires in this little recess backing there so we're not putting hardly any pressure on our wires there.And this press is up against the camper, and I'm going to Mark them with just a small drill bit, create a pilot hole. I'm going to make sure that I have this evened up, try to cover up any holes. We can eventually clean up all this old caulk that's on there, and just where the camper has faded a little bit on the outside of the light there. Let me get this even, I'm going to get some holes drilled. And then I'm just going to use the existing hardware that was already in place when it comes to the screws that we're using. I think they looked like they we're instilled good shape, and I can just thread those in with just a screwdriver. Let me get those started, it might take a little bit of effort at first. They'll get us a nice, tight hold.And if you really wanted to be over the top with sealing that, you could put some caulk in those old holes, but this is going to provide a nice fit. And then I would suggest putting just a little bead of caulk around the outside of this and we can really seal that up good. Leave a little bit down at the bottom exposed so if water does get in the backside there, it can drain out. And then once we get these all the way in, we can hook up our power to our camper and test this out. And then I'm going to pop this cover back in. Now, I just used a flat blade screwdriver to pry on the end right here to get that out, so be very careful with that. That's the one side of this style, it's not as easy to just pray out with your hand, but you're not going to be popping this out in theory too often because you don't have to replace those diodes, so we shouldn't have to take this out. If you bumped it, we do sell replacements for that so see, we got a nice fit right there, so let's get hooked up to power and let's test it out.I have power hooked up to the camper, can flip my switch and confirm that this works and you can see we get that nice bright LED light. So if you're looking for a replacement or a really nice upgrade, this is going to be one that I think is going to work out really well for you. Pretty quick and easy installation, especially if you already have wires running to that area, but that's going to do it for our look at the Optronics LED Oval RV porch light.
Customer Satisfaction Score:
99% were satisfied with this product
1% of customers were not satisfied
Ratings & Reviews

Do you have a question about this RV Exterior Light?
Info for this part was:
At etrailer we provide the best information available about the products we sell. We take the quality of our information seriously so that you can get the right part the first time. Let us know if anything is missing or if you have any questions.


Thank you! Your comment has been submitted successfully. You should be able to view your question/comment here within a few days.
Error submitting comment. Please try again momentarily.