
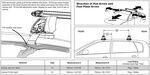
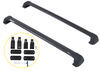
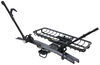
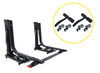
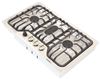
This custom fit kit lets you mount 4 Rhino-Rack 2500 legs to your vehicle with a naked roof. Clamps mount to legs with bolts. Includes 4 clamps and 4 pads.
Features:
Specs:

California residents: click here
Videos are provided as a guide only. Refer to manufacturer installation instructions and specs for complete information.
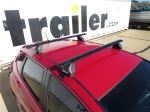
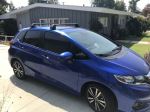
Today on our 2016 Honda Fit, we're going to be doing a test fit on the Rhino-Rack Vortex Aero Roof Rack System. We're going to be using part numbers RRVA118B-2 for the Aluminum 46" Long Black Crossbars and part number RRRLKVA for the 2500 Series Leg Kit, and finally part number DK438 for the Fit Kit specifically for our Honda Fit. This Rhino Rack Vortex Aero Roof Rack System is going to allow you to carry your roof-mounted accessories, such as your bike racks, kayak carriers, ski carriers, cargo boxes and baskets. It has an aerodynamic design that's going to help cut down on wind noise when you're on the road, and it's also going to add a sleek look to your Honda Fit. All four of the 2500 Series legs feature padding, so you don't have to worry about it harming and scratching the roof of your vehicle. The hooks here are also padded, so that when it grips the inside of the top you don't have to worry about it harming it. The crossbars themselves are made out of an aluminum construction, and they're lightweight, so they're going to allow you to maximize your roof's weight capacity, though you'll want to be sure to check your vehicle's owner's manual to see how much it can carry. Now, we'll show you how easy it is to get installed. I've already got our front one installed.
You can see how it's nice and secure. Let's go ahead and do the rear one together. We've got our whole kit laid out like this. For our rear crossbar, I've already got the leg with the fit kit installed. The other side installs the exact same way. First thing we want to do is go ahead and take our 2500 Series leg.
Let's go ahead and unlock it. We're going to take out our bolt here. Now, you need to be sure you grab the correct hook. The front hooks are different from the rear. Since we're doing the rear, we've got the elongated hook here.
Go ahead and set that in place. We're going to replace that bolt. Now, we're not going to tighten all the way down. We're going to leave that loose. All right. Then, we're going to grab the bottom portion of our leg kit here.
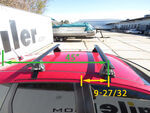
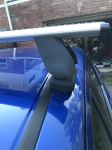
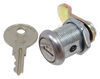
This is going to clip on like this and it swivels. We need to make sure that the little arrow here is pointing away. Before we put that in place, we'll grab our pad. Since we're working with the driver side, the arrow on bottom is going to be facing forward, so towards the front of the vehicle. We're just going to push it in place on the bottom of this, and you make sure it gets seated all the way around. Then with everything facing forward and then out, go ahead and push that on bottom like that. That's going to stay in place. Then, we can move over to our crossbar. We want to make sure to take off our end cap. We can turn it over. We'll take our whole leg kit. We need to make sure that the T-bolt here and nut is loosened up just enough to where we could easily slide it onto the channel here. Turn it upside down. Line it up like so. While we're at it, we can go ahead and take our end cap, put that on, and just lock it up. That way, it doesn't slide off or get damaged or anything like that. We can take our tape measure. Now, per our instructions, from the opening of the channel here to our leg kit needs to be 98 mm, which converts to 9.8 cm. I'm going to take my tape measure here, line it up to where it needs to be. Then, I'll move my leg kit forward just to the front here, just to where it makes contact, and then I'm going to take my included tool and tighten down that bolt here. Once that's secure, we can go ahead and head over to our Honda Fit. Now, you'll need to be sure you have both doors open, and then we'll gently set our roof rack system in place. All right. Then, we're going to grab our tape measure and make sure we have the correct distance apart. Now, per our instructions, it says we need to be 750 mm from center of our crossbar to the center of the other crossbar. That converts to 75 cm. Let's go ahead and take our tape, put it in the center, and then get it lined up. Once we've got side lined up, we can go ahead and line up the other side. Come back a tad. Now, for putting our hook into position, we want to pull down slightly on our weatherstripping here and make sure that the hook makes contact with the body here. Then, as we tighten it, the weatherstripping will go back up. Now, while we're here and we've got everything in position, we'll take our included tool and we're just going to slightly tighten that down. We're not going to tighten it down all the way. We're going to get it to where it makes contact and then we're going to go ahead and repeat the same process for the other side. Now, once it's made contact, since we know the other side is in position, we can go ahead and start tightening this down a little bit more. Now, it's important that you alternate sides. We're going to give this one a few turns, and we're going to run over to the other side and do the same thing. Now, once you get it tight on both sides, your tool here acts as a torque wrench. You can see you've got this curved handle here. When you're tightening it up, when that starts to straighten out by the force that you're putting on it, that's how you know it's where it needs to be. With this side being done, we'll make sure we've got the correct torque on this side, which we do. We can now close up our doors and put on our locking covers. Take our cover. We've got two tabs, one side. Put that side in first and then push it into place. As you could see, that's going to hide all of our hardware, so no one can remove or tamper with our roof rack system. Now, the way we installed the front one is per our instructions. It told us to come off of this fixed point here and measure back to the center, so we got that lined up on both sides and then we just tighten it down. That's going to complete our test fit on the Rhino-Rack Vortex Aero Roof Rack System on our 2016 Honda Fit.


Do you have a question about this Accessories and Part?
Info for this part was:
At etrailer we provide the best information available about the products we sell. We take the quality of our information seriously so that you can get the right part the first time. Let us know if anything is missing or if you have any questions.


Thank you! Your comment has been submitted successfully. You should be able to view your question/comment here within a few days.
Error submitting comment. Please try again momentarily.