
To see if this custom-fit item will work for you please tell us what vehicle you'll use it with.
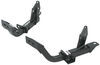
This custom fit kit lets you mount 4 Rhino-Rack 2500 legs to your vehicle with a naked roof. Clamps mount to legs with bolts. Includes 4 clamps and 4 pads.
Features:
Specs:

California residents: click here
Videos are provided as a guide only. Refer to manufacturer installation instructions and specs for complete information.
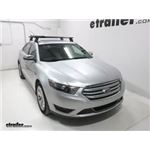
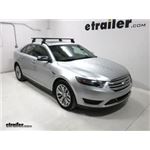
Speaker 1: Today, on our 2017 Ford Taurus, we're gonna be test fitting the Rhino Rack Vortex Aero roof rack system, consisting of part numbers, RRVA126B-2. These are the Vortex Aero crossbars, black in color and 49 inches long. These also come in silver, as part number RRVA126S-2. We'll also be using part number RRRLKVA. These are the 2,500 series legs for the Vortex Aero crossbars. And finally, part number DK229, and this is the custom fit kit of the Ford Taurus, that will clamp it on to your vehicle.The Rhino Rack Vortex Aero roof rack system is great for carrying a wide variety of accessories on your roof, while freeing up space inside your vehicle.
It can carry anything from bike racks, to cargo baskets, to small cargo boxes. Unlike square and round bars, it has this aerodynamic design to it, which is gonna cut down wind noise and drag while you drive, without the use of a fairing. It also has this strip on the top, this Vortex Aero strip, which also helps out with that as well. Undoing the end cap here, this is capable to be used with T track accessories. You just remove this strip, place your item in and then cut it to length.Unlike some of the other roof racks that are out there, the Rhino racks do come with box included, so once you install this onto your roof, it's secured to your roof as well.
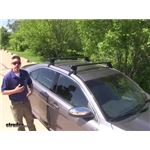
You can purchase a lock for this portion here, as well, and make these key to like, if you wanted to.With the two bars combined, it does have the carrying capacity of 165 pounds, but you always want to double check with your vehicle's manual to make sure your roof can withstand those weights.Now that we've gone over some of the features of the roof rack system, let's go ahead and show you how it installs. We already have our front bar installed on our vehicle, and how we got it to this position is, once we had it in place, we measured from the center of the door jamb, back to the center of the bar. And we did this on both sides, to make sure that it was even.Let's go ahead and show you how that rear bar gets assembled now. In front of us, here, we have our 2,500 series leg, which is gonna be attached to our bar in a minute, here. We have the clamp and this rubber foot pack, here, that's gonna be attached to the 2,500 series leg.
Then we have the end caps here, which will come with our leg as well, and these are lockable. We have our end cap tour bar, and the tool here, to lock it into place once you're finished. And, of course, the tightening tools and keys for the roof rack as well.We'll start by flipping our bar and getting our leg ready to install. We're going to take this bracket here, and slide it into this T track slot, like so. And in the instructions, you'll have a measurement, measuring back from this point, to where the leg is supposed to sit.
And normally, you would have a strip that you put into place, cut to length that it needs to be, and you'll be good to go. But for demonstration purposes, we'll just measure it out.So, measure from the edge here, out. Then we'll take our included tool and tighten down the screw in the center here. With that done, we can actually replace our end cap here, and take our tool and secure it in place.Next, you take our rubber foot here and place it on the bottom of our leg. You want to make sure that you're putting the right one in the right place. So, this is rear left, with the arrow facing out. So, I find it easier to just to actually remove the end foot here, and everything just kind of lines up. And it just kind of pushes into place. Push this back in place, again making sure the arrow is facing the right direction. You notice that this is rear left, because once we set it on, like so, this is gonna be on the left side of the vehicle.Next, we'll install our clamps. Remove this screw on the leg here, install our clamp, and reinstall the screw loosely, because you're gonna want to be able to move this around a little bit once you get it on the vehicle. Now, we've gonna just set this on our vehicle.We'll start up by opening up the rear doors on both sides. Be very careful when we set our bars down, because we don't want to scratch the roof or anything like that, with our clamps. Before I had mentioned, we went from the center of the door jamb for our front bar measurement. Now to get our rear bar measurement, we'll measure from the center of the front bar, back on both sides as well, to keep the bars parallel.With everything measured out, next we'll just loosely get our clamps tightened up against the door jamb here, using our tightening tool. We'll do this on both sides. And I want you to notice, that with this tightening tool, it has a curve to it. As you tighten it evenly on both sides, it'll straighten out. Once it's straightened out, it's torqued down to its proper specifications, and this is kind of a fail safe to make sure you don't over tighten it on to your roof.You can see that it's straightened out. So, now we're tightened up. It's not going anywhere. Now we can put on our end caps, load up our gear, and we're ready to hit the road. We'll line up the tabs here, with our leg. All right, and now we're secure, and we're ready to go.And there you have it for the Rhino Rack Vortex Aero roof rack system, on our 2017 Ford Taurus.

Info for this part was:
At etrailer we provide the best information available about the products we sell. We take the quality of our information seriously so that you can get the right part the first time. Let us know if anything is missing or if you have any questions.


Thank you! Your comment has been submitted successfully. You should be able to view your question/comment here within a few days.
Error submitting comment. Please try again momentarily.